How to put a virtual server on windows 10. Adding a shared folder
Probably, many users of modern computer systems have come across the concept of virtual machines. Not everyone, however, knows what it is and why it is needed. Let's try to explain this with examples of what they are for Windows 10. This will make short review general rules their installation and creation, especially since for the most part they are almost the same. So it is possible to consider a similar question on the basis of any one program.
What are virtual machines for Windows 10?
We will not go into consideration of a huge number of technical terms and principles of work, it is enough to look at this concept from the point of view of, so to speak, a simple and intelligible language.
A virtual machine for Windows 10, however, as for other operating systems of this family, is a special software, which allows you to emulate a real computer, but only in virtual terms. That is, physically a computer, with all its "iron" and software components is absent, but is represented in the system itself as its virtual copy.
This is somewhat similar to a certain constructor, where there are details from which you can assemble the desired configuration, similar to how physically computer terminals are assembled manually. In other words, for example, a virtual machine for Windows 10 x64 allows you to create a 32- or 64-bit computer system with a certain type of processor, RAM hard disk, video or graphics adapter, etc., as well as install any “OS” into it. ”, other than “tens” (yes, even Linux or Mac OS X).
Main programs
If we talk about programs that are virtual machines for Windows 10, today you can find quite a lot of them. However, the most common and practical products are Oracle VirtualBox (or Innotek VitrualBox), MS Virtual PC, VMware Workstation.

What will be used in the process of creating a virtual computer system, not the point is important. The fact is that it is very similar to Windows 10 in all basic principles. Differences may concern only some specific nuances.
How to create a virtual machine in Windows 10: general rules
In general, the process of creating a virtual machine includes several main steps that are almost identical to each other. True, if using third party programs the user will have to solve the question: "How to install a virtual machine on Windows 10?"
And not everyone understands: why use additional software if the “ten” itself already has a built-in module called Hyper-V? Indeed, with its help, creating virtual machines for Windows 10 is much easier, because you can do without other specific applications. And in some of them, the procedure can be quite confusing.
On the other hand, several main stages can be noted: installing a program or activating a module, naming a machine and creating a location, defining parameters random access memory, virtual disk and other "iron" components and installation of a guest operating system. It makes no sense to describe all the programs, so let's focus on the option of using the Hyper-V module.
Pre-enabling the built-in Hyper-V client
Let's make a reservation right away: the Hyper-V module is present only in the Pro and Enterprise versions of the dozens. It is not available in other versions. By default, it is disabled so as not to use the resources of the computer system at all levels. It needs to be turned on.

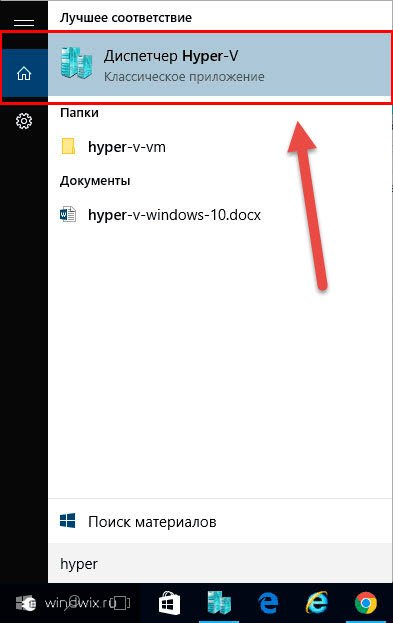
To do this, you will need to log in to the Programs and Features section from the Control Panel, where you select windows menu. It simply puts a check mark next to the name of the module. You will have to wait a few minutes for the service to be activated. After that, the system will reboot, and then the Hyper-V Manager component will appear in the administration section. This is our virtual machine for Windows 10. It remains to apply its settings.
Create a virtual switch
When you log into the appropriate manager, you will first need to create a virtual switch. By the way, this is how virtual machines for Windows 10 created using third-party programs differ from the Hyper-V module. They simply do not have such an opportunity, although many note that in the case of the "native" module, this only complicates the situation.

However, it is the switch that allows you to set up an Internet connection. So, we launch the "Dispatcher", and then click on the computer name and select the same module for virtual switches. There are three types: external, internal and private. It is better to choose the first option (either Wi-Fi will be used). Next, click the create button, set the name of the switch, select the desired connection type and use the "Apply" button.
Basic steps for creating a virtual machine
Now you can do the machine itself. For this, the same “Hyper-V Manager” is used, in which the command to create a virtual machine is selected from the menu on the right. At the first stage, as in all other programs, we indicate its name and location on the hard drive or in the logical partition.

Next comes the choice of generation. Many experts advise choosing the second one, since it has a number of additional features and even works with UEFI, but does not support installation of 32-bit systems. The first generation handles both 32- and 64-bit systems equally well, but does not support UEFI, so it's up to you to decide.

The RAM reservation can be left unchanged (here the automatic detection the optimal parameter, unlike other programs, the module is still “native”), however, if there is a physical “RAM” at the level of 4 GB and above, the bar can be raised. It is advisable not to use dynamic expandable memory. This may affect the operation of the main system.

In the next network settings window, you need to select from the created switch, and then specify the reserved space on the hard drive. After that, we indicate the location of the pre-mounted image with the system intended for installation and click the "Finish" button.

To activate, we use the selection of the created virtual machine in the "Hyper-V Manager" and use the appropriate command. After that, on the panel, click on the green button. The system will prompt you to press any key, after which the guest operating system will be activated and installed in the normal mode.
Enable Virtualization in BIOS
But that's not all. If you do not enable virtualization in the BIOS, the one created for Windows 10 may not work.
To activate this component, before starting the system, enter BIOS settings(usually these are the Del, F2, F12 keys, etc.), after which we go to the advanced settings section (Advanced).

There is a line like Virtualization Technology here. By default, this component is disabled (it is assigned the Disabled parameter). Change it to Enabled and exit the BIOS with saving the changes (usually the F10 key - Save & Exit Setup). After the reboot, the virtual machine can be used without any restrictions.
In principle, an additional check of devices at boot for the BIOS can be enabled in the BIOS itself. virtual machine, in the corresponding settings section. But this is, so to speak, just in case.
Good day, readers.
The latest versions of operating systems from Microsoft have a wide range of features. And one of them is the virtualization system. Moreover, the latest build of the OS provides all necessary tools for this. Later in the article I will tell you how the installation of a virtual machine on Windows 10 goes. And as usual, there are several methods.
A virtual machine is an active area in a computer that has its own operating system, software, and even a hard drive. At the same time, it starts inside an already installed OS in a separate window.
Such partitions work with Windows XP and newer systems. They host any software with which you can do whatever you want. At the same time, this will not affect the main OS in any way. Therefore, if desired or necessary, you can even launch viruses on purpose, observe what is happening, and deal with them.
One of the main advantages is the ability to create a restore point, to which users can always return at any time.
For ordinary users, at first glance, such tools may seem unnecessary. But this is not the case - customers thus have the opportunity to try out a new operating system, dubious programs or software that does not work on the existing version of the OS. Sometimes it becomes necessary to use a server that can just be created in the agreed area.
Hyper-V( )
tenth Windows versions x64, there are already built-in tools that allow you to create the desired component - Hyper-v. But they are disabled by default. So they need to run:

Important! In some cases, an element may not be in the list. This means that users use a 32-bit OS, have less than 4 GB of RAM, or the corresponding function is disabled in the BIOS.
After a fresh start of the system, through the search, find Hyper-V. Also the corresponding item should appear in " Start" In chapter " Administration Tools».
Setting( )
The first thing to do is to set up the network so that the gateway to the Internet is opened. To do this, we perform several movements:

After that, you can safely move on to creating a machine and installing an operating system. At the same time, options for hosting Linux and Mac OS are provided, but for such purposes it is better to use other means. One of these is Virtual Box x64 Oracle. Unfortunately, the solution is paid. Despite this, it has the widest functionality. A trial version is also provided.
Creation( )
Developing a new virtual area is not a difficult process. To do this, we perform a number of actions:

This can also be done later.
In general, that's all. As a result, information on your virtual space will appear. After pressing " Ready”, it will be created and appear in the list of virtual machines in Hyper-V.

launch( )
To start the element we need, you need to perform a minimum of actions:

If an image was specified during creation *.iso or portable memory to be loaded, this will happen during the first start. Exactly at this moment and the installation of the operating system will begin.
Virtualization may be necessary for those users who work with various emulators and / or virtual machines. Both of them may well work without enabling this parameter, however, if you need high performance while using the emulator, you will have to turn it on.
Important warning
Initially, it is advisable to make sure that your computer has support for virtualization. If it is not there, then you risk simply wasting your time trying to activate through the BIOS. Many popular emulators and virtual machines warn the user that his computer supports virtualization, and if you enable this option, the system will run much faster.
If you did not get such a message when you first started some emulator / virtual machine, then this may mean the following:
- Virtualization is already enabled by default (this is rare);
- The computer does not support this setting;
- The emulator is not able to analyze and notify the user about the possibility of connecting virtualization.
Enabling virtualization on an Intel processor
Using this step-by-step instruction, you can activate virtualization (relevant only for computers running on Intel processor):

Enabling virtualization on an AMD processor
The step-by-step instruction looks like this in this case:

It is not difficult to enable virtualization on a computer, for this you just need to follow step by step instructions. However, if the BIOS does not have the ability to enable this feature, then you should not try to do this using third-party programs, as this will not give any result, but it may worsen the computer's performance.
We are glad we were able to help you resolve the issue.
Poll: Did this article help you?
Not reallylumpics.ru
Virtual Secure Mode (VSM) in Windows 10 Enterprise
Windows 10 Enterprise (and this edition only) has a new Hyper-V feature called Virtual Secure Mode (VSM). VSM is a secure container (virtual machine) running on a hypervisor and separated from the host Windows 10 and its kernel. Security-critical system components run inside this secure virtual container. No third-party code can run inside VSM, and code integrity is constantly checked for modification. This architecture allows you to protect data in the VSM, even if the kernel of the host Windows 10 is compromised, because even the kernel does not have direct access to the VSM.
The VSM container cannot be connected to the network and no one can gain administrative privileges on it. Inside the Virtual Secure Mode container, encryption keys, user authorization data, and other information that is critical in terms of compromise can be stored. Thus, an attacker will no longer be able to get inside using locally cached domain user account data. corporate infrastructure.
 The following system components can run inside VSM:
- LSASS (Local Security Subsystem Service) - a component responsible for authorization and isolation local users(thus the system is protected from "pass the hash" attacks and utilities like mimikatz). This means that passwords (and / or hashes) of users registered in the system cannot be obtained even by a user with local administrator rights.
- Virtual TPM (vTPM) is a synthetic TPM device for guest machines that is required to encrypt the contents of disks
- OS code integrity control system - protection of the system code from modification
To be able to use the VSM mode, the following hardware requirements are imposed on the environment:
- UEFI support, secure boot and Trusted Platform Module (TPM) for secure key storage
- Support for hardware virtualization (at least VT-x or AMD-V)
How to enable Virtual Secure Mode (VSM) in Windows 10
Let's look at how to enable Virtual Secure Mode in Windows 10 (in our example, this is Build 10130).

Checking the operation of VSM
You can make sure that the VSM mode is active by the presence of the Secure System process in the task manager.
 Or by the event “Credential Guard (Lsalso.exe) was started and will protect LSA credential” in the system log.

VSM security testing
So, on machines with VSM enabled, we register under the domain account and run the following mimikatz command from under the local administrator:
mimikatz.exe privilege::debug sekurlsa::logonpasswords exit
We see that the LSA is running in an isolated environment and the user's password hashes cannot be retrieved.
 If the same operation is performed on a machine with VSM disabled, we get an NTLM hash of the user's password, which can be used for "pass-the-hash" attacks.
Hello friends! If you have a great idea to test the latest operating system from Microsoft Windows 10, then of course you need to install it on a virtual machine. It is much safer than you would install it as a second system on your computer or laptop. The virtual machine was developed for this, so that you and I would experiment on the unknown and improve in the process, without fear of any consequences.
If you encounter any problems with Windows 10, you can simply reinstall the "ten" installed on the virtual machine and absolutely not worry about the main operating system. It’s more correct not to even reinstall, but to restore Win 10 from a previously created backup, and we will also analyze how to do this.
How to install Windows 10 in a virtual machine
So it's decided, today we will install Windows 10 on a virtual machine, for such purposes VirtualBox will suit you without a doubt. Simplicity and functionality is what attracts beginners and advanced users to it and distinguishes it from other virtual machines, VMware Workstaion and Virtual PC!
Note: Our site has articles about VirtualBox that you may find useful.
If I persuaded you to install Windows 10 on a virtual VirtualBox machine, then the first thing to do is download the VirtualBox installer.
Go to the official site https://www.virtualbox.org/wiki/Downloads, select the latest version of the virtual machine at the moment, at the time of writing the article, the version of VirtualBox 4.3.18 was relevant for Windows hosts x86/amd64.
After the installer has downloaded, right-click on it and select "Run as administrator". VirtualBox is very easy to install on our computer.

We also run the virtual machine as an administrator, this is very important.

Click on the "Create" button.

"Specify OS name and type" If you decide to install on a virtual machine Windows 10 64-bit, choose in Windows list 8.1 64-bit. If you decide to install another operating Windows system 10 32-bit, then select Windows 8.1 32-bit from the drop-down list and enter an arbitrary name for the virtual machine, for example Windows 10, then the type of virtual machine Microsoft Windows , then click Next.

Specify the amount of memory for the virtual machine. You can’t allocate a little RAM to a virtual machine, but you don’t need much either, the most optimal size is 2048 MB or 2GB, I think your computer has at least 4GB of RAM.

Create a virtual hard disk. Create a new virtual hard disk. Create.


Specify storage format " Dynamic virtual hard disk” and the space on your hard disk for the needs of the virtual machine will not be taken up immediately, but as files accumulate.

Specify a name and size for the file. You can specify 50 GB for Windows installation 10 this is quite enough, but if you plan to seriously work with Windows 10, I advise you to specify an amount of at least 120 GB. Also click on the yellow folder

and select a partition of your hard drive for the location of the virtual disk, it is better to choose a non-system partition,


VirtualBox Settings for Windows 10
After creating a virtual machine, it must be configured. Select our virtual machine with the left mouse and click "Configure".

System. Uncheck the box " Diskette". Let's set the CD / DVD-ROM as the first boot device, because we will boot the virtual machine from installation disk or Windows image 10, we leave the Hard disk as the second device. Check the box Enable I/O APIC

Leave the processor as is.

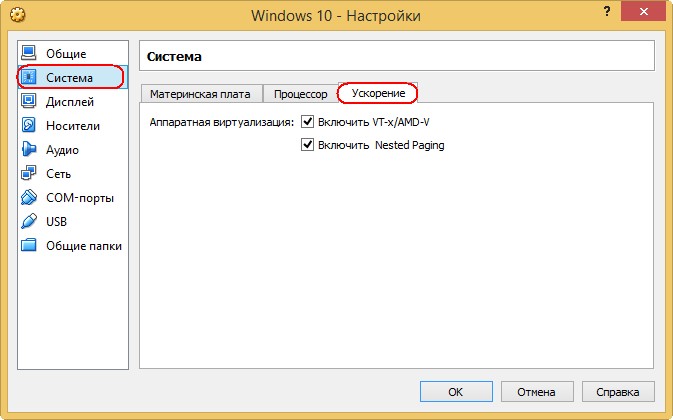
System "Acceleration" Hardware virtualization must be enabled, tick both items.
Display. Video. "Enable 3D Acceleration" and "Enable 2D Acceleration"

carriers
If you have a disk drive, it will be available in the virtual machine and if you have a Windows disk you can use it to install the operating system, check the Live CD/DVD box.
There is also a virtual drive here, let's connect an image with the Windows 10 operating system, which we downloaded in yesterday's article, to it. In the "Media" option, select "Drive" and " Select optical disc image»

An explorer window will open, we will find and select our image with Windows 10 in it. where to download it quite legally, it is written in our article, the link above.


Net. Mark with a tick " Turn on network adapter ". Connection type "Virtual Host Adapter".

That's all the main settings of the virtual machine are ready.
We press the button Run.

and immediately you may get this error: VT-x/AMD-V hardware virtualization features enabled but not functional».

To get rid of it, select the "Advanced" tab

Enter advanced mode? OK.

Go to the tab "Advanced" Click "CPU configuration.

Choose an option Intel Virtualization Technology and put it in the On position (enabled),

but this is if you have an Intel processor. If you have AMD processor, then we look for the Secure Virtual Machines option in the BIOS and also set it to the On (enabled) position. Next, save the settings we made, press the F10 key.


We start our virtual machine again
And if in the settings of the System category the drive is set as a priority for booting, then it will boot from the Windows 10 image
With release Windows Server 2008, network OS also introduced its first Hyper-V virtual machine. For Microsoft, this is not a new technology, as Virtual PC and Virtual Server were previously used.
The company has since developed a more advanced solution called Hyper-V and integrated it into the Windows platform. With the release of Windows 8 in 2012, Microsoft made Hyper-V available to Windows users, and for the first time focused on the consumer, as more reliable. In this article, we'll look at using it.
Create a virtual machine with Hyper-V in Windows 10
Let's take a look at creating a virtual machine using built-in Hyper-V technology. The benefits include the ability to run multiple operating systems at the same time as long as you have enough hardware resources. Personally, I chose to do this because I need to do some compatibility testing. Hyper-V is also great way to try and test applications before using them on the main production environment.
Preconditions
- Windows 10 Pro or Windows Enterprise 64-bit (Hyper-V is not available on Windows 10 Home Edition).
- Your processor must support Secondary Level Address Translation.
- Virtualization must be enabled in your computer's BIOS or firmware.
Enable virtualization
Restart your computer and sign in BIOS Setup(usually by pressing F2, F10, or the F12 key) on the keyboard before the computer loads the Windows operating system. This process may vary by brand, so refer to your computer's user manual for instructions on how to load the BIOS. On my computer, I have to press F10, select my language, select Security >> System Setup and enable Virtualization Technologies.
Configuring Hyper-V
Click Windows Key + R and enter: OptionalFeatures.exe, press the key ENTER.
This action will open Enable and disable them all Windows components. Check all options Hyper-V and press the button OK.
Then wait while Windows searches for the required files, makes changes, and installs and configures Hyper-V. You will be prompted Reload to confirm the changes. There will be a series of reboots.

Configuring a network for a virtual machine
In the first step, we will create a Virtual network connection. Right click mouse in Hyper-V Manager, click on DESKTOP-I1CTS2Q and run Create Switch. In my case, I have allocated an External virtual switch. The "Create virtual switch" button will create access to the Internet. OK.

Create a Hyper-V virtual machine
Next, you need to open hidden menu quick access by pressing Windows key+ X, go to Control Panel >> Administrative Tools >> Hyper-V Manager. (See article: How to open the Control Panel in Windows 10) or type Hyper >> Hyper-V Manager in the search box.
In the left pane of the Hyper-V Manager, select DESKTOP-I1CTS2Q. This selection will enable the actions in the panel on the right. Click Create - Virtual machine. Create a new virtual machine will start. Click the Next button and follow the instructions on the screen.

Give the virtual machine a name and specify a storage location. So if you have additional partitions or disk, then you can view and save it there.
Select the generation type you prefer to use. If you are based on the need of older applications, better fit Generation 1.

Choose how much memory you would like to give to the virtual machine. This choice will depend on how much you have available. The bigger, the better. If you are limited in the established physical memory, 2 GB or less, uncheck "Use dynamic memory for the virtual machine.

If you have previously created a network for the virtual machine, install it and click Next to continue. If not, you can always adjust the settings after.
The next window will set up the virtual HDD where you will install the operating system. Assign the size you would like to have in the virtual machine. You can also select an existing virtual hard disk if you already have one.
Check your settings options. You can click the Back button and make the necessary changes. Once you are satisfied, click Finish.
Enable the Hyper-V Virtual Machine
After creation, it remains for us to start the virtual machine, for this, in the Hyper-V Manager window, find Virtual Machines and double-click, in the window that opens, click the "Start" button.
Operating system installation
Next, I'll show you how to install Windows 7 Professional in a virtual Hyper-V machine. You, on the other hand, have a wide choice of operating systems, which include other versions of Windows, and some Linux distributions. To install Windows, I will use a file ISO image.
In the right pane, under the virtual machine name, click Settings. Select from the menu in the hardware tree DVD drive. In one DVD drive, set the options for booting from a DVD disc or an available ISO file.
Installing the operating system on the built-in Hyper-V virtual machine in Windows 10, as you can see, is not difficult. The process is exactly the same as in other programs such as VM VirtualBox or VMware. You don't need to install any third party software, and as I said earlier, it's free.