Remove usb ports. How to easily reset a forgotten password on any version of Windows. Get help solving the problem
Due to numerous requests from readers, I decided to write a detailed and simple instructions, how to reset the password for a user account in any Windows versions: 10, 8.1, 8, 7, XP.
So, you turned on the computer, and the system asks you to enter a password to log in. You enter the user's password, but it does not match: the “invalid password” error appears. What to do if no password is suitable, but you need to log in? There is a solution - you can reset your password using special program, recorded on a bootable USB flash drive. Now I’ll tell you how to create such a flash drive. 
You will need to briefly use any others computer. To do this, you can contact a relative, friend, neighbor, maybe you have a computer at work - I think this is not a problem now.
So, we sit down at another computer or laptop. Insert any flash drive into it:
Download a free program for resetting Windows passwords -. You can download it from the official website (or from my Yandex.Disk): 
Run the downloaded file lsrmphdsetup.exe:Install the program as usual: i.e. We agree with everything and press the ““ button in all windows. Next" In the last installation window, click the “ Finish” – the program will start automatically and its shortcut will be created on the desktop: 
In the start window, click the button Burn Bootable CD/USB Disk Now!(“Burn bootable CD/ USB disk right now"): 
In the next window select Windows version, which is installed on the computer where we will then reset the password. Not on the list Windows 10, but it’s not scary: if you have a “ten”, then choose here Windows 8.1 with your bit depth.
By the way, on one of the forums I saw a message that you can create a bootable USB flash drive with Windows 8.1 64-bit, and it will be suitable for resetting the password on any version of Windows (I checked on Windows 10 64-bit and on Windows 7 64-bit - so and is): 
After you have selected the desired version of Windows, click the “ Next”:

In the next window, place a marker on the item USB Flash
and select the letter of our flash drive (it is already inserted into the computer). In my case, the letter of the flash drive: F.
Then press the button “ Start”:
The program will take some time to load necessary components from the Microsoft website:

After this the program will ask: “ Should you format your USB drive now?“All files, if they are on the flash drive, will be deleted. Press the button “ Yes”:
Now we wait until the bootable USB flash drive is created:


At the end of the process, press the button “ Finish”:
 All! The bootable USB flash drive with the password reset program is ready. We take it out and take it to our computer.
Insert the bootable USB flash drive into your computer. And now comes the most important, and at the same time, the most difficult moment for those who will be doing this for the first time. We need configure the computer to boot from our flash drive .
Those who know how to boot a computer from a flash drive can go straight to the end of this article. For those who don’t know how to boot from a flash drive, I’ll try to explain as clearly as possible:
============================================================================================
In order to “force” the computer to boot differently than usual (i.e. with hard drive), and from the device we need (in our case - from a flash drive) - we need to enable a certain setting in Bios computer.
To get into this very Bios, we must immediately after turning on the computer press a certain key on the keyboard (and press not just once, but many, many times until we see the BIOS on the screen).
This key is different on different computers and laptops:
- The most commonly used key is Delete(or Del ).
- You can also often call up the BIOS using the key F2(and on some laptops Fn+F2 ).
- Keys are used less frequently Esc, F1, F6 and others.
In general, immediately after you press the Power button on your computer or laptop, do not wait until it starts Windows boot, and immediately start pressing the key many times Delete on keyboard. After a few seconds (5-10) you should see Bios.
If nothing like this appears, and your Windows starts loading as usual, then we don’t wait for anything else: we restart our computer again (you can directly use the Reset button) and try pressing another key many times - F2.
If you don’t get into the BIOS again, reboot the computer again and try pressing the next key - Esc. After F6 etc. But hopefully you won't have to experiment for so long: in the vast majority of cases, either the Delete or F2 key works.
By the way, a hint about which key to load the BIOS usually flashes at the bottom of the screen immediately after turning on the computer. But for some reason no one looks at her, or does not have time to look at her.
On different computers Bios different, and it looks different for everyone.
For example, on my computer it looks like this: 
On another computer it will be like this: 
On the third computer it’s like this:  That is, I say this because it is almost impossible to write separate instructions for each Bios.
The main thing that anyone who needs to configure booting from a flash drive should know: in the BIOS (no matter how it looks like for you) you need to find the section where the word is present Boot(from English “Loading”). By using the arrows on the keyboard to navigate to this section, we set it to first place in the list of boot devices flash drive.
In Bios, the flash drive may be displayed with its own name (for example, Transcend), or as USB-HDD; There are other options. One thing is important: it must be selected as the first device from which the computer will boot.
Usually the flash drive is “raised” to first place using the arrows on the keyboard, or the keys +/- , or F5/F6.
Having set the setting we need in the BIOS, we must leave it, not forgetting to save changes made. To do this you need to go to the section Exit(it’s usually the last one) – and there select the item “ Save and Exit” (“Save and Exit”). And then confirm once again that we are leaving by clicking “ Yes”.
That's all: if you did everything correctly, the computer will reboot and boot from the flash drive (press the Delete key again, or F2, or something else - no need!).
Many people don’t even want to get involved with the creation bootable flash drive with any software, because They are afraid that they still won’t be able to configure the computer to boot from it. I tried to describe this entire process of booting from a flash drive in as much detail as possible. If you have mastered this text, I hope it has become at least a little clearer and now all that remains is to practice.
===============================================================================================================
So, I created a bootable USB flash drive with a password reset program on another computer. I insert this flash drive into my computer and turn it on.
Immediately I press the key many, many times Delete on keyboard. After a few seconds I get into Bios.
Using the arrows on the keyboard, I go to the section Boot(although in my Bios you can work with the mouse - in older versions of Bios this will not work).
Here my first device now is HDD
(ACHI PO: WDC WD50...):  I select this line using the arrow on the keyboard and press the key Enter. A list of devices from which you can boot opens. In my case, this is a hard drive and my flash drive (it is listed here twice). We raise to the first place in the list - flash drive(if there is a choice: USB or UEFI, then choose UEFI). We do this using the arrows on the keyboard or keys +/-
, or F5/F6:
I select this line using the arrow on the keyboard and press the key Enter. A list of devices from which you can boot opens. In my case, this is a hard drive and my flash drive (it is listed here twice). We raise to the first place in the list - flash drive(if there is a choice: USB or UEFI, then choose UEFI). We do this using the arrows on the keyboard or keys +/-
, or F5/F6: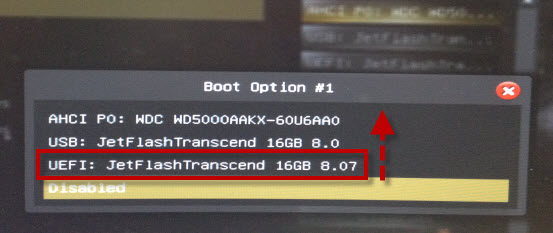
Now the flash drive is in first place in the list of boot devices: 
Now we exit here, saving the changes. To do this, move the arrow on the keyboard to last section Exit. Select the line Save Changes and Exit- press the key Enter:
Then select Yes:
After a while, a menu opens in which, using the key Enter we select an item Lazesoft Live CD:
Wait while it downloads: 
In the next window, check that the item is selected Reset Windows Password(“Reset Windows password") and press the button Next:
A window will pop up with a message about non-commercial use of the program - click Yes:
Click again Next:
In the next window highlight the username, whose password will be reset and click Next:
Click on the button RESET/UNLOCK:
The password has been successfully reset - click OK. Then Finish:
We go to “ Start” and press Reboot Computer("To restart a computer"): 
Click OK:
After the computer restarts, we can login to windows without password!

If you needed a bootable (although not necessary) USB flash drive to reset your Windows 7, 8 or Windows 10 password, this guide will give you 2 ways to make such a drive and information on how to use it (as well as some limitations inherent in each of them) . Separate manual: (using a simple bootable USB flash drive with OS).
I will also note that I have described a third option - an installation flash drive or disk with Windows distribution can also be used to reset password for already installed system, which I wrote about in the article (should be suitable for everyone latest versions OS starting from Windows 7).
I first successfully used the Online NT Password & Registry Editor utility about 10 years ago and since then it has not lost its relevance, not forgetting to be updated regularly.
This free program can be placed on a bootable USB flash drive or disk and used to reset a local account password (and not only) Windows 7, 8, 8.1 and Windows 10 (and also previous versions OS from Microsoft). If you have one of the latest versions and use an online Microsoft account instead of a local one to log in, using Online NT Password & Registry Editor you can still access your computer in a roundabout way (I’ll also show you).
Warning: Resetting the password on systems that use EFS file encryption will render the files unreadable.
And now a guide to creating a bootable USB flash drive for password reset and instructions for using it.
Note: if for some reason this method did not work, then you can download ISO image this utility and (the SysLinux bootloader is used).
So, USB drive ready, connect it to the computer where you need to reset the password or gain access to the system in another way (if you are using an account Microsoft entry), place it and begin active actions.
Once loaded, the first screen will ask you to select options (in most cases, you can just press Enter without selecting anything. If you have problems with this, then use one of the options by entering the specified parameters, for example, bootirqpoll(after this press Enter) if errors related to IRQ occur.

The second screen will show a list of partitions in which installed Windows. You need to indicate the number of this section (there are other options, the details of which I will not go into here; anyone who uses them knows why without me. But ordinary users will not need them).

After the program makes sure that the necessary registry files are available in the selected Windows and the ability to write to the hard drive, you will be offered several options, of which we are interested in Password reset, which we select by entering 1 (one).


The next screen is where the fun begins. You will see a table of users, whether they are administrators, and whether they are blocked or enabled Accounts. The left side of the list shows each user's RID number. Select the one you need by entering the corresponding number and pressing Enter.

The next step allows us to choose several actions when entering the corresponding number:
- Reset the selected user's password
- Unblock and engage the user (This is precisely the feature that allows you toWindows 8 and 10 with account Microsoft to gain access to your computer - just at the previous step, select the hidden Administrator account and enable it using this item).
- Make the selected user an administrator.
If you do not select anything, pressing Enter will return you to selecting users. So, to reset the Windows password, select 1 and press Enter.

You will see information that the password has been reset and again the same menu that you saw in the previous step. To exit, press Enter, the next time you select - q, and finally, to save the changes made, enter y upon request.

At this point, resetting the Windows password using the bootable USB flash drive Online NT Password & Registry Editor is completed, you can remove it from the computer and press Ctrl+Alt+Del to reboot (and set boot from the hard drive in the BIOS).
Almost every user connects a phone, tablet, reader, flash drive and external HDD to a computer. When working with these devices, Windows installs their drivers. At the end of use, they are not deleted from the computer (that is, they gradually accumulate) and, just like temporary files, unnecessary registry entries clutter the system.
In addition to this, if devices are disconnected from USB port and incorrectly (they are pulled out without software shutdown using the “Remove” function), then installed drivers not only remain in the system, but also continue to function. Which is why they often become the cause software conflict while connecting another USB device (the system “does not see” the device, gives errors, freezes).
This article will help you avoid all these troubles: it will tell you how to remove the driver of an unused USB drive or gadget from operating system completely how to automatically uninstall all USB drivers.
Removal using standard means
Surface cleaning
1. Open the Start menu.
2. Click right click mouse in the “Computer” panel that appears. From the list of commands, select “Properties”.
3. In the left column, click “Device Manager”.

4. In the dispatcher window, in horizontal menu, open the View section and click Show hidden devices».

5. Open the directory " USB controllers».
6. Remove an old or unused driver: right-click on its name → click “Delete”.

Deep cleaning
1. Hold down the Win key and press the Pause/Break key. Or open: Start → right-click Computer → Properties.
2. In the window that opens, in the left panel, click “ Extra options systems."
3. On the Advanced tab, click the Environment Variables button.

4. In the top block, click “Create”.

5. In the New User Variable window:
- in the “Variable name” line, enter - devmgr_show_nonpresent_devices;
- in “Variable value” - 1.
6. Click OK in the Variable panel and in the Environment Variables window.
7. Return to the system properties window (Win+Break) and click “Device Manager”.
8. In the manager, open: View → Show hidden…
9. Click the “Update configuration...” button (the last one in the panel).

10. Icons of unused drivers in the manager are grayed out (that is, you can remove this driver). Open the following directories one by one and remove unnecessary elements (right-click on the name → Delete):
Non-plug and play device drivers

Advice! In this directory you can also remove old drivers, installed by programs that have already been uninstalled from Windows (for example, the Comodo firewall package).


This device section displays installed drivers for flash drives, readers, and hard drives. Transparent object icons indicate that they are not in use (not connected). This means you can safely get rid of them.
11. Once cleaning is complete, restart your PC.
Automatic removal by USBDeview utility
1. Copy to address bar browser this link - http://www.nirsoft.net/utils/usb_devices_view.html#DownloadLinks (official website of the utility). And then press "ENTER".
2. On the page that opens:

- if you have a 32-bit system, click the first link “Download USBDeview”;
- if 64-x, the second - “... for x64 systems”.
3. Unpack the downloaded archive: right-click on it → select “Extract all...” → in the “Extract...” window, click “Extract”.

4. Open the unzipped folder. Run with administrator rights executable file USBDeview.
5. The utility window displays a list of all drivers installed in the system. Disabled elements are marked with red “chips”.

To remove a driver from Windows, select it with a mouse click, and then click the “Trash” icon in the USBDeview panel. Or right-click on it and select “Uninstall Selected Devices” from the context menu.

Note. In addition to the removal function, USBDeview allows the user to disable/enable the driver and view its properties.
Removing all USB device drivers
Global driver cleaning can be performed using the DriveCleanup utility (download link - http://uwe-sieber.de/files/drivecleanup.zip).
1. Unpack the archive downloaded to your computer.
2. If you have 32-bit Windows, open the “Win32” folder; if you have 64-bit, open the “x64” folder.
3. Run the “DriveCleanup” file as administrator.

After launch, the utility will automatically perform cleaning. When the procedure is complete (when the message “Press any key” appears in the console window), press any key.
Good luck in setting up the system!
At the modern pace, we don’t notice how often we connect and remove various USB devices, and when we see the error descriptor request failure when working with Windows 10, we get scared, not knowing where to go and what to do. This could be due to several factors.
- Computer hardware problems related to power supply.
- Static electricity
- Energy saving.
- Incorrect operation of drivers.
Let's go through each point step by step with clear instructions.
Insufficient nutrition
The situation is that each connected device: printer, scanner, mouse, keyboard, flash drive external HDD, smartphone for synchronization, etc. food required. Naturally, it is impossible to have such a number of ports, and we resort to using usb-hubs - these are splitters with multiple inputs - even those with extra food from the network cannot always provide sufficient power.
Initially, as soon as the system displays the error “Code 43 Descriptor request failed usb devices"in windows 10, you need to extract from the port and:
- try to connect directly - if the connection was through a hub - it works, then it means there is not enough power;
- check the functionality on another PC, if it works, then we are looking for a problem in our computer at the software and hardware levels;
Let's check the power:
- Right-click (RMB) on “Start” → “Device Manager”

- “USB Controllers” → “USB Root Hub” → RMB “Properties”

- “Power” tab → make sure that the required power does not exceed the available power. So you need to check all root hubs.

Relieving overvoltage
The error in Windows 10 “usb device not recognized_device descriptor request failure” is also possible in the case of a problem with the power supply to the ports; it is necessary to reset the voltage and remove clumps of static. Follow the instructions step by step:
- Remove all USB devices.
- Turn off the computer, not in the usual way, so press and select “Shut down”, be sure to wait until the system is completely turned off.
- Unplug the power cable from the outlet - completely turn off the power, then:
- For stationary computers – hold down the on button. – about 10 seconds (exactly when everything is de-energized) and then release.
- For laptops with removable batteries, remove and then press the power button. - for the same period of time.
IMPORTANT!!! If the laptop is under warranty and the battery is under the cover, do not remove it!
4. Plug everything back in and turn on your machine as usual.
5. And again, one by one, slowly insert into usb ports our devices.
Power saving and bos usb descriptor request failure windows 10
An error of this kind can happen completely unexpectedly, the fact is that after active work in order to save energy, it is possible to automatically turn off the ports, this can be eliminated and is done practically in a few clicks, let's get started.
- RMB click “Start” → “Device Manager” - for inexperienced users
- +[X] for more advanced users, call up the same menu.
- “USB_Controllers” → then for each “Compound USB device” and “USB Root Hub”, as well as “USB Generic Hub”, right-click context menu→ “Properties”
- "Power_Management" tab → uncheck "Allow_to_turn off_this_device_to_save_energy" → OK

When finished, try reconnecting the external device. Works? Great! Otherwise, we continue.
Drivers: updating!
In other words, we avoid usb device descriptor errors in Windows 10 - after doing all of the above or partially and not coming to a result, think about it. Why could a suddenly unknown, but hitherto very well-known device appear? Apparently it’s worth updating the drivers, we’ll tell you how to do it correctly. Again, we will reinstall for all categories, as with power management.
- Go to “Device Manager” - the methods are described above


- “Select a driver from the list of already installed ones” → “Next”

- The driver “Root USB...” must be specified, see the screenshot for details → “Next” → Installed successfully

If the error is resolved and the “Unknown Device” is no longer in the list, you can not update the remaining drivers.
Invalid login handle on Windows 10!
From the moment Windows boots, errors begin, although before that everything was fine, what’s the matter? The fact is that many people ignore installing the driver on motherboard and sooner or later after the next update from the download center, an error occurs. The first and necessary thing is to download drivers from the official website of the motherboard manufacturer; they may be named in the list as: “ACPI_Driver”, “Intel_Management Engine_Interface”, “Firmware utilities”, “Intel_Chipset_Drivet” and so on. We recommend that you take seriously the selection of the resource from which you will download. There are times when there is no firewood for ten, so feel free to download on Windows version 8 – compatibility mode, but certainly the bit size of your Windows 10.
- Download driver
- Install
- System restart
- We check and rejoice in the absence of errors.
The problem persists...
After trying all the instructions, the problem in the form of device descriptor failure with code 43 does not allow you to work or play your favorite games? Let's go through the possible options.
- It’s worth checking the BIOS, you may need to reset it - you shouldn’t experiment on your own, you can, of course, do it yourself, but only if your level of computer skills is “God”.
- You may need a Windows update or a complete reinstallation if you plan on your own - see point 1.
- We don’t want to tell horror stories, but if the problem is not at the software level, then it is at the hardware level, contact the service center to get qualified help, because USB ports may need to be replaced.
We will be glad if the article helps to correct the error; even more interesting and useful things can be found on our website, for example:
- What to do, if ;
- why there is a black screen when booting into Windows 10;
- How .
I use 3G to reserve an Internet connection Huawei modem E173, connected to the router’s USB port. The connection through it is always up in hot standby mode (to switch to the modem, just reset the default route from the main connection). But there is one problem - periodically the modem freezes and the connection is lost.
As a rule, it is enough to restart pppd, but yesterday the modem stopped responding completely. Messages appeared in the log that most likely relate to hardware problems.
Xhci_hcd 0000:02:00.0: WARN Event TRB for slot 1 ep 4 with no TDs queued? xhci_hcd 0000:02:00.0: WARN Event TRB for slot 1 ep 4 with no TDs queued? xhci_hcd 0000:02:00.0: WARN Event TRB for slot 1 ep 4 with no TDs queued? xhci_hcd 0000:02:00.0: ERROR Transfer event TRB DMA ptr not part of current TD xhci_hcd 0000:02:00.0: ERROR Transfer event TRB DMA ptr not part of current TD xhci_hcd 0000:02:00.0: ERROR Transfer event TRB DMA ptr not part of current TD
Restarting pppd did nothing, it seems the modem does not respond to any command.
Apr 24 10:02:11 inet chat: abort on (\nBUSY\r) Apr 24 10:02:11 inet chat: abort on (\nERROR\r) Apr 24 10:02:11 inet chat: abort on (\ nNO ANSWER\r) Apr 24 10:02:11 inet chat: abort on (\nNO CARRIER\r) Apr 24 10:02:11 inet chat: abort on (\nNO DIALTONE\r) Apr 24 10:02:11 inet chat: abort on (\nRINGING\r\n\r\nRINGING\r) Apr 24 10:02:11 inet chat: send (^MAT^M) Apr 24 10:02:11 inet chat: timeout set to 12 seconds Apr 24 10:02:11 inet chat: expect (OK) Apr 24 10:02:23 inet chat: alarm Apr 24 10:02:23 inet chat: Failed
Attempts to reinitialize the modem programmatically were unsuccessful because its device (/dev/ttyUSB0) does not respond to AT commands. All that remains is to disconnect and reconnect the modem to the port. But first I decided to try a method I recently came across on the Internet.
To reset the desired USB bus, we will need to compile a binary. In order not to compile it again every time and use it on almost any machine, I will compile it statically.
$ wget https://gist.githubusercontent.com/x2q/5124616/raw -O usbreset.c $ gcc -Wall -static -o usbreset usbreset.c $ sudo install -o root -g root -m 0755 usbreset /usr/ local/sbin $ lsusb | grep Huawei Bus 001 Device 002: ID 12d1:1001 Huawei Technologies Co., Ltd. E169/E620/E800 HSDPA Modem $ sudo usbreset /dev/bus/usb/001/002 Error in ioctl: No such device
Despite the error, entries appeared in the log indicating that the modem was “rebooted”.
$dmesg | tail usb 1-6: New USB device strings: Mfr=3, Product=2, SerialNumber=0 usb 1-6: Product: HUAWEI Mobile usb 1-6: Manufacturer: HUAWEI Technology usb 1-6: configuration #1 chosen from 1 choice option 1-6:1.0: GSM modem (1-port) converter detected usb 1-6: GSM modem (1-port) converter now attached to ttyUSB0 option 1-6:1.1: GSM modem (1-port) converter detected usb 1-6: GSM modem (1-port) converter now attached to ttyUSB1 option 1-6:1.2: GSM modem (1-port) converter detected usb 1-6: GSM modem (1-port) converter now attached to ttyUSB2
Let's try to connect to it and execute several AT commands.