Home media server for windows xp. Installation and initial setup of DLNA Home Media Server (HMS) on Windows. Adding other DLNA-compatible devices to your home network
Now every Internet user has the opportunity to store their media files on a home server without using computer memory. This is very convenient if you collect your favorite films, videos or video clips, and you can view all this not only on your PC, but also on your LG TV. This review is devoted to a detailed consideration of this topic and answers the question of users on how to set up an upnp dlna home media server for an LG TV.
To be able to take advantage of all the benefits home server on your LG TV, you need the computer and TV to be connected to the Internet via the same network, this can be either wi-fi or cable.
To synchronize devices you will also need special program, it is called “Home Media Server”, you can download it from the official LG Store. In the case of a PC, the program can be downloaded from the manufacturer’s official website, but you need to activate it on both devices, and then agree to the offer to synchronize them.

- If it is not possible to handle the settings yourself, take advantage of the very convenient offer that is presented on our website: calling an LG service center technician to your home.
How to set up upnp dlna home media server for TVLG: Access folders and files

Open the settings interface of the “Home Media Server” program and select “media resources”, here specify the path to all folders and files that you want to play on the TV. To make your task easier, you can open access to local disks, then you can play all the files. Once you have decided on the access rights, you can start the dlna server itself; the corresponding button is located at the very bottom of the main screen of the “Home Media Server” program.
All will be shown here visible devices To connect, you need to select your TV.

In turn, on TV you can activate the Smart Share application; on smart TV it is installed by default. Open Smart Share, on the main screen you will see an icon with a picture of a folder and the inscription DLNA server. This icon will appear if you have already activated and configured the “Home Media Server” on your computer or laptop and both devices are connected to the same network.
Open the server folder and select the video or music folder, now you can play them on your smart TV.
The Home Media Server program is used as a DLNA server for viewing content and listening to music from a computer and laptop on a TV. Home Media Server is ideal for these purposes and has various useful settings.
What is DLNA?
IN English translation Digital Living Network Alliance (DLNA) – certain standards, thanks to which compatible devices can transmit and receive various media content over the home network and display it in real time using wired and wireless channels.
Thanks to this technology, home computers Cell phones, consumer electronics, laptops are united in a single digital network. When you use DLNA certified devices, they are automatically configured and connected to your users' networks.
Thanks to the transmitting device (server), information is transmitted to the TV. A PC, phone, camera, or camera can act as a server. The presence of DLNA support may mean that the device can receive video.
Such a wired or wireless network there are advantages:
- The ability to instantly access materials located on all the user’s home devices. You can watch a movie or photo immediately after downloading, you can listen to music on music center in the very high quality.
- For wireless connection there is no need to drill holes in walls and doors.
- With a wireless connection via Wi-Fi, you can download entire files to the desired devices for further viewing.
Disadvantages of DLNA include:
- To make a wired connection (for example, through reinforced concrete walls that block the radio signal), it is necessary to drill holes in the walls and doors, which will negatively affect the interior.
- On wireless connection various obstacles in the form of steel reinforcement or thick concrete (brick) walls have a significant impact.
- As with the Internet, there is a possibility of file playback delays when streaming if it is too large or underused high speed connections.
- Using a weak router can affect the speed and quality of data transfer.
- Not all file types can be played, and HD video may be of poorer quality.
Installing Home Media Server (HMS)
Installation of HMS is carried out in the following sequence:

After installation is complete, it is better to delete unpacking files manually, because they are not automatically deleted.
General setup of HMS as a DLNA server
The installed DLNA server will prompt the user to continue the settings process upon startup:
- When you launch it for the first time, a window with initial settings will appear. It will ask you to select a device for broadcasting media content. Many templates with devices will appear in the proposed list. If your device or a similar one was not found, then you should stop at the standard DLNA Device. Having made a choice, you need to move on to the next action.

- Select the folders from which you want to take media content. You can select media content folders at this stage or add them later. Having selected the folders, you need to click on the “Finish” button.

- After making the initial settings, you will be prompted to create backup copy with settings, image cache and database. You will also be prompted to configure an automatic backup schedule. Then press the “Close” key.

- The main program window will appear. Here you should pay attention to certain important settings. On the left side the types of settings will be listed, and on the right side There are sections with specific settings.
- On the left side you need to go to additional settings and configure automatic loading of the DLNA server when the computer is turned on. For this purpose, you need to select the second and third points.

- Next, you need to go to the “Server” tab and specify your DLNA server, which it will be on the network.

- After changing the name, you need to return to adding folders (if this has not been done before or when adding other folders). To do this, click on the “Add” button, then select the folder you are going to add. Next, you need to perform a “Scan” to get files from the folders to the server.

- If the actions are performed correctly, a list of these files will be on the right side of the screen. If the necessary files are present in this list, all that remains is to launch and start using the program. To do this, press the “Launch” key.

- In the case of enabled " Windows Firewall"The system will ask you to allow access to the network. You should select which networks access will be allowed and click on the “Allow access” button.

Connecting and viewing media content
After starting the program, you should turn on the TV. At correct connection it will be located in the "Home Media Server".
Using the example of an LG TV
As an example, we present a variant of operation of the LG LN655V television receiver with a DLNA server. In the main Smart TV menu, go to LG SmartShare.
First connection:
- When connecting the device to the TV for the first time, go to the “Connection Guide”, which is located in the lower right corner.

- Next, you need to go to the “PC Connection” tab and click “Next”.

- Next there will be two more windows, where you also need to select “Next”. If nothing is automatically set in the window for selecting an IP address, then select your home network(wired or wireless, depending on how the TV is connected).

- On the fourth click, the owner’s computer should be visible. If it is missing, you need to restart the server.

After the initial connection, the device will be listed in the final section of LG SmartShare "Connected Devices". If it is not there, you need to restart the server on your computer. For example, for movies, select the folder with “Movies”, and then “Catalogues of media resources”.
A list of folders that have been added to HMS settings will appear. You can use any folder to launch the movie.
Using the SONY Bravia TV as an example
In this case, the KDL-46XBR9 television receiver was used. Algorithm of actions:
- The Home Media Server program is installed and launched on the computer. To go to settings, use the corresponding key.
- On the right side you can see the “Add” button. In addition, it is possible to select a file to scan when the program starts. Scanning is necessary if the user changed the contents of this directory. The green circle shows scanning.

- Next, you need to click on the button with file types on the right side. PAL video files cannot be played on certain TVs. You should enter “NTSC” to be able to recognize content (for example, MPEG-PS_PAL_NTSC for avi).
- For the mkv container, select Transcoding (Core AVC). In DLNA you need to write MPEG-PS_PAL or MPEG-PS_NTSC (depending on the TV).

- Then you need to go to “Categories”, then select “Device”. There you need to select the TV type and resolution. You should select DLNA1 or DLNA1.5. You can find out which version is supported in the instructions or by visiting the official website.

- Configure Web access to the server, for which you need to go to the next item in the categories.
- TO client devices you should add your TV. When you click on the icon with a lifebuoy, the program will be in automatic mode The computer name is defined and it will be added to the “Server” section, “Name” field. To identify devices on the network that support DLNA technology, you need to use “Search”. You need to make sure that the TV is turned on and connected to wireless or wired networks. After scanning the network, the program will add network clients (TV and computer).

- You need to go to the individual settings of the television receiver and insert the above-mentioned setting data.

- The “File Types” key will take you to the registration settings for making the proposed corrections.

- You should return to the main settings window and go to the “Transcoder” category item. In the "File Format" section you need to specify "MPEG (DVD)". In the “Video” section, select MPEG2 compression, quality 6000000. In the “Sound” section, select AC3, 448000, “Frame size” - 1280x720, 16:9. Changing the original frame size - always. Check the box for “Add color to frame size” and all the boxes in the lower list.
- Next, go to the subtitles tab. Here you can configure the style of subtitle display according to your own preferences and other parameters necessary for their optimal display.

- In the final “Advanced” category, check the “Installation” field Windows services"Home Media Server" (UPnP)". This will facilitate the automatic download of the program when the PC is turned on as a service.

Possible problems (errors) and their solutions
Among possible malfunctions When setting up Home Media Server as a DLNA server, you can name the following:
- The server is found, but does not open on media devices. Making settings in the “Home Media Server (UPnP)” will help eliminate this inconvenience. Setting the settings in the “Device” (specify the old and new model version): “Authorization Service” - “Russian names of the main folders” - in the “Server” section, specify a permanent port (from 1024 to 65535).
- Errors occur, stop, or slow down during playback. You need to select “Transcoding” smaller size frame and quality of video content, then stop watching the movie so that a sufficient volume of the transcoded file is formed, and set a disk to store temporary transcoding files that is different from the one used for the swap file. We also need to optimize the system as a whole (disk fragmentation, list of automatically loaded programs).
- In some cases, a message may appear on the screen indicating that the file type is not supported.. After two or three restarts everything should be fine.
DLNA technology makes it easier to transfer files between Internet-connected devices. The process of setting up Home Media Server as a DLNA server is simple; the main thing is to accurately follow the step-by-step instructions given in the article.
All devices that have a DLNA module have been tested in advance and have a corresponding sticker on the case.
It is also necessary to have a description of the type of content supported; there is a DLNA server, printer or player, that is, the module allows you to transmit a certain type of content - images, signals, sound.
All these devices can be freely connected to each other, depending on their purpose, the equipment has its own class. The following classes can be distinguished:
- Digital media servers. This category includes storage devices such as mobile phones.
- Digital media players. This includes devices that can receive and play digital content. For example, a TV that can play music and sound from another device.
How to create a home network
The home network layout for DLNA is similar to the Internet data transmission pattern.
It is he who ensures that devices connect to each other. To set up your home network you will need the following:
- TV to play.
- Media server for data storage, phone or laptop.
- Router – used to provide connection between receiving and transmitting devices.
- Cables or wireless adapters, are required to connect DLNA to the network.
- Powerline adapters - allow you to distribute the Internet over the electrical network.


The first thing you need to do is connect your media playback device to your router.
There are several ways to do this - connecting via an electrical network, via a cable, or via a wireless bridge.
- Powering your media device is a great way to set up a network throughout your home. For this, regular electricity is used, no cables are needed. For setup, only an adapter for a Powerline socket can be useful.
All that is required is simply to connect the TV to the network via an adapter and your DLNA home network will begin to function. - If the router and TV are located nearby, it is best to use a cable connection. The Ethernet cable connects to the TV and router port.
- Create a media group using wireless bridge appropriate when the TV is located far from the router. The bridge can be connected to a TV via cable, and to a router via a wireless network.
Advice: The optimal solution for any case would be an electrical connection.
The next setup step is connecting other DLNA devices to the router.
After connecting to the TV, you can connect any DLNA server to the network - laptop, phone, tablet.
But if this is not possible, you can connect them using the methods indicated above.
Thus, the TV will be able to “see” the devices and play content.

Setting up DLNA Homegroup devices
In order for the TV to recognize content, you must configure the media group devices. For laptops and tablets you will need to install a special software.
These could be the following programs:
- Windows Media Player 11 or 12.
- VAIO Media Server (for TV from Sony).
- AllShare for Samsung.
- LG Smart Share.
- Home Media Server.
You must allow the group access to the laptop; this can be done in the software settings by activating media file sharing.
It can be music files, images or videos. Typically a library or list is created that can later be played by a media device.

Not every smartphone can be connected to a DLNA group. But those that have this function connect via Wi-F to a wireless router.
In general, the Home Media Server program is conceived by the developers as a home media server. But most often HMS is used as a DLNA server. It is ideal for this purpose and has many useful settings, often functioning even better than such official programs as LG SmartShare PC SW and standard method DLNA settings via Windows Media Player. The idea is to allow the TV to play movies, music, pictures and other content directly from your laptop or computer. At the same time, they must be connected to the same home network, for the organization of which a router or router is usually used. After that, all that remains is to configure the program, and it’s done. You can download it on the official website http://www.homemediaserver.ru by clicking on the “Download” button.
Installing Media Server is as easy as shelling pears: unpack the archive and run “setup.exe”, where we agree to all the conditions and click the “Next” button everywhere. After successful installation and launch of HMS, the main program window will appear. When you launch it for the first time, select your TV from the list of devices (for example, LG TV). You can add media resources to which your TV will have access in the next window or in the settings later. In the program data backup and recovery window, click “Run” and “Close”.
HMS as DLNA server
We immediately go to the program settings. Here we have to configure our home media server like DLNA. To do this, in the “Media Resources” category in the very first tab “Directory List”, using the “Add” button, indicate the paths to the folders on our computer where the media files that you would like to see on an LG TV or other are located. After adding all the folders, click “Scan”. Although we will set up auto-scanning of new media resources, new elements still sometimes do not appear automatically, and you need to scan using this button manually.
On the “Scanning” tab, it is important to enable automatic scanning of directories when they change and start the program, so that new media files are immediately displayed on the TV.
In order for Home Media Server to start when the computer boots, in the “Advanced” category you need to check the boxes “Start the program when you start a Windows session” and “Install a service Windows Home media server..." Setting up HMS for the DLNA server is complete, click OK.
Next, select the “PC Connection” tab and click the “Next” button 3 times. Please note that in step 3 your home network is selected (wired or wireless, depending on how you connect the TV), otherwise select it.
In step 4 you should see your PC. If it's not there, restart the server, this usually helps. Next, select the device and go to the “Connected devices” item.
View Media
After the first connection, our device will be displayed in the last item of LG SmartShare – “Connected devices”. If it is not there, restart the server on your PC. For example, to watch movies you need to select the “Movies” folder, then “Media resource directories”.
Here you will see a list of folders added in HMS settings. Go to any folder and launch the movie. Sometimes the TV may write that “The file type is not supported.” Don’t despair, this is a glitch, try to run it again and everything will work out 2-3 times.
Features of HMS
Advantages home media servers from Serviio are as follows:
- on the TV you can see a clear PC folder structure;
- the ability to start playing media files on TV from the program itself on a PC. To do this, you need to select a file from the list and click on the green Play button, which is present if the TV is turned on;
- relative stability of operation (after PC SW DLNA from LG it’s just a fairy tale);
- a large number of settings.

Flaws:
- some confusion for beginners;
- Sometimes automatic scanning of new files does not work;
- Periodically you have to restart the server for the device to appear on TV.
Despite these shortcomings, HMS is ideal as a home media server, including DLNA. Details on setting up the Home DLNA server are in the following video.
Other options
The capabilities of the Home Media server reviewed do not end with DLNA. HMS can provide access to computer media resources using UPnP (Universal Plug and Play) technology and the HTTP protocol. This is more relevant for smartphones and tablets.
But also for DLNA given server maybe a lot more. For example, you can give access not only to computer resources, but also to streams of Internet radio and IPTV television. It is also possible to broadcast so-called podcasts from various online cinemas, such as hdserials.ru, hdkinoklub.ru and hundreds of others. There are also possibilities for transcoding media files of a format that is not supported on TV. How do you like this? All this will be discussed in the following articles, subscribe to our newsletter, as well as VKontakte and Twitter.
Note.
In this article we will set up a media server (DLNA) on a computer for a Philips TV. After setup, you will be able to watch movies, photos, and listen to music on your TV that is on your computer (laptop). All this using DLNA technology. This means that the TV can be connected to a computer via Wi-Fi. More precisely, the computer and TV must be connected to one Wi-Fi router. By network cable, or wireless network.
I'll explain in more detail. Do you have a Philips TV (in this article we will talk about these TVs), with the support (if you have a Smart TV, then there is definitely DLNA support). Your TV is connected to the Wi-Fi router (via Wi-Fi or cable). Also, a computer is connected to this router. We launch the DLNA server on the computer, open required folders with video, photos, or music, and just start watching on the TV. Everything is over the air, without wires. It’s very convenient; you don’t have to write movies to a flash drive all the time. We simply access the computer, select the desired movie and watch.
Using the method described below, you can run a DLNA server on Windows 7, Windows 8, and even Windows 10. To launch and manage the server, we will use the free, simply excellent program “Home Media Server (UPnP, DLNA, HTTP)”. I recently showed how, where we launched a server using a proprietary program. Since Philips does not have such a program, we will use the “Home Media Server”. The program is really very simple and cool.
We will need:
- Philips TV with DLNA support. There must be a TV, or. I will show the example of Philips 43PUS7150/12 with Smart TV (Android TV).
- A computer that is connected to the same router as the TV. It can also be connected via Wi-Fi networks, or via LAN.
- The program "Home media server (UPnP, DLNA, HTTP)" for setting up a DLNA server.
You can do without third party programs, and set everything up as standard using Windows. I wrote about how to do this in the article.
In fact, a server launched in this way will be able to see absolutely any TV: Philips, Sony, LG, Samsung, etc. Sony, by the way, already has models on Android TV. So, the instructions for them should also be suitable. Unless access may differ before viewing the contents of the DLNA server on the TV itself.
Setting up a DLNA server for a TV using the Home Media Server program
First, download and install the program "Home Media Server (UPnP, DLNA, HTTP)". I recommend downloading it from the official website: https://www.homemediaserver.ru/index.htm. Click on the button Download opposite the EXE version. The file size is approximately 35 MB.
Save the file, then run it and follow the instructions to install the program.
Launch the program using a shortcut on your desktop or from the Start menu. First of all, we need to configure access to files on the computer. We can open only certain folders, all local drives, or even removable media for the TV.
In the program window, click on the button at the top Settings. We are interested in the first tab, Media Resources. There will already be three folders open there. These are standard. To open access to all local drives on your computer, check the box next to Local disks. To open access to removable drives, check the box next to Removable drives.

If you want to open, for example, only one local drive or folder, then do not check these boxes, but click on the button Add. And in Explorer, select the drive or folder that you want to open for viewing on your TV. The folder will appear in the list. You can delete a folder by simply highlighting it and pressing the button Delete.

I think the meaning is clear. You can open only one folder, which contains, for example, your movies. And you can open all disks. I recommend checking the box next to Local disks. Then, the My Computer folder will be displayed on the TV, in which you can view all files.
At this point, the setup can be completed by pressing the button Ok. If you want, you can also go to the tab on the side Server, and change the name of your DLNA server. It will be displayed on the TV.

Click the button Ok to exit the settings.
To start the DLNA server, click the button Launch.

If your TV is turned on and connected to the router, then in the program window, open the tab Playback devices (DMR), you will see your TV. This means everything is fine. If the TV does not appear, then check the connection, and see the tips at the end of this article.

The program can be minimized. You can proceed to setting up DLNA on your TV.
Watch DLNA movies on your Philips TV from your computer
Press on the remote control remote control button SOURCES.

On the menu Sources choose Network (media). Or run the program Media With Android menu TV.

Select the server running on your computer from the list.
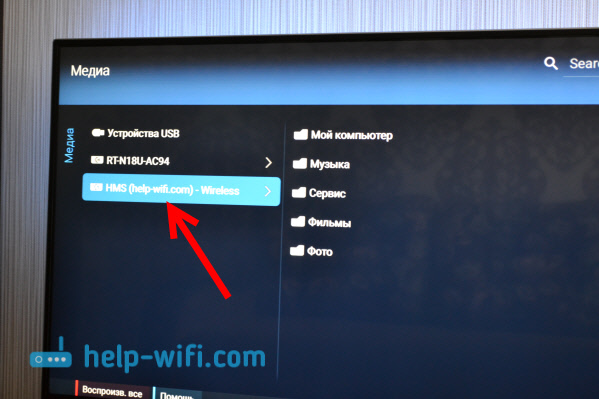
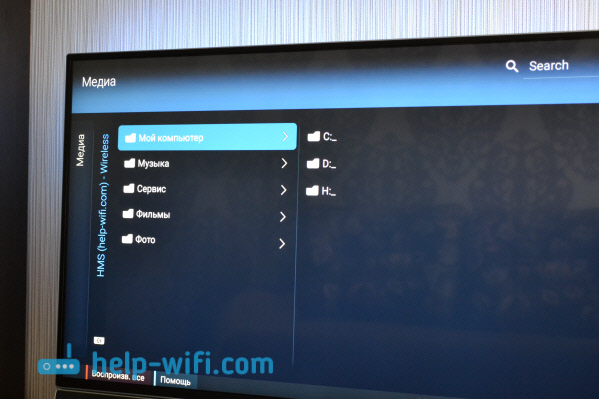
If you have opened all local drives, then you will have a My Computer folder. Select it, all the disks will be there. You can open the desired folders and start watching movies, photos, or playing music from them. If you open one of the standard folders: Movies, Photos, or Music, then all available content will be there, sorted into different categories. To view content by folder, select Media Resource Catalogs.
Select the folder with your movies and simply start watching the desired file.

That's all the setup. We got it from TV full access to videos, photos and music that are on your computer. The program "Home Media Server (UPnP, DLNA, HTTP)" will prevent your computer from falling asleep and interrupting movie playback. You can also control viewing from the program itself on your computer. There are a lot of settings and possibilities there, I think you’ll figure it out.
Why is the DLNA server (files) not displayed on the TV?
The most common problem when setting up such a scheme is the lack of a running server on the TV. When files are from a computer, they simply do not appear.
In such situations, the first thing you should always do is check the connection of the TV and laptop to Wi-Fi, or the connection via cable. Perhaps one of the devices simply turned off. Turn off and on the TV. You can also restart your computer and start the server again. You can also try disabling the antivirus, which may be blocking the TV connection.
If a DLNA movie plays with delays, it's glitchy
In such cases, you most likely started watching a very difficult movie. And the router cannot cope with transmitting information. Typically, this problem appears on cheap routers and when connected via Wi-Fi. Large movies, in high quality, that do not want to be played via DLNA, are better watched from a USB drive or hard drive.
If, when opening a video, the TV says "Format not supported"
There are times when the TV does not want to play a video file. Most likely, the standard player simply does not support the format, there is no codec. In this case, if you have a TV on Android TV, then from Google Play Store you can install VLC player. It can also play files from local network. And most likely, it will play videos that were not opened by the standard player.