Running a virtual machine on windows 7. Step by step installation and configuration of the Virtualbox virtual machine. Thank you for your attention
Good afternoon.
Why you may need a virtual machine (a program for running virtual operating systems)? Well, for example, if you want to test some program, so that if something happens, do not harm your main operating system; or planning to install some other OS that you don't have on a real hard drive.
In this article, I would like to dwell on the key points when installing Windows 7 on virtual machine VM VirtualBox.
1. What will be needed for installation?
1) A program that will allow you to create a virtual machine on your computer. In my example, I will show the work in VM Virtual Box (more details about it). In short, the program: free, Russian, you can work in both 32 and 64-bit OS, many settings, etc.
2) An image with the Windows 7 operating system. Here you choose for yourself: download, find the desired disk in your bins (when you buy new computer, often the OS is bundled on disk).
3) 20-30 minutes of free time ...
2. Setting up a virtual machine (VM Virtual Box)
After launching the Virtual Box program, you can immediately click the “create“ button, the settings of the program itself are of little interest.
If you previously had a virtual HDD- you can choose it, if not - create a new one.
A dynamic hard disk is preferred. Because its occupied space on a real hard disk will increase in direct proportion to its fullness (i.e. if you copy a 100 MB file to it, it will take up 100 MB; if you copy another 100 MB file, it will take up 200 MB).
At this step, the program asks you to specify the final size hard drive. Enter here how much you need. It is not recommended to specify less than 15 GB for Windows 7.
This completes the configuration of the virtual machine. Now you can run it and start the installation process...
3. Installing Windows 7. What to do if an error occurs?
Everything is as usual, if not one but ...
Installing an OS on a virtual machine is, in principle, not much different from installing on a real computer. To get started, select the desired machine to install, in our case it is called "Win7". You launch it.
If we have not yet specified a boot device in the program, then it will ask us to specify what to boot from. I recommend that you immediately specify the bootable ISO image that we prepared in the first section of this article. Installation from an image will go much faster than from a real disk or flash drive.
Usually, after starting the virtual machine, a few seconds pass and the OS installation window appears in front of you. Next, you act as when installing the OS on a regular real computer, more about this, for example,.
If during installation an error with a blue (blue) screen got out, there are two important points that could cause it.
1) Go to settings random access memory virtual machine and move the slider from 512 MB to 1-2 GB. It is possible that the OS did not have enough RAM during installation.
2) When installing the OS on a virtual machine, for some reason, various assemblies behave unstable. Try to take the original OS image, it usually installs without any questions or problems ...
4. How to open the VHD disk of a virtual machine?
A little higher in the article, I promised to show how to do this ... By the way, the ability to open virtual hard disks appeared in Windows7 (Windows 8 also has this feature).
To get started, go to the OS control panel, and go to the section administration(you can use search).
On the right in the column there is the possibility of connecting a virtual hard disk. We only need to indicate it location. By default, VHD drives in Virtual Box are located at the following address: C:\Users\alex\VirtualBox VMs\(where alex is your account name).
More like about it all - .

That's all, successful installations! 😛
Since we all love to experiment, dig into system settings, run something of our own making, it is necessary to think about a safe place to experiment. Such a place for us will be the VirtualBox virtual machine with installed Windows 7.
When starting the VirtualBox virtual machine (hereinafter referred to as VB), the user sees a window with a completely Russian-language interface.
Recall that when you install the application, the shortcut is automatically placed on the desktop. If this is your first time creating a virtual machine, in this article you will find detailed instructions which may be useful at this stage.
So, in a new window, click "Create", after which you can select the OS name and other attributes. You can choose from all available operating systems.

Go to the next step by clicking Next. Now you need to specify how much RAM to allocate to the VM. For its normal functioning, 512 MB is enough, but you can choose more.

After that, we create a virtual hard disk. If you have previously created discs, you can use them. However, in the same article, we will focus on how they are created.
We mark the item "Create a new hard drive" and move on to the next steps.


In a new window, you need to specify where the new disk image should be located and how large it is. If you are creating a boot disk containing Windows 7, then 25 GB is enough (this figure is set by default).

As far as placement is concerned, the best solution would be to place the disk outside of the system partition. Failure to do so may result in overload boot disk.
If everything suits, click "Create".
When the disk is created, the parameters of the created VM will be displayed in a new window.

Now you need to configure the hardware of the virtual machine.

In the "General" section, the 1st tab displays key information about the created machine.
Let's open a tab "Additionally". Here we will see the option "Picture Folder". The specified folder is recommended to be placed outside the system partition, since the snapshots are large.
"Shared Clipboard" implies the operation of the clipboard when interacting with your host OS and VM. The buffer can work in 4 modes. In the first mode, the exchange is made only from the guest operating system to the main one, in the second - in the reverse order; the third option allows both directions, and the fourth disables communication. We choose the bidirectional option as the most convenient.
"Mini toolbar" is a small panel that allows you to manage the VM. This console is recommended to be activated in full screen mode, since the main menu of the working window of the VM repeats it entirely. The best place for it is at the top of the window, because that way there is no risk of accidentally pressing one of its buttons.

Let's go to the section "System". The first tab offers to make certain settings, which we will discuss below.
1. If necessary, adjust the amount of VM RAM. At the same time, only after its launch it will become completely clear whether the volume is chosen correctly.
When choosing, you should start from what size physical memory installed on the computer. If it is equal to 4 GB, then it is recommended to allocate 1 GB for the VM - it will function without "brakes".
2. Let's determine the order of loading. A floppy disk (floppy) player is not needed, turn it off. The first in the list should be assigned a CD / DVD drive in order to be able to install the OS from a disk. Note that this can be either a physical disk or a virtual image.

See the reference section for other settings. They are closely related to the hardware configuration of your computer. If you set settings that are not consistent with it, the VM will not start.
Bookmark "CPU" the user specifies how many cores are on the virtual motherboard. This option will be available if hardware virtualization is supported. AMD-V or VT-x.

Regarding hardware virtualization options AMD-V or VT-x, then before activating them, you need to find out if these functions are supported by the processor and whether they are originally included in BIOS– it often happens that they are disabled.

Now consider the section "Display". Bookmark "Video" indicates the amount of memory of the virtual video card. Activation of two-dimensional and three-dimensional acceleration is also available here. The first of them is desirable to include, and the second parameter is optional.

In chapter "Carriers" all disks of the new virtual machine are displayed. Also here you can see virtual drive with an inscription "Empty". We will mount the image into it installation disk Windows 7.

The virtual drive is configured as follows: click on the icon located on the right. A menu opens in which we click "Select Optical Disc Image". The next step is to add the operating system boot disk image.


We will not cover network issues here. Note that network adapter is initially active, which is a prerequisite for the VM to access the Internet.
On the section COM there is no point in dwelling in detail, since nothing is connected to such ports today.
In chapter USB check both available options.
Let's go to "Shared Folders" and select the directories to which the VM is planned to provide access.
The entire setup process is now complete. Now you can start installing the OS.
Select the created machine in the list and click "Run". Herself Windows installation 7 on VirtualBox is very similar to a regular Windows installation.
After downloading the installation files, a window with a choice of language will open.


We accept the terms of the license.

Then choose "Full installation".
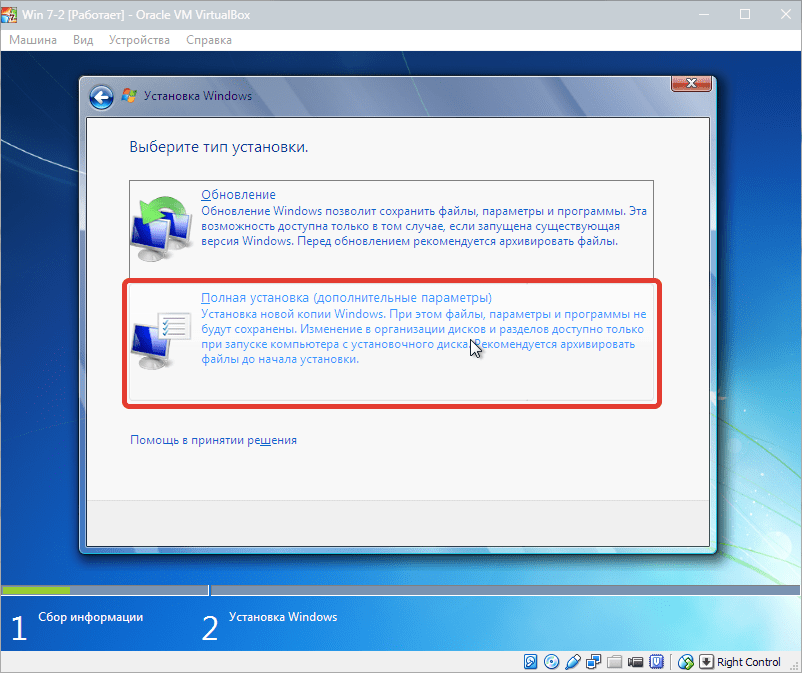
In the next window, you need to select a disk partition for installing the operating system. We have only one section, so we select it.


During installation, the machine will automatically restart several times. After all reboots, enter the desired username and computer.


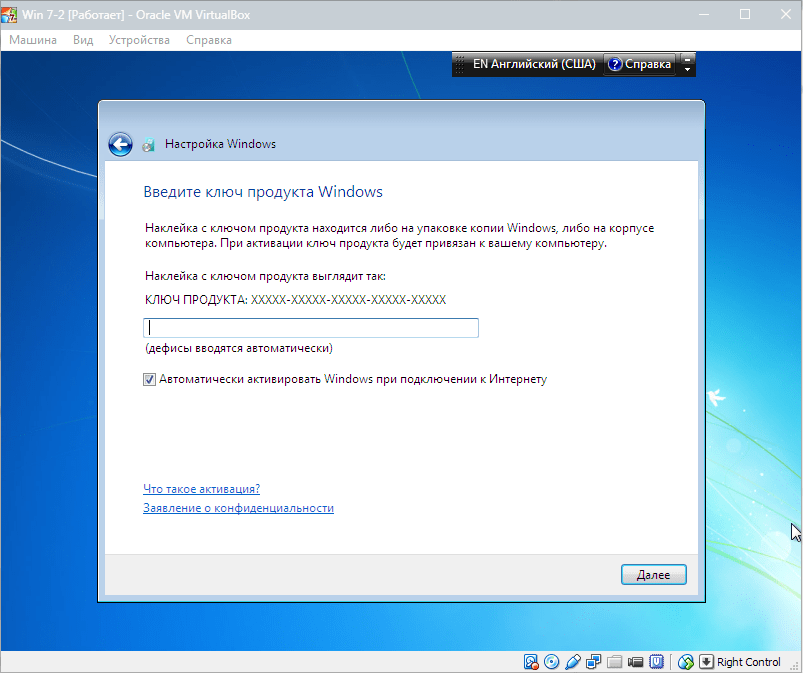
Here we enter the product key, if any. If not, then just click "Further".

Set the timezone and date.

Then we choose which network to attribute our new virtual machine to. Click "Home".

After these steps, the virtual machine will automatically reboot and we will get to the desktop of a freshly installed Windows 7.

Thus, we installed Windows 7 on the VirtualBox virtual machine. Then it will need to be activated, but this is a topic for another article ...
In Windows 7, creating a virtual machine is very easy if you have detailed guide with a description of the sequence of steps of action. Below is step-by-step instruction how to create and install another version virtual Windows on a Windows 7 computer.
Brief definition of a virtual machine
In order to facilitate the process of adapting users when switching to a new modification of Windows and eliminating difficulties with some non-functioning applications in the seventh version of the OS, specialists from Microsoft have developed a special update "KB958599" for the "Seven" versions of Enterprise Professional and Ultimate and serving for download, for example , Windows XP in Windows 7 environment.
This package is called "Virtual PC" - a program that emulates PC hardware, which installs a separate environment in Windows 7, it installs a different version of the operating system. It should be noted that in addition to the OS from Microsoft, you can install a system from another developer, for example, "Linux".
Analysis of the possibility of creating a virtual machine
In the case of operating OS editions on the computer: Professional, Enterprise or Ultimate, then with automatic update operating system in the Virtual PC is already downloaded. You just need to analyze the possibility of its application.
To this end, Microsoft has developed an application called "Hardware-Assisted Virtualization Detection Tool". You need to install this program from the developer's official resource and after opening it will display a message about the possibility of running a virtual machine on a specific hardware.
For example, when displaying the alert shown in the figure below:
 You can immediately start "Virtual PC" and no preliminary adjustments of the parameters are needed.
If the answer is negative:

We can conclude that hardware virtualization is not supported and the user will have to make adjustments in the system. You need to enable it in BIOS.
The function has various names, for example, "Intel_Virtualization Technology", "Virtualization Extensions" and others.
 If the inscription "Disabled" is displayed, then it is turned off and it is necessary to set "Enabled" on the contrary to enable it.
Procedure for manually creating Virtual PC
To do this, you need to perform two main steps:
- Install Windows Virtual PC;
- Install virtual Windows disk XP Mode.
The first stage consists of the following sequential steps:

 The second stage consists of the following steps:


How to install a new virtual machine in Windows 7?
The sequence of actions algorithm consists of the following steps:


Use of visualization systems from third-party developers
In the "Seven" you can use and alternative methods creating virtual machines. For example, VMWare Workstation and Oracle VM VirtualBox.
To create a new virtual machine through "VirtualBox" from Oracle, follow these steps:

The algorithm of work in the VMWare Workstation program is similar to the above scenario of actions and has an intuitive interface.
Good day, readers.
Microsoft operating systems provide all necessary tools to create a virtual machine. It is another device that has own memory, operating system and software. In other words, another system appears, running in a separate window. Later in the article I will tell you how the installation of a virtual machine on Windows 7 goes.
The seventh version of the OS from Microsoft provides a built-in tool that allows you to create a VM. Indeed, it is intended only for Windows usage xp. We are not entirely satisfied with this state of affairs. So it is worth using a third-party application - virtual box. The program works with all systems starting from XP version.
To achieve the goal, you need to perform a number of actions:

Now you need to specify all the settings:

VMware Workstation( )


VMware Workstation is another popular OS virtualization software. It is great for administrators who create test systems that work with different environments. To achieve the goal, you need to do a number of actions:

To turn off the machine, you just need to shut down the OS in the usual way.
After creating a virtual machine in VirtualBox, you can proceed with the installation of the operating system Windows systems(or any other) to a VirtualBox virtual machine. By installing an operating system on a virtual machine, you can use several operating systems on your computer at the same time: the main (host) and guest (virtual).
The guest operating system installed on the virtual machine will run in isolation from the main system installed on your computer. You can learn how to work in a new OS, test applications, run outdated programs, use a virtual system for security purposes, etc. In this case, nothing will threaten the main system, and you can make any changes in the guest system.
In previous articles on my site, we have discussed in detail the process of installing the VirtualBox virtualization program and the VirtualBox Extension Pack on a computer, creating and configuring a virtual machine in VirtualBox (you will find links to the articles mentioned here under this article). Now the final step has come: installing the operating system in VirtualBox, installing VirtualBox Guest Additions, final settings of the virtual machine.
After the virtual machine has been created and configured, you can begin installing the operating system.
In this example, I am installing Windows 7 in a virtual machine, Windows 10 is installed on my computer (by the way, you can install an additional Windows 10 on a virtual machine).
Installing Windows on VirtualBox
In the main window of the Oracle VM VirtualBox program, select the desired virtual machine if you have several virtual machines installed, and then click the "Run" button.
In the Virtual Box program window, the process of installing the operating system into the virtual machine will begin. The process of installing the system is no different from installing the system on a regular computer. Go through all the steps of installing the OS on a virtual computer.

After the installation of the operating system on the virtual machine is completed, you will see Windows (or another operating system) in the VirtualBox program window.
The virtual OS needs to be configured to your needs, just like a regular system on your computer.

Immediately after the installation of the operating system on the virtual machine, you will need to install Add-ons for the guest operating system - VirtualBox Guest Additions, which consists of a set of drivers and utilities. After installing the add-on package, the functionality of the guest OS is noticeably increased.
Installing VirtualBox Guest Additions
In the window of the running virtual machine, enter the "Devices" menu item. Next in context menu select "Mount Guest Additions Disk Image...".

After that, in the guest operating system, you will need to open File Explorer. In Explorer, you will see that the VirtualBox Guest Additions disk image is located where the CD-DVD drive should be.

Now you will need to install the VirtualBox Guest Additions.

Go through the steps of installing add-ons for the guest system by successively clicking on the "Next" button. Agree to install software for devices.

After the installation of the guest OS add-on package is complete, reboot the virtual operating system.

Creating a Shared Folder in VirtualBox
The shared folder is needed for data exchange between the main (host) and guest operating systems. First you will need to create a shared folder on the main operating system installed on your computer. On my computer, on one of the disks, there is such a folder “Data Sharing”, which is designed for data exchange.
In the "Path to folder" field, specify the path to the folder on the main system. Select “Other…”, and then in the Explorer window, select or create the desired folder.
In the "Add Shared Folder" window, check the boxes next to "Auto-connect" and "Create a permanent folder", and then click on the "OK" button.

In the Explorer window, by going to "Network", in the VBXSVR folder you will see a shared folder. In Virtual Box, you can create multiple shared folders.

After installing the guest additions, extract ISO image operating system from the virtual machine's disk drive, since the system image is no longer needed.
For faster access, a shared folder can be added to Explorer's "Network Location" as network drive. To do this, press the "Windows" + "R" buttons on the keyboard. In the Run window, in the Open field, enter the following command:
Net use x: \\vboxsvr\foldername
Then click on the "OK" button.

After executing the command, the shared folder will appear in Explorer in the "Network location".

Taking a System Snapshot in VirtualBox
VirtualBox has a very useful feature: Snapshots. An operating system snapshot is the current state of the operating system at the time the snapshot was taken. Essentially, this backup copy recovery systems. You can take one or more snapshots and then restore the system to the state it was in when the snapshot was taken.
A typical situation: an operating system was installed on a virtual machine, after setting it up and installing the necessary applications, a snapshot of the guest operating system was taken. After that, the user "killed" Windows (or another system), changed the configuration, etc. As a result of these actions, the operating system malfunctions, or does not work at all.
Since this is a virtual OS, it can be easily removed from VirtualBox and then installed new system to the virtual machine. If a snapshot of the system was previously taken, then nothing will need to be done. In this case, it will be possible to restore the system in working condition using the previously made "Snapshot".
To create a snapshot of the system, click on the "Snapshots" button in the main window of VirtualBox.

In the "Snapshots" tab, click on the camera view button. In the "Take a snapshot of the virtual machine" window, you will need to give a name to the snapshot being created, and in the description you can add additional information (I added the date the snapshot was taken). Next, click on the "OK" button.

After that, the process of creating a snapshot of the system in Virtual Box takes place.

A system snapshot has been created and can be accessed from the main VirtualBox window. Just keep in mind that system snapshots take up a certain amount of disk space in the guest operating system.
Restoring with a System Snapshot
If necessary, for example, in case of serious problems with the guest system, you can restore the state of the virtual machine using a previously taken system snapshot. Restoring using a system snapshot occurs when the virtual machine is powered off.
Click on the "Snapshots" button in the main window of VirtualBox. In the Snapshots tab, click right click click on the system snapshot, and select Restore Snapshot from the context menu.

In the question window, agree to restore the snapshot. If the guest system is not running, you can uncheck the "Create a snapshot of the current state of the system" option so that you do not create an unnecessary snapshot, since the system is not working normally.
Click on the "Restore" button.

If you will be taking a snapshot of the current state, give it a name and description.
In the next window, click on the "Restore" button.

The guest operating system will be restored on the virtual machine to the state it was in when the system snapshot was taken.
Updating VirtualBox
To update VirtualBox you will need to download setup file programs new version, as well as a new version of the Extension Pack. After installing the program, all previously made settings will be saved.
After running the guest operating system in the virtual machine, you will need to install the VirtualBox Guest Additions again. If multiple operating systems have been installed in VirtualBox, then the Guest Additions will need to be installed on each operating system.
Article Conclusions
You can install a guest operating system on a VirtualBox virtual machine, install VirtualBox Guest Additions, create shared folders, take a snapshot of the system, and then restore the virtual OS using the snapshot.