How to install a network adapter. Connecting and setting up a network adapter. The network adapter does not have valid IP settings: Solving the problem. Antivirus, firewall, third-party programs and drivers How to configure a network adapter
If we consider the work network adapter, Wi-Fi module or router, users of Windows operating systems may encounter a situation where such equipment stops working due to failures or reinstallation of the system as a whole. Now we will consider the question of how to install network driver on Windows 7. At the same time, we will briefly touch on the main points of installation and subsequent configuration.
How to install drivers automatically on Windows 7
First of all, don't panic. A driver crash, for example, when re-installing an operating system, is not some kind of critical situation.
Please note that during the process of installing and configuring the system, it automatically installs the most suitable drivers (programs for their correct operation) for almost all devices known today, including network adapters and related equipment. The very essence of the problem, how to install drivers for such devices on Windows 7, comes down to just waiting for the reinstallation process to complete and initial setup. True, after booting the computer at the end of the process, in some cases the driver database may be located not on the hard drive, but on the Windows installation disk.
Using driver updates
If for some reason the driver for the corresponding equipment was not installed correctly, you first need to check in the “Device Manager”, called from the standard “Control Panel”, whether the equipment really does not work (in the list it is indicated by a yellow circle).

Here you can do it in the simplest way: in context menu use the driver update command directly or go to the properties section, where you select the button of the same name (this applies to all systems, including even XP).

The system will search for the most suitable driver and report it successful installation or will display a notification that the driver is already installed. But the most suitable driver is often not the best solution. Therefore, you should use the selection of the location from which the installation will be made.

This is where the installation tool comes in handy. Windows disk. However, for example, if the user is dealing not with a desktop computer, but with a laptop, in order to solve the problem (Windows 7), you need to use a special disk with drivers, which is required when purchasing the device. You understand that, unlike desktop computers assembled by hand, a laptop contains a standard manufacturer configuration that is not changed upon sale.
Here you simply insert the disk into and then specify the location of the required driver installer when the system asks.
Removing a device from the system and reinstalling it
If this option does not suit someone, the question of how to install network adapter drivers on Windows 7 can be solved by removing the device from the system.

When repeated reboot Windows detect the device automatically, after which you can use the method with the original driver disk.
But this can also be done manually. You need to look through the folders located on the optical media and select from there a special device in the folder indicating the corresponding equipment installation file drivers (usually these are files with the .inf extension). You can install it on the system by calling the context menu (right click) and using the installation command.
How to install WiFi drivers on Windows 7
Regarding built-in modules wireless communication and routers, in principle, there is nothing complicated about installing drivers.
Based on the above, you can use all the described methods, but, as a rule, Wi-Fi modules are detected automatically by the system, and for routers, drivers can be found on accompanying optical media. The installation process is practically no different from the standard one. Another thing is when you need to configure the equipment so that it works correctly.
Setting up a router, Wi-Fi and local network connection
For routers, access to settings is used in the form of logging into the browser via the address 192.168.1.1 or 192.168.0.1 (depending on the model - this address can be found on the nameplate on the back of the router, where you can find the login and password for logging in), where the parameters are written provided by the provider.

When all operations are completed, the turned on Wi-Fi module will itself determine the presence of a wireless network, of course, provided that the preliminary installation of a new connection has already been made. The module itself is activated by default. If it is turned off, you can turn it on by combining the Fn button with one of function keys. For example, on Fujitsu laptops this is Fn + F5. The module will require a login password, if provided, and will then connect.

By the way, for both cable and wireless connections, it is recommended to specify automatic address acquisition in the TCP/IP settings. However, if we are talking about it may very well be that some parameters will have to be entered manually. You can obtain them from your system administrator.
Bottom line
In conclusion, it remains to be said that the question of how to install network device drivers on Windows 7, in general, is not difficult to solve. Only one problem can be noted when there are several in the system that can cause a hardware conflict. In addition, if you don’t have the original driver disk at hand, you can find out the brand of equipment and its manufacturer, and then, using another computer connected to the Internet, go to the manufacturer’s official website and download latest version drivers taking into account the installed operating system (in our case, Windows 7 32 or 64 bit).
Very often, in the comments I am asked how to solve the error “The network adapter does not have valid IP settings.” This error appears during the process of diagnosing problems with your Internet connection. And we run diagnostics because the Internet on the computer stops working. And the error “There is no Internet connection”, “The page could not be opened” and something like that appears in the browser.
The error “The network adapter does not have valid IP settings” appears in Windows 10, Windows 8 (8.1) and Windows 7. In fact, it makes no difference what system is installed on your computer or laptop. The solutions will also be almost the same. I will show the differences, and I will try to show them using Windows 10 as an example.
Also, the error may appear both when connecting to the Internet via a network cable (Ethernet), or via Wi-Fi networks. Most often, there are problems with connecting to the Internet, and this error in the diagnostic results appears due to the settings of the IP addresses of the adapter through which you are connected to the Internet. The error looks something like this:
It is written above that the “Wireless Network Connection” network adapter does not have valid IP settings. The same error may appear for the adapter " Wireless connection", or "Ethernet" in Windows 10. Or "Local Area Connection" in Windows 7.
What should I do if my network adapter does not have valid IP settings?
First, here are a few simple tips to try first. If they don't help, consider other, more complex solutions.
- If the Internet is connected through a router, simply reboot it. Turn off the power for a few minutes and turn it back on. Here .
- Restart the computer on which the error with missing valid IP parameters appeared.
- Remember what you did before this problem appeared, and after which the Internet stopped working. Maybe something was installed, configured, or removed. If the error appears after installing a program, remove it.
- If your Internet is connected via an Ethernet cable directly to your computer (without a router), then it is possible that the problem is on the provider’s side. Call your provider's support and explain the problem.
If these solutions did not help get rid of the error, and the Internet did not work, then we try to follow the recommendations that I will discuss below in the article.
Resetting TCP/IP protocol parameters, DNS cache and WInsock
I thought for a long time about what decision to write first. You can first check the IP settings for the problematic adapter and try to enter the parameters manually. But I decided to advise you to do a reset first network settings. We will clear the TCP/IP, DNS, and WInsock settings.
Important! This method will completely remove all network settings that you manually set in the properties of network adapters. There's nothing wrong with this, but you may need to re-configure some settings. Especially if it's not yours home computer, and the network was set up by specialists. For example, in the office.
This method allows you to solve many different problems in the operation of the Internet connection, including the error with the lack of valid IP settings for wireless or Ethernet adapter.
If you have Windows 10, then you can reset the network through the settings. There is a separate section for this:

I wrote in more detail about resetting network settings in Windows 10 in a separate article:
Also, all this can be done via the command line. This method is useful if you have Windows 7 or Windows 8. In the "ten" these commands also work.
First, you need to run the command line as an administrator. The easiest way is to open Start and in the search bar start typing " command line". In the search results, click on it right click mouse and select "Run as administrator".
We execute the following commands in turn:
Resetting TCP/IP Settings
netsh int ip reset
netsh int tcp reset
Resetting the DNS cache
ipconfig /flushdns
Clearing Winsock Settings
netsh winsock reset
Resetting the routing table
This is what it all looks like:

Reboot the computer and see if the Internet is working. If it doesn’t work, then run the troubleshooting again and see if the error appears again that the adapter does not have valid IP settings. If the problem is not solved, then try another method.
Checking the IP and DNS settings of a wireless Wi-Fi and Ethernet adapter
If you have Windows 7, then this article is written in more detail in the article:. And here we will look at the example of Windows 10.
Right-click on the Internet connection icon, select "Network Center...", and "Change adapter settings."

Next, right-click on the adapter through which we connect to the Internet (and the error appears), and select "Properties". For example, I opened the adapter properties " Wireless network" (Wi-Fi connection).

In the next window, select the item “IP version 4 (TCP/IPv4)” and click on the “Properties” button. Another window will open with the IP and DNS settings for this adapter.
If you have automatic receipt of addresses there, then you can try to register the addresses manually. And immediately set DNS addresses from Google. It looks something like this:
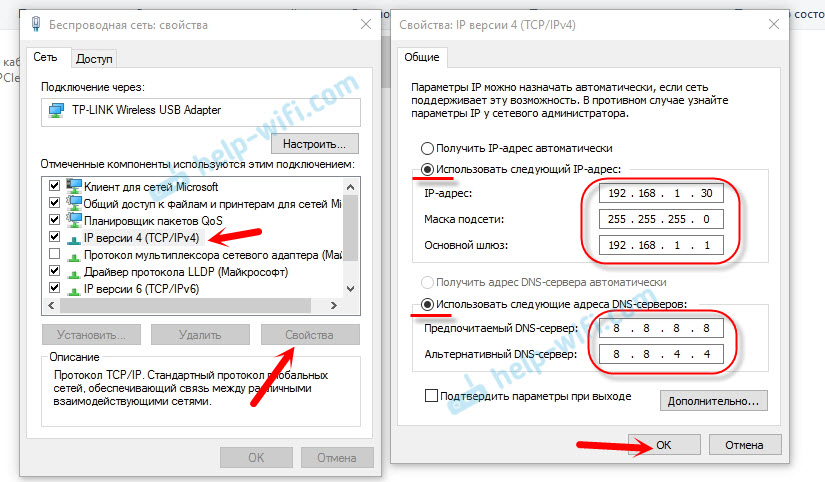
Now I’ll explain a little. You can try to register static DNS addresses (8.8.8.8 / 8.8.4.4) in any case, regardless of how your Internet connection is.
We register static IP only if we have a connection through a router (and not directly from the provider, only if the provider does not issue static addresses).
- The default gateway is the IP address of the router. We look at it on the router itself, on a sticker. This is most likely 192.168.1.1, or 192.168.0.1.
- The netmask will be set automatically after you specify the IP address.
- And the IP address is the same address of the router, only with the last digit changed. For example, I changed the number from 1 to 30.
After that, click Ok and restart the computer. If this does not help solve the problem and get rid of the error, then it is better to set the automatic retrieval of addresses back, or register only static DNS.
Avast Antivirus - the cause of the error with the lack of valid IP settings
Update. Messages began to appear in the comments that it was possible to get rid of this error only after uninstalling the Avast antivirus. Since such comments began to appear very often, I decided to check everything and add this information to the article.
I installed Avast with all components on my computer, but did not notice any problems. The Internet is working. And this is understandable, since the error most likely appears under certain circumstances. Which cannot do without Avast.
Sergey suggested in the comments that he Resetting Avast antivirus settings helped. After resetting the settings and restarting the computer, the error disappeared.
Before uninstalling your antivirus, try resetting it. In the settings, go to the "Troubleshooting" section and on the "Restore default values" tab, click on the "Reset" button. Confirm by clicking "Yes".

Restart your computer.
And so, if you have this error and Avast is installed, then try to remove it.

But without an antivirus it’s somehow not very good. Even if the Internet works.
Therefore, try downloading Avast again from the official website and installing it again. Only during the installation process disable all unnecessary components. In fact, no one needs them, they just load the system. And it is possible that because of one of these components the Internet stops working.

However, it is also possible that the problem is due to the “Web Screen” component.
Another option. Checking if there are components from Avast antivirus in the connection properties (Wireless network, or Ethernet). I already wrote about this in some article.
We open the properties of the connection through which our computer is connected to the Internet and see if the list of components contains the word “Avast” in the name.

If there is, uncheck the box next to it.
Update : in the comments, Dima shared another solution related to Avast antivirus. This problem started for him after turning on "Offline mode". Check if you have offline mode enabled in Avast settings. To do this, right-click on the antivirus icon in the tray.

Check, maybe this is your case.
Remove the network adapter and reinstall the driver
If all else fails, you can still experiment with the driver wireless adapter, or network card. Depending on which connection you are using, you get an error with missing valid IP settings.
Go to Device Manager, to the "Network Adapters" tab. Right-click on the adapter through which the Internet does not work and select "Delete".

After this, restart your computer. The adapter will be detected and installed on the system again.
You can also try downloading the driver for your wireless (Wi-Fi) or wired (Ethernet) adapter from the manufacturer’s website and start installing it.
- Disable your antivirus and the built-in firewall in Windows.
- As I already wrote at the beginning of the article, try to remember what you changed or installed before the Internet stopped working and this error appeared. Maybe the system installed updates. Think about what programs installed on your computer can affect the operation of network adapters.
- Try disabling unnecessary programs from startup.
- Check to see if Bonjour is installed on your computer. If installed, remove it.
If one of the proposed solutions helped you, write about it in the comments. Maybe you know another solution - write about it. Also ask questions about the topic of the article, we will figure it out together.
Good afternoon, dear readers and guests of the blog site, we continue our troubleshooting of operating systems of the Windows family and next in line is this network error "To configure TCP/IP, you must install and configure the network adapter". You can meet it both in Windows 7 and in the freshly installed Windows 10 fall creators update. In any case, it will be solved the same everywhere, since Microsoft has a large number of errors, it simply migrates from old systems to new ones, It’s just the way it is and there’s nothing you can do about it.
Reason for error
To be honest, I never heard a clear description of the reason from Microsoft, its official answer boiled down to the fact that you allegedly changed one network adapter to another, the first one was not really removed from the system and is in Windows equipment, which is why you are catching in the network adapter settings there is an error "To configure TCP/IP, you must install and configure the network adapter." As a result it doesn't work for you the local network, you cannot get an IP address from your DHCP server and you will no longer be able to work on such a computer. In my case, I did not change anything, since on mine motherboard, two built-in network cards, sorry Microsoft.
It looks like this in the properties of the network adapter.

In the notification area, the network adapter icon is marked with a warning sign.
Methods for solving the error
The easiest way is to reset the TCP/IP network settings, I have already talked about this in these publications:
I advise you to read it, it will take you a couple of minutes.
If this method didn’t work for you, then you need to open the “Device Manager” snap-in, the universal method for opening it is to press the Win and R key combination and enter devmgmt.msc. (look for the link on the left)

In the dispatcher Windows devices, we find the section with network adapters and among the list of equipment we find ours,

if suddenly it is not there, then with a high probability it is hidden, find hidden devices, you can use this method. On the View tab, find the option "Show hidden devices"

Now update the configuration and your operating system Windows system 10 or another will automatically detect all current equipment and the error “To configure TCP/IP, you must install and configure a network adapter” will disappear. Now you can use your computer freely.

I showed you the solution, but I would also like to dwell on some optimization points:
- Check your computer for viruses
It seems simple tips, but many people do not do basic things when using their operating system.
The network adapter is printed circuit board, which is inserted into a slot on the motherboard. It can also be integrated into the motherboard or connected to a computer via a USB connector. There are other options, but the ones listed are the most common. You can distinguish the adapter by the characteristic connector designed to connect the connector network cable. Adapters for network connection using or Wi-Fi technology. The latter are distinguished by the presence of a radio antenna. The purpose of any type of network adapter is the physical connection of the computer and the transmission medium, as well as the preparation and transmission of data from one device to another.
Installing and configuring the network adapter
Before installing the network adapter, pay attention to its brand; it will be required during the setup process. Physical connection requires access to the motherboard. To do this, you need to disconnect the cover from the system unit.
Next, find the slot on the motherboard for installing the card. Often, this requires removing the closing metal plates from the rear panel of the system unit in order to expose the external interface of the adapter. Install the module into the slot, make sure that the cable connector is accessible, and screw the board to secure it. Then put the cover back on system unit. Connect the network cable.
Turn on your PC. After the system boots, a message will appear that a new device has been found. For correct operation, you will need to install a driver that matches the system and brand of network adapter. It is better to download it from the manufacturer’s official website. After this, reboot the system. The network connection icon should appear on the taskbar.
Right-click on the icon and select "Network and Sharing Center" shared access" This is where all network connection settings are made. In particular, go to the “Change adapter settings” menu, after which all available network connections will open.
To change properties, right-click on the icon of any of them and select “Properties” in the context menu. In addition, the status of each connection is visible here: “Enabled” or “Disabled”. Connections that are enabled but not working for some reason are crossed out with a red cross. Enable or disable connection ( software control adapter) can also be done through the context menu.