Companies that assemble computers. How to build your own gaming computer from scratch. Preparing for assembly
Are you planning to get a new computer? You have 2 ways - buy ready-made or assemble it yourself. The advantages of the first way are obvious: bring it, connect it and use it. No extra hassle. Convenient, but... if you decide to do this, you will most likely overpay. And inside the sealed system unit there may not be what you expected. For example, cheap “noname” hardware sold to you at a High End price, or a slightly adjusted defect that, at best, will fail before the warranty period expires. And at worst - immediately after its completion.
Assembling a computer from separate components is a troublesome, but smarter way. Firstly, such a purchase is 10-25% cheaper. Secondly, you will know exactly what your iron “pet” is made of. And thirdly, you can handle this on your own, even if you have no idea about the compatibility of the parts. Online configurator services will come to your aid, and this article will teach you how to use them.
Before starting assembly, check for yourself:
- What tasks will the new PC be used for?
- What budget do you have?
The most economical option is office class computer. The range of tasks for which it is intended is small. This includes working in undemanding applications, the Internet, listening to music, watching videos on YouTube, and simple games. Such a machine (turnkey kit) will cost approximately 15-25 thousand rubles. It usually includes:
- Inexpensive motherboard.
- Inexpensive processor, like an Intel Celeron with a built-in graphics core, so you can save on a video card. Or plus a budget video card.
- Box cooler.
- Hard disk drive (HDD).
- 2-4 GB of RAM.
- Case with built-in power supply, peripherals.
Mid-budget option - multimedia PC. These are most often purchased for the home. Multimedia computers used for the most different tasks, excluding heavy games and particularly resource-intensive applications. The cost of assembly is 30-60 thousand rubles. As a rule, it contains:
- Motherboard based modern chipset with a large set of slots and USB (optimally with support for USB 3.1).
- Modern processor Intel Core i3-i7 or AMD equivalent.
- Cooling system (processor cooler + 1-2 case fans).
- Multimedia or gaming class video card.
- SSD+HDD (the first one is for operating system, the second is for data storage)
- 8-16 GB of RAM.
- Power supply 500-650 W.
- Multimedia monitor.
- Housing, peripherals, expansion boards.
Expensive option - gaming pc. The price of a computer for gaming on average starts from 60,000 rubles, the upper threshold is not indicated. Assembly usually includes:
- Gaming motherboard.
- Modern Intel Core i5-i7 processor or AMD equivalent.
- Productive cooling system of air or water type.
- 1-2 gaming video cards.
- A discrete sound card (if the built-in audio sounds good, you don’t have to buy it).
- SSD+HDD.
- From 16 GB of RAM.
- Power supply from 550 W and more powerful.
- 1 or more gaming monitors.
- Case, gaming keyboard, mouse and other accessories.
We will separately highlight the servers and specialized computers, for example, for video editing, mining, etc. Their price can be anything, but it is usually quite high. The composition of the configuration is determined by its purpose.
How to allocate a budget when purchasing components
Start building the assembly of your future computer with the key and most expensive part. This is, as a rule, a processor, and when buying a gaming PC - a processor + video card combination. And sometimes - a monitor.
Secondly, we select:
- Motherboard.
- Cooler.
- Power unit. We determine the required power after selecting the remaining components, but we allocate funds in advance, since it is impossible to save on the power supply.
The third line is where you can save money. Of course, savings should in no way affect the quality of the devices. This category includes parts that you can postpone the purchase of if you don't have enough money. Or buy in smaller quantities than planned.
- RAM. If you can’t buy everything at once, you can get by with one module for a while.
- HDD.
- Expansion cards ( sound card, TV tuner, DVD/Blu-ray drive, etc., optional for PC operation).
- Periphery. If you don’t have enough money for expensive gaming devices, you can use regular ones for a while. This is better than cutting the budget for a video card or power supply.
- Frame. The cost of system unit cases does not always reflect their quality. Some manufacturers increase prices only for decoration - lighting, unusual shapes, etc. If decoration is not the main thing for you, feel free to buy a case with a regular design. The main thing is that it is roomy (especially important for long video cards and tall tower coolers), with a convenient location of the compartments (the power supply is at the bottom, the disk shelves are across, there is a compartment for cables), as well as with an ergonomic placement of buttons and connectors on the "muzzle".
Assembling a computer using the online DNS store configurator
Let's figure out how to use the online configurator using the computer store DNS service as an example. The choice fell on it, since it has a device compatibility check and everything else is very simple and clear. For example, let's assemble a game system unit in a minimum configuration.
Let's start with choosing a processor. To do this, go to the service page and click the “Add” button in the first line.

In the left column next page CPU characteristics are collected, on the right - products from the store’s assortment are listed. We select an Intel brand processor with a free multiplier (for overclocking). After we noted the parameters of interest, the service automatically found suitable models. Having selected one of them - Intel Core i5-6600K without a cooler, click “Included”.

- For a gaming computer.
- GPU manufacturer - NVIDIA.
- GPU model - GeForce GTX 1080.
- Memory capacity - 8 GB.
They may be different for you. In general, when choosing components for a gaming PC, focus on system requirements the most resource-intensive game you are going to play on it. Then you can't go wrong.

Our choice fell on the GIGABYTE GeForce GTX 1080 WINDFORCE OC. We add it to the kit and move on to selecting the motherboard.
In order for the service to display only those motherboards that are suitable for the selected processor, at the top of the filter table (characteristics) we put the “Compatible” label.
From the rest we noted:
- For a gaming computer.
- Form factor - ATX (full-size).
- Based on the Intel Z270 chipset.
- With USB 3.1 type A and C ports.
Next to the name of each product there is a short list of its characteristics. To open the full description, just click on the catalog line.

I went to the kit Gigabyte board GA-Z270-Gaming K3.
We noted:
- Tower type.
- Copper base.
- 4-pin connection connector.

The choice fell on DEEPCOOL GAMMAXX 200T.
The following components are: RAM and SSD drive. Let's take 2 planks Kingston HyperX FURY Red 16 GB and Plextor M8SeY SSD 512 GB.
Finally, let's select a power supply. The total power consumption of our assembly is 352 W (to find out, click on the button shown in the screenshot at the top of the page).

It is advisable that the rated power of the power supply exceed this value by at least 25-30%. We got almost 2 times more, and that's not bad.
There are no compatibility issues with our build. When they are there, the first button on the panel (with puzzles) turns red. The hardware is optimally selected, the only thing missing is the system unit case. But we will buy it sometime later, since the price of all this stuff was as much as 124,993 rubles.

You can save your build in personal account on the DNS website (registration is required) and there, if you want, make a purchase. But we do not advise you to do this right away, since similar configurator services are also available in other stores, where prices may be lower, the assortment may be richer, and delivery times may be shorter. Let's get to know them.
Regard store configurator

Assembling a computer is not difficult. Assembling a computer is like a construction set - all the parts just fall into place and knowing the theoretical part, in principle, there should be no problems with the assembly. All that is required of you is time and accuracy, since this designer is often expensive and does not forgive mistakes.
In this article, we will look at the most important aspects and questions that may arise when building a PC. How to assemble a computer without breaking anything?
Before assembling a computer, you must be sure that all components are compatible with each other. It is not difficult to check components for their compatibility. If you are not sure, then use special assembly configurators, which are available in many stores. For example, one of these configurators is www.regard.ru/cfg.
By the way, you can choose the most suitable assembly for you on our channel in Yandex.
CPU
The contact pad on processors for desktop PCs comes in two types: PGA (in the form of “pins”) and LGA, where they were replaced by contact surfaces.

PGA is used in AMD and older processors Intel versions. After socket 775 (the place where the processor is installed), Intel switched to the LGA socket. It is extremely difficult to bend or break anything in such a processor, which cannot be said about motherboards for this connector. Manufacturers of motherboards for the Intel socket do not just install a special plug.

Under it there are a lot of contacts, which are called “legs”. Care is required here. You probably won't be able to get any dust or dirt that gets in. The legs are very flimsy. If you bend one of the legs, then it’s quite possible to checkmate. the board will become faulty. It’s also not worth leveling them yourself. If this does happen, it would be wiser to contact a service center.
The plug from the socket must be removed immediately before installing the processor. Check that all the legs are intact and nothing is bent, and only then proceed to install the processor into the socket.
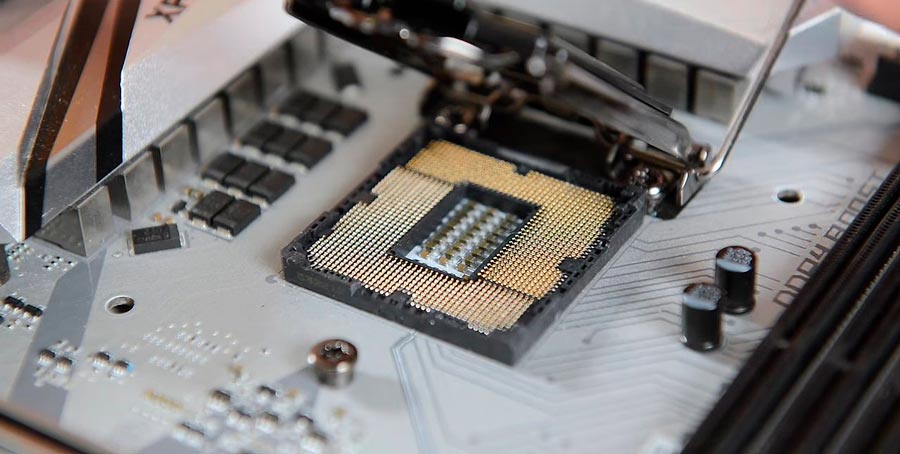
By the way, the stub on latest versions motherboards for Intel processors do not need to be removed at all.
The locking mechanism is opened using a special lever. The flag on the processor and socket should face the same direction.
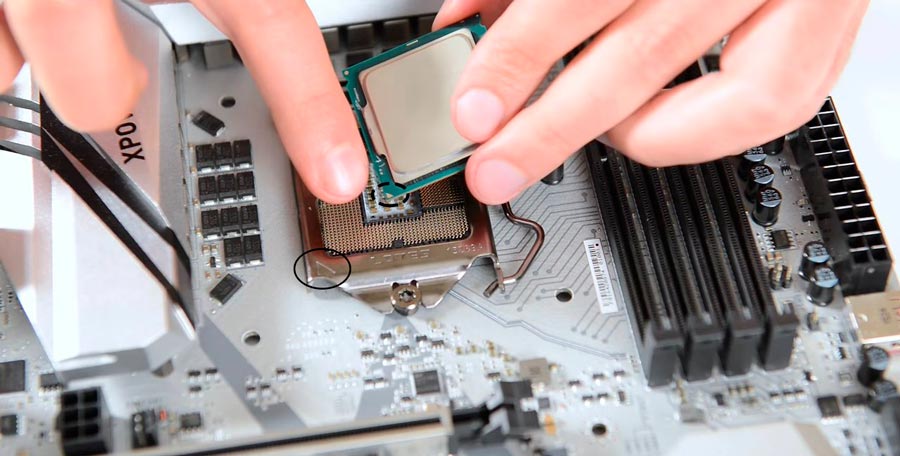
This and a pair of keys on the connector and processor are your main reference points. Make sure that the processor is properly seated on the contacts, and only then close the locking mechanism.
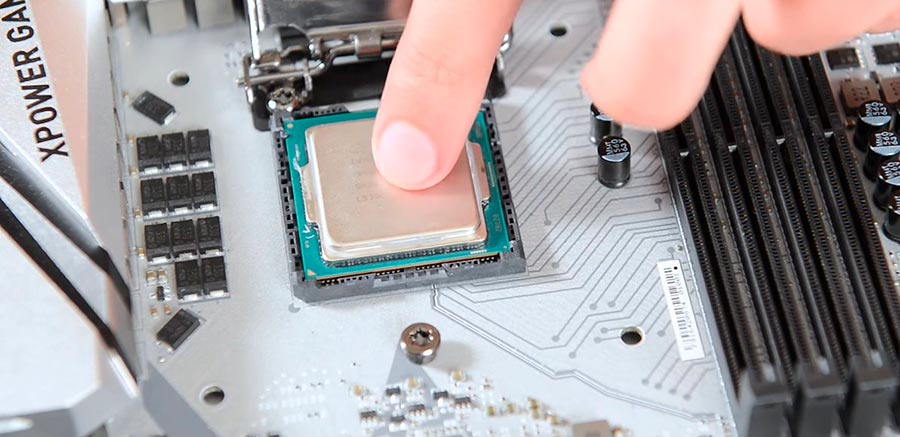
He will struggle a little, but don't be alarmed. This is normal, it's just that the processor frame presses the processor quite tightly against all the legs.

With AMD processors the situation is different. Their “legs” are located directly on the processor, and the motherboard connector is made in the form of special niches for these “legs”. Make sure that all the legs on the processor are in place and that nothing is bent before proceeding to install the processor into the socket. When installing, again, you should focus on the special markings (checkbox).
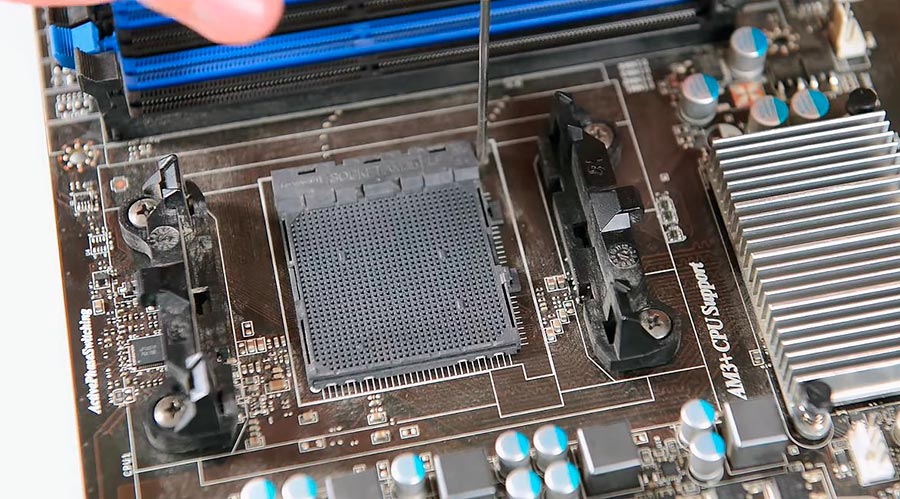
Installation of AMD processors is easier. Carefully open the socket and install the processor. It should fit completely into the connector.

Cooling system
Perhaps installing a cooler is a more difficult task (relative to installing other components). Often they already have thermal paste applied to them. Should it be replaced with something more worthwhile? If it is a budget cooler or a box cooler (included in the kit) - yes, it is desirable, but not critical. On top-end cooling systems this will be unnecessary.
Before installing the cooler, wipe the surface of the processor. This can be done with alcohol or a degreaser.
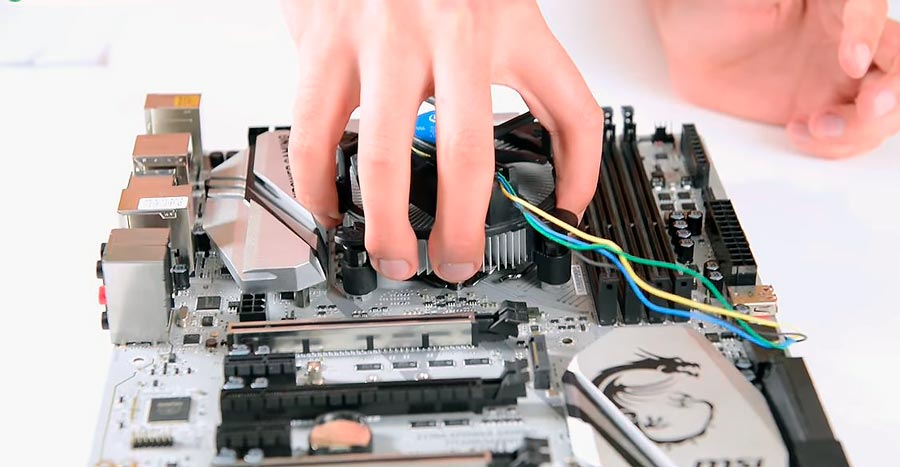
Read the instructions, do not ignore this step. Install and check that the cooler is secure and not loose. You can grab it with your hand and lift it up motherboard.
With cooling for AMD processes, everything is simpler, but be sure to read the instructions too. Install the cooler and secure it with a lever.

A cooling system purchased separately also usually already has thermal paste applied, but the fixing methods may be different. For tower coolers, for example, you need a special substrate for the processor (backplate), and in the case of AMD processors, it may be necessary to remove the original latches on the board
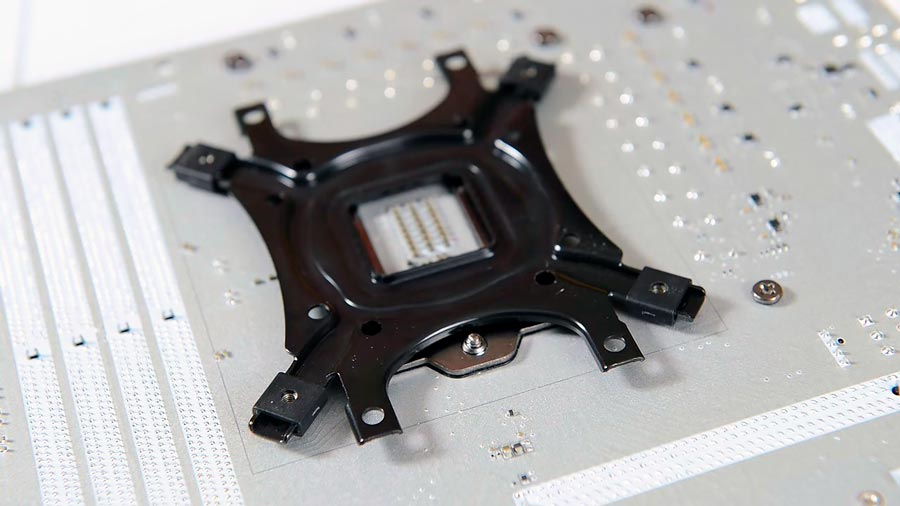
Tower coolers are usually secured with screws; a mounting key is most often included in the kit. The most important thing when installing such a cooler is not to overdo it with tightening the screws. It should fit snugly against the processor and not wobble, but this does not mean that the screws need to be tightened like a car wheel.

Don't go too hard. After installing the cooling system, connect it to the motherboard - CPU FAN connector.
Thermal paste
It happens that the paste is not applied to the cooler, but lies separately with it in the box. Then you will have to apply it yourself. The paste is applied only to the metal cover of the processor. The thinner the layer, the better.
The paste is applied well, for example, with a plastic card. It is not advisable for the paste to get on the processor substrate. Some thermal pastes conduct electricity and this can cause a short circuit.

Just apply some paste to the center of the processor and install the cooler. Under pressure, it is evenly distributed over the processor cover. Sometimes the edges are left unsmeared, but they do not play a significant role in the heat dissipation process. Which thermal paste is better to choose and how to change it, read.
RAM
The simplest thing is to install RAM. True, in slots with one-sided fixation, memory is more difficult to insert. Sometimes normal effort is required.
There is a key in the socket and a notch on the memory board. Open the latch on the slot, insert the model all the way, close the latch. Make sure that the memory is level, especially for slots with one-sided fixation.

It often happens that the module is not fully inserted on the lever side. This may result in the system not starting after turning on the PC.
Usually, before installing the motherboard into the case, I check the performance of the system on an open bench. You don't have to do this, but maybe it will be useful to someone.
After installing the processor, cooling system, hard drive and RAM, I power the motherboard, processor from the power supply and connect the HDD. Next, I use a screwdriver to close the connectors to which the power buttons from the case are connected. They are usually located in the lower right side of the mat. fees:


Gigabyte

After checking the functionality of the system, and sometimes installing Windows at this stage, I move on to assembling it in the case
Frame
Now it’s time to install the motherboard in the case, but before that it is advisable to install the power supply, otherwise in the future there may be a problem with neatly laying the wires. Plan in advance what will go where and run the appropriate wires there.

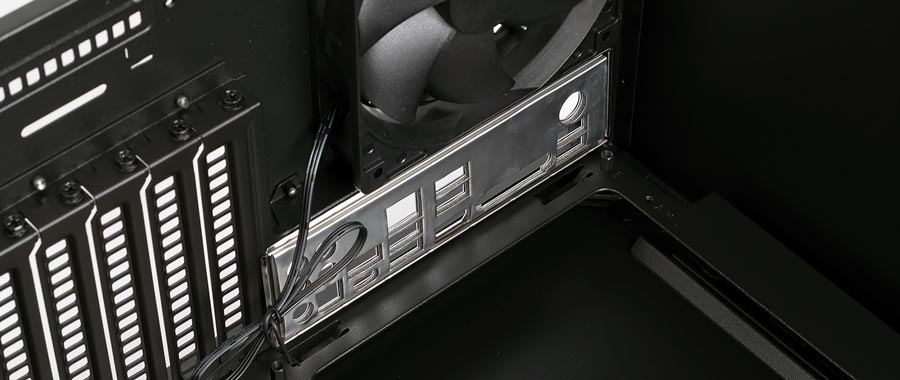
Also, before installing the motherboard, do not forget to install the special socket for the connectors that came with the motherboard on back housings. It starts from the inside of the body and is installed as if pressing it outward.
The board must be placed in the case on special racks (hemp), there are from 4 to 15 of them. Don’t miss this moment! Having matched the motherboard with its approximate location in the case, screw the stands into these holes in the case.

They must be the same height. Check whether all the “stumps” are screwed into the body to the same height (to the end). In cheap cases this can be a problem and often cannot be done without the help of a tool. The motherboard should not touch the case, it should lie evenly on the stands.

The stands are part of the housing kit. It happens that there are more holes on the board than on the pallet. No problem, you don’t have to use everything. The main thing is to secure the edges of the board and the middle of the board in at least one place.
Drives
Connecting the drive couldn't be easier. In the case of a regular SSD (2.5 inches) or hard drive, you will be dealing with only two wires: power and the data cable (SATA) that comes with the motherboard.

Check the location of the key to see if anything is interfering with their normal connection. It's the same with the SATA cable. In most cases, the cord has a locking mechanism with a lever at the top of the connector. If you need to remove the cable, just clamp it, otherwise you may break the connector on the motherboard.

In modern cases, drives are fixed in special slides. Very convenient and does not require special screws, unlike budget cases.
Laying wires
Do not allow situations where the power wire or connector is connected to the device at a break; you are guaranteed to break the block or connector on the device itself, especially for drives.

You can ignore neatness and cram all the wires into a clump. The system will work, of course, but unfortunately. The wires will interfere with normal air circulation in the case, the system will quickly become dusty and overheat. Plus, there is a possibility that one of the wires may get into the cavity of the processor fan.
Place the wires behind the back wall and secure them with zip ties through special eyes.
Case fans
As a rule, there are two of them in front and one for blowing out. Attached to the body with self-tapping screws. Before installing into the housing, pay attention to the air flow indicators. If this is the back wall (or the upper part of the case) - the arrow is for blowing out of the case, the front - air intake into the case.

The fan can be connected to both the motherboard and the power supply (via an adapter). If the fan has a 4-pin connector, then it must be connected to the corresponding connector on the mat. board, which is designated as SYS FAN. The advantage of the 4-pin connector is that it becomes possible to automatically control the fan speed depending on the processor load.
Make sure there is nothing obstructing their air circulation path. The top part of the hard drive should be ventilated - this will prolong its life.
Connecting the Power Supply
First of all, we connect the most important cables. There are two of them - a 24 pin (or 20+4) power cable for the motherboard and an 8 pin (or 4 pin) cable for powering the CPU processor. We insert them to the limit, you will hear a characteristic click (not always). Do not confuse the power supply wires 4 pin CPU and PCI-E.
Sometimes it happens that the processor power connector on the motherboard has an 8-pin connector, but the power supply cable intended for the CPU has only a 4-pin connector.

You can connect half of it and it will work, but it is not advisable to do so. It's not a fact that your motherboard will survive this.
By the way, this does not apply to video cards and we’ll see why later. If the characteristics of the power supply indicate CPU power 4+4pin, this means that the connector is dial-up, suitable for both 8-pin and 4-pin connectors.
The same goes for the board's power supply. Power supply 20+4 means that your unit is suitable for both motherboards with a 20-pin slot and a standard 24-pin one.

The situation with a video card is different. Here you can also find a dial-up connector with 6+2 contacts or only 6. In fact, there is only a 6-pin connector here. It can be one, two or three - depending on the coolness of your power supply. And it differs from the 8-pin only by a jumper.
The additional 2 contacts do not create a potential difference, they are two zeros. They serve as a marker for the card that your power supply is powerful enough for the card and will provide the required amperage.

Carefully connect additional ports on the case. Do not hurry. There is a key on the connector - use it as a guide, make sure that the legs of the connector are straight and do not bend them. This is especially true for the USB 3.0 connector. It is not uncommon for a user, due to inattention, to bend the leg on a connector or tear it off when abruptly removing the connector. How to connect the front panel of the computer to the motherboard is described in more detail here.
Video adapter
As a rule, the video adapter is installed last. Everything is simple here. Insert the video card into the graphics slot and secure it with a screw to the expansion card frame. If the card is wide, it is better to secure it with two screws.
Don't forget about the lock on the slot. It's not for beauty. Before installation, it must be open and only then insert the video card until it clicks. Remove the card only using the release lever. Click on it and the card will rise in the slot, after which it can be removed.
Static electricity and methods to combat it
Do not assemble your PC while wearing synthetic socks while standing on a wool carpet. You can use simple cotton gloves, especially when working with RAM modules without heatsinks. Perhaps this is the only detail that is afraid of static. Common sense and mandatory reading of the instructions are your best helpers.
If the computer does not start after assembly, check how you installed the components. It starts, but rather stops working - most likely a problem with the RAM or its incorrect installation. assemble the computer
If it comes to the BIOS is already good, you can find possible reason. If the lights on the motherboard light up, the coolers spin, but nothing appears on the monitor, check the installation of the video card. Resetting the BIOS or updating it may help.
As you can see, assembling a computer yourself from components is not so difficult. The main thing is to know the theoretical part. We have discussed the main points that may come in handy. Naturally, that's not all. How many variations of components are there? possible problems. There should be no mechanical damage to the components. Before you decide to assemble a computer, carefully check the components for external defects. Good luck with the build.
Hello! If you are thinking about buying a new gaming computer, then you don’t have to worry too much and purchase a ready-made system, while overpaying 10-20% of the cost. For those who want to save money, the best option would be to assemble a computer from components. In the huge variety of hardware for a computer, how can you select the necessary and compatible components?
Many gamers who believe that the issue of assembling a computer is too complicated for them do not want to understand the topic and prefer to trust a specialist. However, in reality, there is nothing difficult about assembling a computer for gaming yourself. So why then overpay for the services of specialists or for a ready-made system unit?! In this article we will look at one of the simplest and most effective online configurators: DNS, with which you can collect gaming computer even a person completely far from the computer topic. 
How to understand what kind of hardware you need
Typically, assembling a computer begins with choosing a motherboard or processor. However, given the fact that we are assembling a system for games, the first place comes video card. Naturally, this does not mean that we should spend our entire budget on a video chip, limiting ourselves to a dual-core processor and a gigabyte of memory. However, it is based on the characteristics of the video card that gamers understand whether this or that game will work for them.
So, in order to understand what components we need for our future gaming computer, we need to follow these steps:
- Determine in what games do you plan to play on your new machine and choose the most demanding ones among them.
- Visit the official websites of the developers of these games and view system requirements requirements for computers. You can also visit gamer forums dedicated to a particular game and find out what kind of hardware someone uses.
- You can use the highest system requirements as the basis for your computer configuration.
Wherein Special attention Pay attention to the requirements for the video card and processor.
When assembling a gaming computer yourself, you need to competently distribute your budget. Of course, there will be a desire to take additional equipment, but you need to remember that money tends to run out. Therefore, first of all, you need to buy something that you cannot do without, i.e. video card, processor, motherboard, drive, power supply etc.
The rest peripherals are optional. So, at the first stage, if you have a limited budget, you can purchase 4-8 GB RAM, and then buy the required number of planks. You can also purchase a discrete sound card later, optical drive, modern case, comfortable keyboard and functional mouse. You shouldn’t spend money on these devices at the very beginning; it’s better to overpay for a processor or video card, which you won’t be able to change later.
We assemble a gaming computer for 30,000 rubles
So, let's move from theory to practice. Let's start with the lowest price category - up to 30,000 rubles. To build a computer, we will use the well-known online configurator offered by a computer hardware store DNS. There are many other similar configurators, but I chose this one for a number of reasons: it is as easy as possible to learn, the equipment compatibility check is excellent, the cost is calculated automatically, and sometimes useful tips pop up. Having created your account, you can build computer systems and store them right here, without having to buy anything.
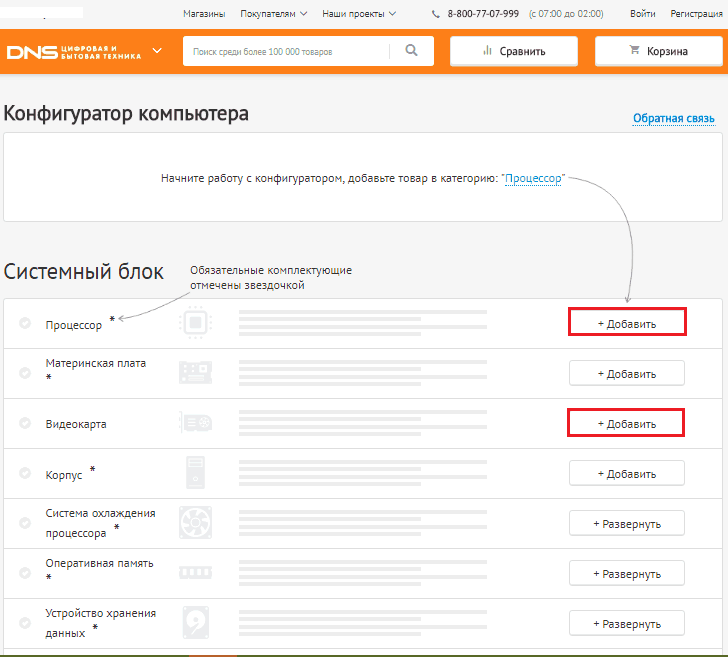
So, the component assembly page in this configurator looks like this: 
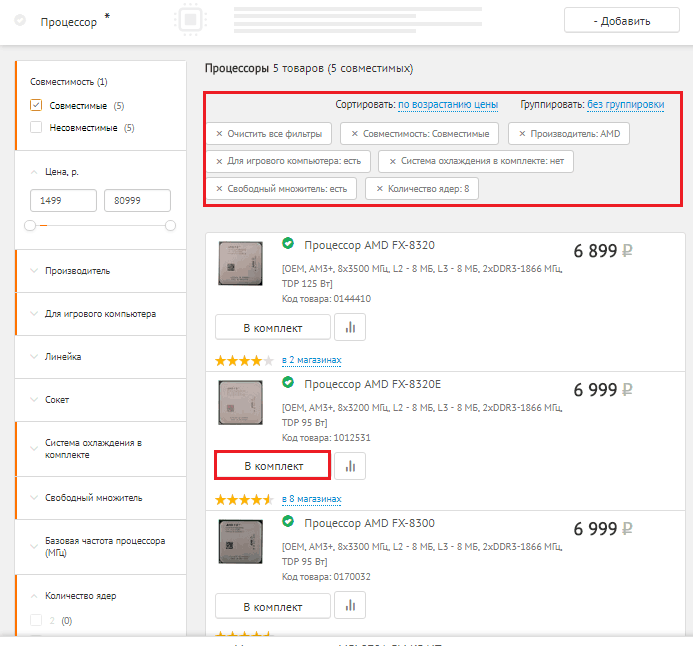
First, let’s add two main components of a gaming computer to the configurator – processor and video card. In the left column you can select device options. The following parameters were set for the processor to select the optimal device:
- Manufacturer: AMD. The choice is due to budget limitations.
- For a gaming computer.
- With a free multiplier and eight cores.
- No cooling system.
As a result of this filtering, only five processors remained, the cost of which varies between 6900-11300 rubles. The first three models cost the same, so we choose the more energy efficient one - AMD FX 8320E. Click on the Add to Kit button to add the processor to our assembly. 
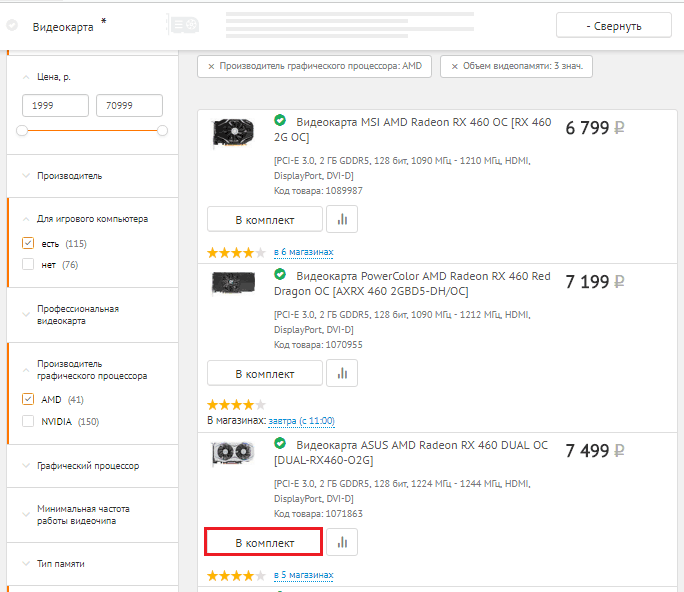
When selecting a video card, configure the following filters:
- For gaming computer
- Manufacturer – AMD (also for cost reduction purposes)
- Memory capacity 2-4 GB
At the same time, we have activated the automatic filter compatibility, so that those devices are selected that match the already selected elements. So, as a result of filtering, 14 video card models were selected that met our criteria.
To learn more about the characteristics of each model double-click on the icon with its image. We look at the detailed data in the product card, and to exit to the configurator, click Back to catalog. 
Of the proposed options, the video card turned out to be the most attractive ASUS AMD Radeon RX 460 DUAL OC, which has an affordable price and does not require additional power. 
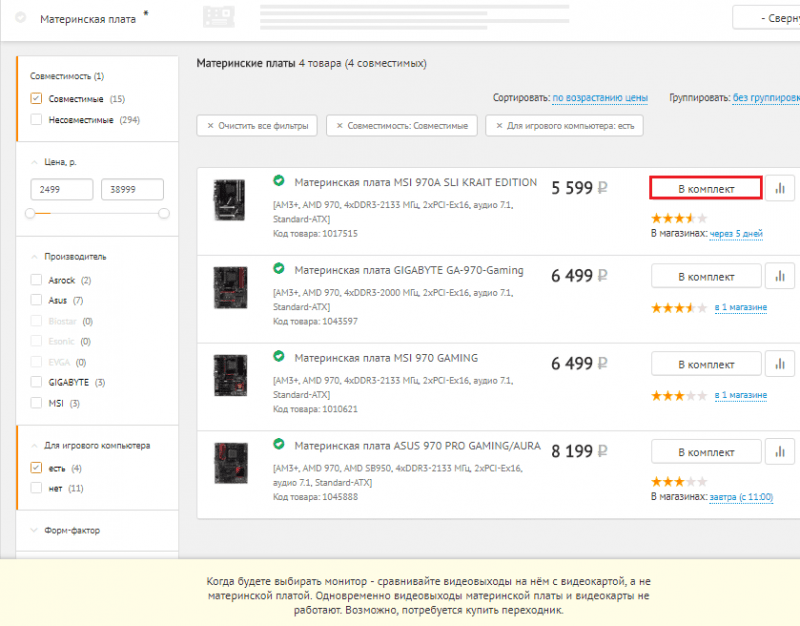
Next, we proceed to choosing a motherboard. From the four models selected by the configurator, we choose MSI 970A SLI KRAIT EDITION, which is slightly cheaper than the others, but has similar characteristics. 
When choosing a cooler, in the parameters we indicate 100W of power dissipation, copper base, tower type and 4 pin connection connector. The configurator offered several options, among which we choose a cheaper model DEEPCOOL GAMMAXX 200T.
To check whether we are within the budget, look at the upper corner of the configurator, where total cost of all components. As you can see in the screenshot, we still have about 9,000 rubles at our disposal. 
Don't be alarmed by warnings like " Suboptimal power consumption", etc., which may appear here - until we fully assemble the system, such warnings are inevitable. The red elements show which components are missing for the system to work.
So the next step is SSD selection. In the filter we indicate the volume of 120-128 GB and the SATA-3 interface. The drive is quite fast in an affordable price category Sandisk SSD Plus. Of course, for a gamer this amount of memory will not be enough, but given the limited budget, something has to be sacrificed. In any case, you can buy more later HDD for a larger volume. 
Important: if your configuration does not include a case, the program will show that SATA is not compatible with your equipment - some kind of glitch. Therefore, we simply uncheck the “Compatible” box.
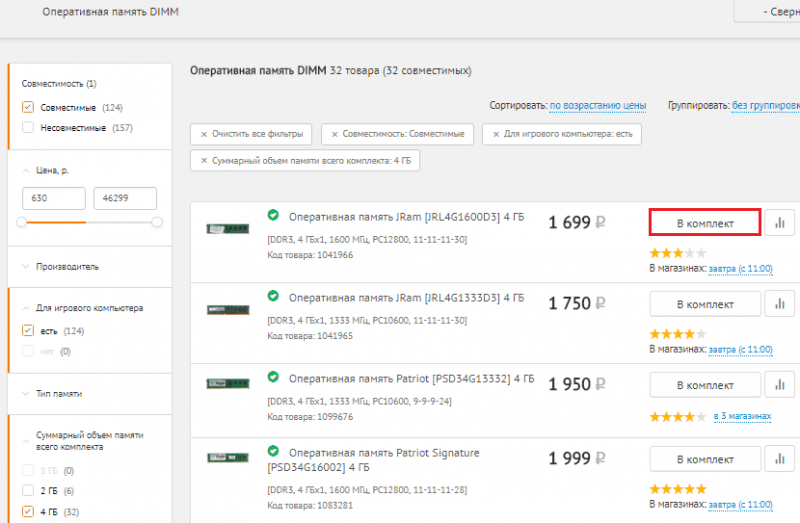
Next, we purchase RAM, which for a gaming computer must be purchased in an amount of at least 8 GB. However, due to the same lack of funds, we first buy a 4 GB stick. From the configurator, the most optimal option was memory JRam DDR3 with a frequency of 1.6 GHz. 
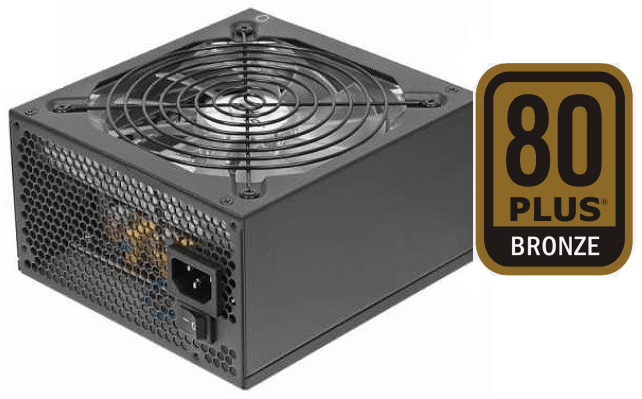
Only now can you start choosing a power supply, because... energy-consuming elements are already included in the configuration. As you can see, the total system power consumption was 244 W. Considering the fact that we plan to make system upgrades in the future, we need to choose a power supply with a power reserve - approximately 450-500 W. As a result of searching according to the specified parameters, we include a power supply in our configuration Accord ACC-500W-80BR. When choosing this block, we also took into account the number of available connectors, which should be sufficient for all our current and planned devices. 
As for the case, you will have to be content with one of the simplest models AeroCool V3X Advance, because There is practically no money left in the budget. This housing is suitable for installing all of our components. 
As a result of assembling this gaming computer, we see that the total cost of the system unit was 31,843 rubles - slightly more than the planned limit.  However, it is quite possible that you can find similar components in other stores at better prices than in DNS. To save the assembled configuration you will have to register on the site. Later, you can access it to monitor price changes, make adjustments, or share the link with friends.
Most people know that the minimum composition of a completely ordinary system unit includes a processor, motherboard, video card, RAM, hard drive, case with power supply and other less significant components. And most likely, no one needs to explain how important the correct selection of components for a PC is.
When and why you need to build a new computer
All these components interact with each other and work stably until something fails. As can be seen from practice, most computer hardware (hardware - computer components) is designed to last for a long time. As a result, the need to build a new PC arises not because of any breakdown, but because the internal components of the system unit inevitably become outdated and can no longer cope with modern tasks.
If you take a working system unit from 10 years ago, it will still perform its functions today, but you will immediately feel a huge difference between the old one and the fresh replacement. It’s not a matter of physical aging of components, it’s all to do with technical progress, because almost every year more productive components appear.
There is no point in constantly updating computer system, due to quite significant cash costs. In this regard, as a rule, an assembly intended for games is carried out with a view to several years in advance, and if the purpose of assembling a computer is to perform office tasks, then its service life should increase to an even longer service life, but there is no way to do without the right choice computer components. Information on how to choose a computer will also be very useful, and in some ways even similar.
Current selection of PC components for today
Choosing a processor for a future computer
The processor is the initial link, what you should start from when assembling a new computer in the first place, regardless of the further purpose of the computer. Only after a specific processor has been selected can you continue to solve the issue with components: the motherboard and RAM, etc.
Taking a look at the processor range, two competitors, Intel and AMD, will immediately catch your eye. If you look superficially at the tests and reviews of the choice between these trademarks, we can come to a small conclusion: Intel processors good in terms of performance and AMD is better in the price segment.
Selecting an AMD processor
If we take two processors identical in frequency and number of cores different manufacturers, then Intel is more likely to emerge victorious. After all, they have a well-implemented CPU structure that took years to develop. AMD is less productive as it may seem at first glance, but if we compare them a little differently, namely in terms of price and performance, then AMD in the mid-price segment is usually more productive.
Of course, choosing between one manufacturer or another is more of a philosophical question, since fans always support one of these competitors. First, you need to familiarize yourself with the leading solutions from AMD.
Data central processing units Today they are made for the AM3+ socket (connector type), having three series of FX models with 4, 6 and 8 cores and the costs of these technical solutions are correspondingly different. These processors will be great budget solution For modern games. At the same time, the number of cores will influence better multitasking, which is not unimportant now. But here the factor is in favor of Intel - the majority of current computer games adapted for four core processors.
As a current cheap addition to upgrading your computer today there will be 4-core AMD Athlon processors with socket FM2 and with socket AM3 AMD Athlon X4. But these processors do not have an integrated graphics core, which is quite significant, because for office computer buying a video card will be an unnecessary waste, so it is better not to use these models to build a promising gaming computer. If you want integrated video, which is considered optimal for a consumer or office computer, then you should take a closer look at processors with socket FM2/FM2+.
The most inexpensive and modern solution from AMD will be the FX 4100 - 4350 series processors. FX4XXX is positioned more as a good platform for home computer, in due time as FX6XXX (FX6100 - 6350) it will be good to prove itself as a budget gaming computer with overclocking potential. Of course for more high performance You can select FX 8xxx and 9xxx series processors, which are considered to be the best performance from the manufacturer.
Selecting an Intel Processor
Intel processors have a slightly simpler selection system. The latter's processors will be the optimal build solution modern computer, have a socket 1150 and regardless of price, all of these processors are equipped with an integrated graphics core, and the final series model range, like processors with socket 1155, the Intel Core i7 completes here. It has 4 cores and hyper threading technology (8 threads). The younger Intel Core i3 model (2 cores, 4 threads) has everything necessary for stable operation in fairly resource-intensive tasks.
The older model is designed for absolutely all occasions, from highly demanding games to video encoding and processing. As for the Intel Core i3, this is the entry-level gaming option, or the minimum option for a budget gaming computer. The golden mean of a productive computer would be the Intel Core i5, nothing extra here, just 4 cores. For office computers, there are two more series of dual-core models - Pentium and Celeron. The Pentium processor is more suitable for the home, since it is a little more productive, and therefore more expensive, while the Celeron, although it is suitable for not very resource-intensive tasks such as watching movies and listening to music, web surfing and social media, but its performance will clearly, although not everywhere, be lacking.
Motherboard
After a long decision about the choice of such a component for a PC as a processor, the time has come to think about the motherboard. First look at the socket of the pre-selected processor, then start selecting the motherboard based on these parameters. The motherboard and CPU connectors must match. When selecting this type of component, you should pay attention to the chipset (it affects many things, for example, the maximum supported RAM frequency, the presence of SATA 3 and USB 3.0), the number of connectors (USB, SATA, PCI, DDR, DVI/VGA for integrated video) , form factor (board dimensions) and manufacturer.
The recommended manufacturers here are Gigabyte, Asus and MSI; some models of motherboards from other manufacturers can actually be even more productive and no less reliable, for example, like ASRock. These same manufacturing companies have proven themselves well in the production of video cards. But it is not at all necessary to buy the same brand of manufacturers and components for the same motherboard and video card. There are many motherboards on sale, but which one you prefer is a personal touch.
Video card
A computer needs a video card not only to display images on a monitor. She is also responsible for processing those same graphics, especially for three-dimensional entertainment. Today, in order to play comfortably at minimum settings, you need to choose a video card that is certainly no less productive than Nvidia GeForce 730 or AMD Radeon R7 240. The average optimal option is GeForce 760/770. If you want to enjoy high or ultra settings for a long time, get ready to fork out for a GeForce 790 or AMD Radeon R9 270 290X, and maybe even a GeForce GTX 980. Don’t lose your head here, you won’t always have the best computer and what it costs today $1999 will cost $299 tomorrow, although the difference between the performance and functionality of the models may not even be noticeable.
As for integrated video, everything is much simpler here. GPU already built into the CPU by the manufacturer. It will work instead of the video card, and will use the RAM memory to perform the functions of the video card. IN BIOS settings It is possible to independently allocate available memory for integrated video. The maximum permissible allocated volume depends on the capabilities of the motherboard (you can check it in the instructions or on the manufacturer’s official website).
RAM
For comfortable work today, the minimum amount is 4 GB of RAM. This applies to office computers and assemblies for simple tasks. It is advisable for a gaming PC to have 8 GB, or, if you really want, 16 GB, which may not be used, it’s up to you to decide. Here it is important to pay attention to the choice of RAM sticks with the required frequency. There is no need to buy RAM with the maximum frequency; you need one that is simultaneously supported by the motherboard and processor. Such companies as Corsair, Goodram, Kingston specialize well in this matter, Silicon Power,Transcend.
Another important fact is the dual-channel operating mode inherent in most, if not all modern motherboards. It increases productivity by more than 15%. How to achieve this? Very simple. Buy two identical RAM modules. For example, 2 sticks of 2 GB each (4 GB of RAM) or 4 GB (8 GB of RAM); usually, stores already sell sets equipped with memory sticks of the same batch.
HDD and SSD
Here we come close to user memory. Everyone knows the purpose of a hard drive; it is where all the information is stored. But this does not mean that the operating system can be installed only on it. Today HDD drives remain good devices storing information, but to get more out of a computer for a partition for the OS, quite a lot of people are already buying an SSD separately, with a capacity of 120 GB or more. SSD technology has shown itself on the positive side in terms of performance. If you install all the system software on a solid-state drive, you will feel a significant difference between the most ordinary HDD and SSD. The computer will boot in a matter of seconds, all applications will open instantly, and you will forever forget about temporary freezes.
As for the hard drive, it still remains relevant in terms of data storage. It is profitable to buy a HDD with a capacity of 1 TB or more, since the cost of 1 GB of memory is cheaper. As for mechanics, the spindle speed is standard for all, 7200 rpm. It’s just not worth choosing less, unless of course the laptop is being updated, and even in them SSD already is not considered new.
It is advisable to have a hard drive buffer size of at least 32 MB. The manufacturer is also considered an important point. Today they are almost all the same. When choosing the right PC component, such as a HDD, you should take a closer look at manufacturers that have been on the market for a long time Western Digital and Seagate, it is recommended to focus on them, although this is not a mandatory rule that should be followed; even among these manufacturers there are defects, although with less probability.
Case and power supply
If you take a closer look at the range of cases, you can pay attention to the presence of a power supply supplied in the kit. Such a power supply can be used only if components with low power consumption are used and then no less than 400W. This power supply is certainly suitable for assembling an office computer with an integrated video adapter, or for some computer assemblies for the home.
Do you have a gaming build with a video card? Then go to the manufacturer’s website, look at the recommended power supply for your preferred video card, add 100-150W in reserve and buy a high-quality power supply. Under no circumstances connect the power that was included in the kit, there is a risk of burning the unit itself and other components. The fact is that such power supplies do not correspond to the declared power, while their quality generally leaves much to be desired. Focus on quality nutrition from Cooler Master or Chieftec, or at least FSP and analogues. They are not only reliable, but also optimal in terms of connectors. They have an increased number of ports for powering SATA and other devices, and the cables themselves are longer. For more correct understanding To see what we are talking about, read the article: how to choose a computer case.
These benefits are especially important for game assembly computer, otherwise you can purchase cheaper models. As for the case, you can choose any one, focusing on the form factor and your taste, do not forget about good ventilation, because it is usually very powerful computers, especially after overclocking they heat up very well.
Other components
The last step is the other components personal computer. This includes DVD drive, other adapters, tuners, etc. Everyone has their own preferences here. However, an optical drive still remains relevant, since Blu Ray has been gaining popularity recently, although it is not in great demand. And some people specifically buy a drive just for the sake of installing the OS and drivers, probably not knowing about the capabilities of a bootable flash drive. If you decide to buy a drive, then the best quality is likely to be Asus and Nec, the probability of failure is quite low, although in reality it depends on your luck.
Given brief information will be useful when selecting components for a future computer. However, after compiling a list of desired hardware, if you do not have sufficient experience, it is better to consult a specialist to avoid an additional trip to the store to exchange the wrong components. Such a specialist may also be located in the store. Professionals will point out the mistakes that a beginner can make. They might even recommend something more worthy.
After you are 100% convinced of the correct selection of components and their compatibility, buy them and start assembling. There are many video reviews on the Internet showing how this is done. They will help you a lot in solving this problem. An extreme case is to give the hardware to a specialist, and he will assemble everything to the heap; usually the assembly is included in the free bonus after purchase.
Assembling a new computer is quite a task, because everywhere you look, store shelves are simply bursting with all kinds of PC components. How to choose among this squeaking, buzzing, winking mass of light bulbs what is worthy of becoming the “internal organs” of your future “family member”? And so that these “organs” are compatible with each other?
Some people think that it is better to entrust the choice of filling for the “iron pet” to specialists or to purchase a system unit already assembled, but we are not looking for easy ways. Assembling a gaming computer is not such a difficult task when you have a helper. Today we will learn how to use the free web service “Online PC Configurator” of one computer store and create 3 assemblies for games in 2017: up to 30,000 rubles, up to 50,000 rubles and up to 100,000 rubles. Believe me, even a second grader can do it!
How to Determine What Hardware You Need
The selection of components for a PC is usually followed by choosing the motherboard and other parts, taking into account compatibility. When assembling a gaming machine, I advise you to change this order a little, because...No, I don’t urge you to sweep powerful and expensive video cameras of the latest generation off the shelves. To buy exactly what will meet your needs and not spend too much, it’s better to do this:
- Make a list of toys that you are going to play on your new computer (after all, we are building a machine for games).
- Go through the official websites of the selected games and write down their system requirements. It is also advisable to look at resources where gamers communicate and take a closer look at their recommendations for choosing hardware. Sometimes these tips are more practical than those from the developers.
- Take the highest system requirements as the basis for the future build.
The key link when selecting components for a gaming PC is the combination of processor + video card (sometimes + monitor). We select the rest for them.
How to properly distribute your budget
The budget allocation survey is no less important than the correct selection of hardware, because when putting together an assembly there is always a temptation to add something extra to it, and money tends to run out unexpectedly.The set of components for the system unit of a gaming computer includes 7-15 items. Our task is to divide them into 3 groups according to degree of importance:
- A key link in the future assembly – processor and video card. These are the most important and usually the most expensive devices.
- Equipment of the 2nd stage– what is necessary for the operation of a PC and what you cannot do without. This includes: a motherboard, a drive for installing the OS and programs (optimally an SSD), a processor cooler and a power supply. The power supply is one of the last to be included in the assembly, but we reserve funds for it in advance, since “”.
- Equipment of the 3rd stage. This group includes what you can do without if you don’t have enough money (in order to buy more later) and what you can save on: RAM (instead of 32 GB, 4-16 GB is enough for the first time), a second drive, an optical drive, a discrete sound card , peripherals, system unit case. As for cases: if the design with bells and whistles and the famous brand, which mainly determine their cost, are not particularly important to you, buy a regular inexpensive case that is suitable in size.
Devices of the first and second stages are 80-90% of your costs. Cutting the budget for them is extremely undesirable, because this is what will bear the main burden “on its shoulders” for the next 3-5 years. If the optimally fitting part seems too expensive to you, it is better to look for it in other stores.
When choosing equipment of the third stage, do not go for cheapness. Savings should in no case concern the quality side of devices! Only quantitative.
Economy gaming computer for 30,000 rubles (without peripherals)
Well, we've sorted out the theory, it's time to start practicing. Free online configurator which I mentioned above belongs to computer store"DNS". This is not an advertisement, just this service seemed to me the best among analogues specifically for untrained users. It does a good job of checking the compatibility of devices based on various parameters, has an automatic calculation of the cost of goods, and sometimes provides useful hints. In addition, it is very easy to use, and the finished assembly can be saved in your account on the store website. There is no need to buy anything after this.Before the build starts, the service page looks like this:
Let's start by including two key devices (how to do this, I think, is clear to everyone). The first is the processor. The main parameters for choosing a product (filters) are collected in the column on the left. Here are the criteria I set to select the models that suit me:
- Manufacturer: AMD. Since we are building a budget gaming computer, I give preference to this family.
- For a gaming computer.
- With a free multiplier and 8 cores.
- No cooling system included.
The configurator selected 5 processors for me at prices ranging from 6,900 rubles to 11,300 rubles. The cost of the first three is almost the same, the performance is the same, so I will choose the less hot and most energy efficient model AMD FX 8320E. To add it to the assembly, press the button " Included».
- For gaming PC.
- Manufacturer: AMD.
- Video memory capacity is 2-4 GB.
Also included here automatic filter « Compatible" It is present in every tab, but sometimes it is worth turning it off. I'll tell you why a little later.
The service selected 14 models. From the brief description in the catalog, it is difficult for me to understand how they differ. To see all the characteristics of the device I like, I will double-click on its name. This will open the product card for me with detailed description and pictures.
To return to the configurator I will click " Back to catalog».

Having looked through all the models that suit me in terms of parameters and price, a not too expensive one is sent to the kit ASUS AMD Radeon RX 460 DUAL OC. By the way, it does not require additional power.
So, the key components have been selected, let's move on to the devices of the second group. Next up is the motherboard.
The configurator found 4 models for me that were compatible with the processor and belonged to the gaming class. After comparing their characteristics, reading reviews and reviews, I send them to the assembly MSI 970A SLI KRAIT EDITION, since, all other things being equal, it is slightly cheaper than the others.
It's time to choose a cooler. My criteria:
- Power dissipation – from 100 W (I focus on the TDP of the processor – 95 W).
- Base material – copper.
- Type - tower.
- Connector – 4 pin.
Socket AM3+ compatibility is automatically set. The choice fell on inexpensive DEEPCOOL GAMMAXX 200T.

I wonder if I'm on budget? At the top of the configurator the total cost of my potential purchases is displayed. There are about 9,000 rubles in stock, so so far everything is fine.

What is this red-green stripe next to the price and why does it say “Compatibility Issues” and “Non-Optimal Power Consumption”? It turns out that this is also normal, because I have not yet included the power supply and case in the assembly. If the problem notification (red icons) remains after adding all parts of the system unit to the kit, then you have made a mistake somewhere.
- Capacity 120-128 GB.
- Interface SATA-3.
I'll look at other characteristics in the descriptions of the models.
I’ll take the fastest one available to me at a price - Sandisk SSD Plus. 120 GB is quite enough for the first time. Later I will buy an additional hard drive to store files.
By the way, if you did not add a PC case to the package, the configurator will consider the SATA interface incompatible with your devices. Why this was done, I don’t know. To avoid this distraction, simply uncheck the "Compatible" box.

The second group is almost finished. There is still a power supply left, but I will choose it a little later. First the RAM. I plan to equip my computer with 8-16 GB of memory, but since I no longer have the funds for this, I will buy 1 4 GB stick for now. Let it be a memory JRam– DDR3 with a frequency of 1600 MHz.
The total power consumption of my current build was 244 watts. The characteristics of the video card indicate the recommended power of the power supply - 400 W. You also need some reserve for possible upgrades and overclocking of the system. Accordingly, the power supply for the PC being assembled must be at least 450-500 W. And of course, it must be of high quality and reliable.
Following these wishes, I am sending a 500-watt Accord ACC-500W-80BR.
In addition to performance, I pay attention to the presence of all the required connectors (the main thing is 4+4 or 8 pin for powering the processor) and an 80+ Bronze energy efficiency certificate.

Well, all that remains is to find a cozy “house” for all this stuff. An expensive fancy “cottage”, alas, did not fit into my budget plans, so I’ll settle on a simple steel case AeroCool V3X Advance. The main thing is that it suits me in size and the presence of the necessary parts: shelves for 2.5-inch drives, a cutout in the area of the CPU cooler, 2 built-in fans and a USB 3.0 connector on the front side.

The configurator shows that all selected devices are compatible, and their total cost was 31,843 rubles.

It turned out to be a slight overrun, but this is an approximate price, because it is not necessary to buy all the hardware in one store. It may be sold cheaper in other places.
Now I can save the configuration in my personal account (registration on the DNS website is required) in order to be able to return to it again (track price changes), edit and show it to other people (share a link).
Mid-budget gaming PC for just 50,000 rubles (without peripherals)
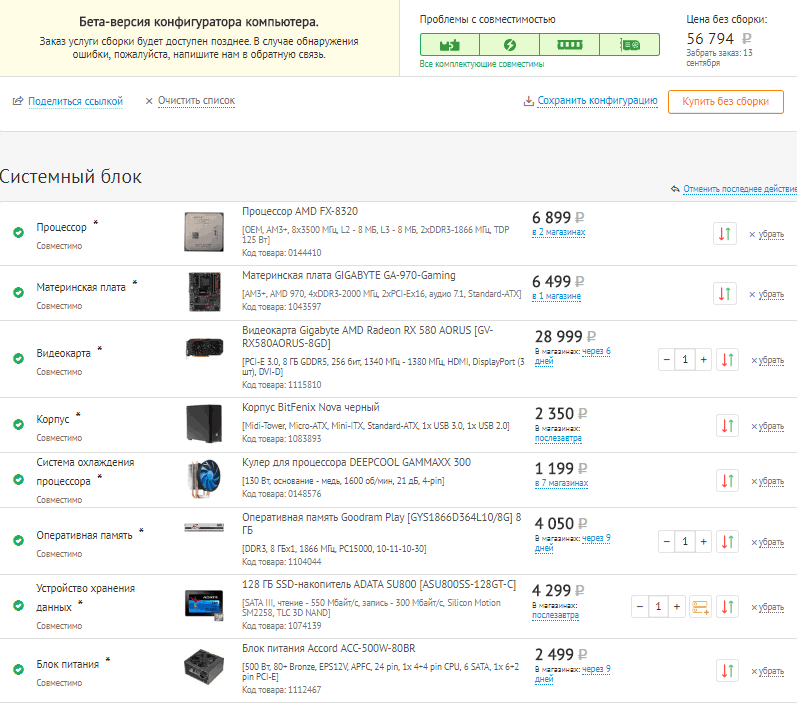
Let's consolidate the skills we've acquired and put together another gaming PC build worth about 50,000 rubles. This time without detailed explanations.Let's start with the processor + video card combination. Since you can’t get away with this amount either, let’s turn again to the AMD line and throw a CPU into the kit AMD FX-8320(compared to the FX-832E, it withstands high heat better and more stable). It will be paired with a video card Gigabyte AMD Radeon RX 580 AORUS – a decent gaming model with 8 GB of memory on board.

Next we select devices of the second stage. This is a gaming motherboard based on AMD 970 chipset GIGABYTE GA-970-Gaming, cooler DEEPCOOL GAMMAXX 300 at 130 W and SSD ADATA SU800 for 128 GB. Let's take the same power supply as in the previous assembly. Its power is just enough for all equipment, taking into account overclocking, plus the kit includes all the required connectors and a bronze certificate 80+.
The final chord is the RAM and the case. I throw in the set 1 RAM module with the desired parameters at the lowest price. This Goodram Play with a capacity of 8 GB and a frequency of 1866 MHz. In the future, the memory capacity can be increased to 32 GB. And all this will “live” in the “house” BitFenix Nova. This case is also not particularly fancy, but it has everything you need. Its main advantages are the lower placement of the power supply (important, since the processor and video card here are much hotter than in the previous assembly, and the power supply needs cold air) and the presence of a compartment for laying wires behind the rear wall (the fewer wires inside, the better the heat sink + it's comfortable).
As a result, goods amounted to 56,794 rubles. Also an overspend, but gaming video cards roads nowadays.
Let's go for a walk! Gaming system unit for 100,000 rubles
With a hundred thousand rubles at your disposal, you can afford not to save. With this amount we will assemble a full-fledged computer for the most resource-intensive toys and, perhaps, there will still be funds left for additional goodies.So, here's what I got:
- Processor + video card: Intel Core i5-6600K And MSI GeForce GTX 1070 AERO OC.
- Motherboard: MSI H270 GAMING PRO CARBON (Intel chipset H270).
- Cooler DEEPCOOL GAMMAXX 200T.
- SSD PlextorM8SeY with PCI-E interface and read/write speed of 2400/1000 MB/s.
- power unit Seasonic 550W(80+ Gold).
- Memory Goodram Play– DDR4, 2 modules of 8 GB, frequency 2133 MHz.
- HDD Toshiba P300– capacity 2 TB, speed 7200 rpm. It was not present in previous builds.
- Optical drive BD-RE LG BH16NS40 with the function of reading and writing 2-layer Blu-ray discs. It was not present in previous builds.
- Frame AeroCool Aero-500 with fan control unit and the ability to install liquid cooling.

The cost of the configuration was 100,343 rubles. Completely done! The only thing missing was discrete sound, but even without it it turned out very well.
I will not claim that the above assemblies are “ultimately true”, because they are compiled from the assortment of one store. Most likely, they can be supplemented and improved without going beyond the allotted budget, but to do this you need to browse online stores, read reviews, look at test results, compare and analyze the experiences of other users. However, this is what you need to do before purchasing; fortunately, the service allows you to save your assembly in your personal account, but, unfortunately, only one.If you do not have experience in selecting computer components yourself, do not rush to place an order immediately. First, consult with knowledgeable people (not from the store employees), and only when the assembly is approved by several experts, buy.