Brief theoretical information. CSS width and height parameters for setting the sizes of html page elements What to remember
Hello, dear reader.
This is the eleventh lesson in learning CSS. In this lesson we will look at just two simple but important properties. These properties control the height and width of the block.
Before studying this lesson, go through the previous lessons:
Theory and practice
In the last lesson we looked at what the block model is, internal and margins. In this we will look at only two properties: the height and width of the block. Height in CSS is set by the property height , and the width is the property width . Let's take a look at the code using a real example (let's take an example from the last lesson):
| 1 2 3 4 5 6 7 8 9 10 11 12 13 14 15 16 17 18 19 20 21 22 23 | <html > <head > <title > home</title> <meta http-equiv = "Content-Type" content = "text/html; charset=utf-8" > <link rel = "stylesheet" type = "text/css" href = "style.css" > </head> <body > <div id = "content" > <div class = "firstPar" > <p> Aliquam malesuada tellus justo, eget lacinia nunc rutrum a. Phasellus dictum tempor eleifend. Nunc ut magna non purus fermentum egestas ac eu nulla.</p> <p> Fusce est tellus, mattis quis nisl et, egestas posuere libero. Donec scelerisque tellus porttitor massa dictum pulvinar.</p> </div> <div class = "secondPar" > <p> Cras</p> <ul > <li > amet condimentum</li> <li > aliquam volutpat</li> <li > elementum interdum</li> </ul> </div> </div> </body> </html> |
And in CSS for each block
Let's see how it looks in the browser:

As you can see, we have set a certain height and width. If we set the height to be smaller than the text fits, then the text would extend beyond the block. Experiment with height and width. At first it will be difficult to determine the required size in pixels by eye, but over time you will get used to it.
This is a small and simple lesson. Try resizing the block yourself and see what happens. Practice is the most quick way learn something!
Description
Sets the width of block-level or replaceable elements (for example, the tag ). Width does not include the thickness of the borders around the element, padding, or margins.
Browsers do not handle widths the same way; the display result depends on the browser used.. In table 1 shows possible optionsand the resulting width.
| Internet Explorer | Opera 10+, Firefox, Chrome, Safari | Opera 9 | |
|---|---|---|---|
| Not specified (compatibility mode) | If the content exceeds the specified width, the block resizes to fit the content. Otherwise, the width of the block is equal to the width value. | In all cases, the browser operates according to the CSS specification. Namely, the width of the block is obtained by adding the values width , padding , margin and border . The contents of the block, if it does not fit in given dimensions, is displayed on top of the block. |
The width is equal to the width value. |
| Transitional HTML |
|||
| Strict HTML |
The width is formed by adding the values of width , padding , margin and border . If the contents of the block do not fit into the specified dimensions, they are displayed on top. |
The width is equal to the width value plus padding , margin , and border . If the contents of the block do not fit into the specified dimensions, they are displayed on top. |
|
| HTML 5 |
|||
| XHTML |
Syntax
width: value | interest | auto | inherit
Values
Any length units accepted in CSS are accepted as values - for example, pixels (px), inches (in), points (pt), etc. When using percentage notation, the width of the element is calculated depending on the width of the parent element. If the parent is not explicitly specified, then the browser window acts as it.
Auto Sets the width based on the element type and content. inherit Inherits the value of the parent.
HTML5 CSS2.1 IE Cr Op Sa Fx
Lorem ipsum dolor sit amet,consectetuer adipiscing elit,seddiem nonummy nibh euismod tincidunt ut lacreet dolore magna aliguam erat volutpat.
Result this example as it appears in Safari browser shown in Fig. 1.
Rice. 1. Block width
Object Model
document.getElementById("elementID ").style.width
Browsers
Internet Explorer 6 incorrectly defines width as min-width . In quirk mode, Internet Explorer versions up to and including 8.0 incorrectly calculate the width of an element without adding padding, margin, or border values to it.
Internet Explorer versions up to and including 7.0 do not support the inherit value.
Description
To resize an image using HTML, the height and width attributes are provided. You can use values in pixels or percentages. If a percentage entry is set, then the image dimensions are calculated relative to the parent element - the container where the tag is located . If there is no parent container, the browser window acts as it. In other words, width="100%" means that the image will be stretched across the entire width of the web page. Adding just one width or height attribute preserves the image's proportions and aspect ratio. The browser waits until the image is fully loaded to determine its original height and width.
Be sure to set the dimensions of all images on the web page. This makes the page load somewhat faster because the browser doesn't have to calculate the size of each image after receiving it. This statement is especially important for images placed inside a table.
The width and height of the image can be changed either smaller or larger. However, this does not affect the loading speed of the picture in any way, since the file size remains unchanged. Therefore, zoom out with caution as... This may cause confusion among readers as to why such a small picture is taking so long to load. But increasing the size leads to the opposite effect - the image size is large, but the file loads faster relative to an image of the same size. But the quality of the drawing deteriorates.
Syntax
| HTML |
|
| XHTML |
|
Values
Any positive integer in pixels or percentage.
Default value
The original width of the image.
HTML5 IE Cr Op Sa Fx

By default, block elements use autowidth. This means that the element will be stretched horizontally exactly as much as there is free space. The default height of block elements is set automatically, i.e. The browser stretches the content area vertically so that all content is displayed. To set custom dimensions for an element's content area, you can use the width and height properties.
The CSS width property allows you to set the width of the element's content area, and the height property allows you to set the height of the content area:
Note that the width and height properties determine the size of the content area only; to calculate the total width of a block element, you need to add the width of the content area, the left and right padding, and the width of the left and right border. The same goes for the overall height of the element, only all values are calculated vertically:

For this paragraph, we will set only the width and height.
This paragraph contains, in addition to width and height, an inner padding, a border and an outer padding.
Try »The example clearly shows that the second element takes up more space than the first. If we calculate using our formula, then the dimensions of the first paragraph are 150x100 pixels, and the dimensions of the second paragraph are:
| Overall height: | 5px | + | 10px | + | 100px | + | 10px | + | 5px | = 130px |
| upper frame | upper indentation | height | lower indentation | lower frame |
that is, 180x130 pixels.
Element Overflow
Once you have determined the width and height for an element, you should pay attention to one important point - the content located inside the element may exceed the specified block size. In this case, some of the content will go beyond the boundaries of the element. To avoid this unpleasant moment, you can use the CSS overflow property. The overflow property tells the browser what to do if the content of a block exceeds its size. This property can take one of four values:
- visible - the default value used by the browser. Setting this value will have the same effect as not setting the overflow property.
- scroll - adds vertical and horizontal scroll bars to an element.
- auto - adds scroll bars if necessary.
- hidden - hides part of the content that extends beyond the boundaries of the block element.

Hello, dear readers! Today we will look at how to set the sizes of block elements of a web page with using css properties and configure the display of content if it does not fit in the element.
width and height - width and height of elements in css
Using the width and height style attributes, you can set the width and height of block elements, respectively:
width: auto|<ширина>|inherit
height: auto|<ширина>|inherit
As values, you can use any units of measurement available in css - for example, pixels (px), inches (in), points (pt), etc.:
p (width:200px; height:150px)
In addition to absolute units, you can set the relative size of elements as a percentage. In this case, the width and height of the element will depend on the width and height of the parent element. If the parent is not explicitly specified, the dimensions will depend on the browser window.
div (width:40%;)
Auto leaves control of element sizing to the web browser and is the default value. In this case, the dimensions of the element will be such that it completely fits all its contents.
Let's look at a few examples.
Welcome to our automotive website. Here you will find many interesting and useful articles about cars, their technical specifications and features.
Result:
In this example, we created a div and nested a paragraph p with text inside it. For the div, we strictly set the dimensions to 300 by 300 pixels. The p element has width and height property values equal to auto, so as you can see in the screenshot, its width is set equal to the width of the parent element, and its height is such that it fits all the text contained in the paragraph.
Now let's change css settings for paragraph p and set fixed dimensions:
Layer2(
background: #eee;
width:250px;
}
Result:

As you can see, the width of the paragraph has become narrower and equal to 250 pixels, and its height has increased so that the text fits, since the height parameter remained equal to auto.
Now let's set the height and width of the paragraph in percentages:
Layer2(
background: #eee;
width:50%;
height:50%;
}
Result:

As you can see in the picture, the width of the p element has become equal to half the width of the div element. And the height increased and became equal to 75 percent of the height of the div.
When specifying the width and height of any elements in relative units, you may need to specify the minimum and maximum possible sizes. After all, for example, when resizing the browser window, the dimensions of the element can decrease and increase to such a size that the readability of the site becomes very low.
You can define the minimum width and height using the min-width and min-heigh attributes:
min-width:<ширина>
min-height:<высота>
Similar style attributes max-width and max-height allow you to set maximum sizes:
max-width:<ширина>
max-height:<высота>
It is clear that when setting the maximum and minimum values for height and width, the dimensions of the element cannot become greater than the maximum and less than the minimum values.
It is worth clarifying that the task height and width parameters only make sense for block tags, since for inline elements these parameters are not processed by the browser.
It may happen that when setting rigid parameters for the height and width of an element, the content it contains may not fit into the limited area.
For example, let’s reduce the size of paragraph p from the examples discussed above to 100 pixels:
Layer2(
background: #eee;
width:100px;
height:100px;
}
Result:

As you can see, the text has gone beyond the boundaries of the paragraph and it doesn’t look very nice. To avoid such situations, there is a CSS rule - overflow.
Overflow parameter for hiding (hidden, visible) or scrolling (scroll, auto) content
Content overflow can occur when both the width and height of an element are constrained. Let's look at two paragraphs:
First paragraph text
Second paragraph text
Result:
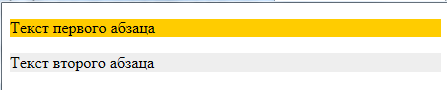
Since neither the width nor the height for paragraphs are specified, the browser independently calculates them based on its own understanding of the value of auto. As a result, the paragraphs took up all the available space in width, and in height in accordance with the content they contained.
Now let’s limit the width of the first paragraph:
First paragraph text
Second paragraph text
Result:

The width of the paragraph was expectedly reduced, and the height was set to accommodate the entire text.
Well, now let’s limit the height of the first paragraph:
First paragraph text
Second paragraph text

As a result, it turned out that the text did not fit into such a limited paragraph and therefore it ran into the area of the lower neighbor. Accordingly, it is practically impossible to read the text in either the first or second paragraphs. It is to control the behavior of content in such situations that there is overflow rule:
overflow: visible|hidden|scroll|auto|inherit
By default, overflow is set to visible, which tells the browser to display content that does not fit in the container. The result can be seen in the example above.
The rule hides everything that does not fit in the container:

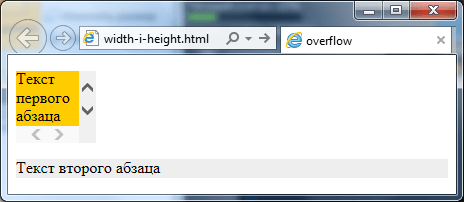
The scroll value will display vertical and horizontal scroll bars on the element even if all the content fits:
First paragraph text
Second paragraph text
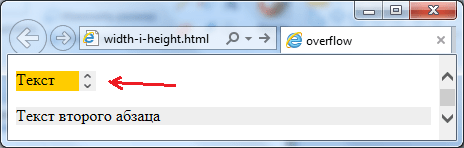
The most popular and logical solution if you need to make scroll bars for a container is the value auto. In this case, the browser itself will determine when and on which axes it should display scroll bars:
First paragraph text
Second paragraph text
Result:
To customize scrollbars, you can also use the overflow-x and overflow-y style attributes, which allow you to customize the display of scrolling on individual axes. Thus is responsible for horizontal axis, and for vertical axis.
Therefore, if, for example, you need horizontal scrolling to never appear in a paragraph, and vertical scrolling to appear only when necessary, then just write the following css rule:
p(overflow-x:hidden;overflow-y:auto;)
And the problem will be solved.
That's all. Until next time. Don't forget to subscribe to blog updates and I will be grateful if you use the social network buttons.