How to flash a Samsung phone: flashing methods. How to flash a Samsung phone, tablet or smartphone with a new version of Android using Odin (Step-by-step instructions)
Flashing your phone can fix many operational errors (for example, if your Samsung Galaxy firmware does not see the network). This can be done in several ways. Installing Android firmware via a PC provides the most flexibility when changing software and allows you to carry out the most complex operations that may arise during reinstallation operating system phone. But, in turn, such a procedure requires a more responsible approach and failures during flashing can be very expensive. Naturally, a lot also depends on the program that changes the software on the device - the so-called flasher. There are quite a large number of them to choose from. specific program The actual model of your phone largely influences it.
For communicator Samsung Galaxy S GT-i9000 such a program is a special utility with a rather original name “Odin”, which will always help you reflash the phone when the need arises. For example, if you don’t know how to flash Galaxy S from Android 2.2 to Android 2.2.1. Or, if you bought your phone quite a long time ago and you still have the firmware installed on Android based 2.1, which slows down the device a little. After all, the official one came out a long time ago Android firmware 2.2 for Samsung Galaxy. 3 - 4 months ago it was announced that the Russian version would be released official firmware based on Android 2.3. As you can see, progress does not stand still and sooner or later you will have a question about flashing your phone. Therefore, knowing how to work with the Odin program will always be useful to you.
Before you start using it, carefully study the FAQ on firmware using the "Odin Multiloader" program for Samsung i9000.
To successfully complete the phone flashing process, perform only those operations that are described in the instructions for flashing the i9000 firmware. And then you will be able to make only positive adjustments to the operation of your Samsung Galaxy S. "Odin" is a fairly easy-to-learn program, but it will only give the desired result if you strictly fulfill all the requirements for flashing the phone.
Instructions for firmware Samsung Galaxy i9000
1. Check the connection and the presence of all necessary drivers. You will also need support for three-button mode. It should be noted that under no circumstances should you turn on the mode USB debugging on your Samsung Galaxy S. Firmware via "Odin", the driver of which may not be available on the PC, will take a little longer the first time - you need to install all the drivers necessary for it to work. If you have already used "Odin", then you can skip the first point.
To prepare for installing the firmware, you must complete the following steps:
Download and install the drivers necessary for operation (fresh Kies, flasher "Odin3");
Launch the three-button mode on the device (volume down+home+power), an image of a robot with a shovel should appear against the background of a yellow triangle; if you still don’t get this, then the three-button mode is not supported on your phone (how to restore support for the three-button mode - see the corresponding article on the website);
Connect the phone to the computer via USB (it is advisable to connect it to the connector on the back of the system unit);
Wait until the installation is completed and the drivers are recognized;
Disconnect USB, exit phone firmware mode.
If everything went well, you can proceed directly to the process of flashing the phone’s firmware.
2. Create a folder in which you will subsequently save all the firmware files unpacked from the archive, the "Odin3" program, and the pit 2.3 settings file for the Samsung Galaxy S GT-i9000.
3. Launch "Odin3" and close all other applications (including Samsung Kies). Depending on the firmware requirements, install required parameters: Re-partition, PHONE=MODEM, CSC=CSC, PIT. If, after completing the firmware, you want to reboot the phone yourself, then uncheck the "Autoreboot" item.
4. Launch three-button mode on your phone as described above.
5. Connect your device to your computer. It is necessary to follow the order - first the firmware mode is turned on, and then the phone can be connected to the PC. Not the other way around! If the ID:COM field turns yellow and the value COM appears, then the connection was normal and you can continue.
6. Click the Start button - the flashing process will start. A yellow bar and messages in the "Message" section will appear in the program window, indicating the status of the process.
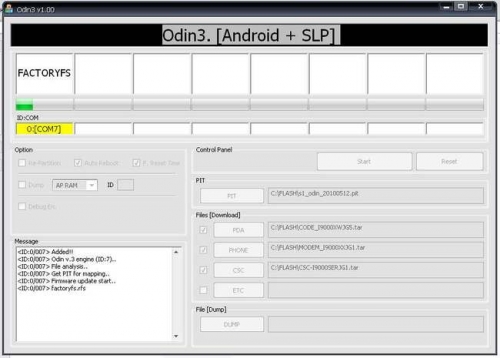
The flashing process takes on average three to five minutes. As a result, the first cell in which COM is displayed will turn blue and the phone will automatically reboot.
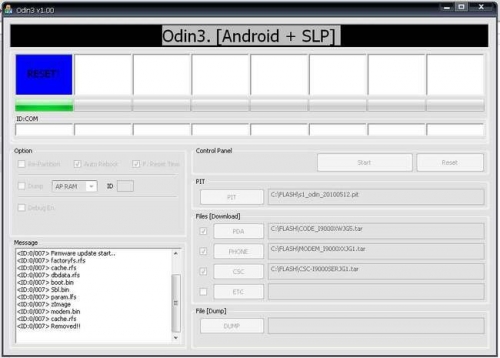
After this, you can disconnect the device from the computer.
If, at the time of unpacking the files, one of the cells turns red and a message appears about the absence of the multi CSC file, then you do not need to do anything. This error is not terrible and the process should not be stopped.
These instructions for flashing firmware via "Odin" will help you understand this program and allow you to update the software without contacting service center. But, if you are reflashing for the first time, then try to get a more experienced person to help you with this. Moreover, during flashing some problems may arise. They can affect all future work. In any case, you should not panic and immediately pull the USB cable out of your phone. Below are possible troubles that may occur.
1. The flashing process takes longer than five minutes. In this case, most likely the whole process just hung. That happens. Reconnect your phone to your PC and run the flashing process from the beginning.
2. During flashing, the message “USB-!-phone image” appeared, the phone does not boot. Most likely it was broken USB connection or the phone itself hung. In this case, remove and reinsert the battery and disconnect the device from the PC. Then enter the firmware mode again and connect the USB. Start the firmware process again.
4. The program stops flashing, the message E:Can"t mount /dev/block/[error number] appears. While flashing the phone, an error occurred. critical error and the process is stopped. The most ideal option would be to determine by the error number what went wrong. If you manage to fix it, then try starting the download again.
4. The message “Can”t open the serial(COM) port appeared. All threads completed. (succeed 0 / failed 1)". Most likely there are connection problems. Reconnect your phone. Try using a different one USB port, free up computer memory for third-party applications, disable others USB devices. Don't forget to exit three-button mode before disconnecting from your PC.
5. After flashing the firmware, the phone does not reboot. Repeat the flashing process again from the very beginning by selecting the Re-partition option in the settings. Be careful - all information on the memory card will be lost! Take care of creation backup copies data.
In other similar cases, you have two options: try to start the firmware again or stop your attempts. You decide.
It is also worth noting that during flashing it is better not to do anything extraneous on the computer. Samsung Kies must not be enabled!
Keep this information for yourself. Even if you are not going to master the flashing process on your own in the near future, the instructions for flashing Samsung Galaxy S firmware can come in handy at any time.
At some point telephone manager OS, and in relatively outdated modifications the service software, needs updating. Today, in modern devices, the process of replacing system software has been significantly eliminated. However, for many connoisseurs and owners of branded communication devices from the Korean manufacturer, the “Samsung” question often remains not completely clear. After all, very often on the Internet the user is faced with confusing instructions, and “playing” on a person’s ignorance often takes on the stupid contours of an amateur’s understatement.
Three universal ways to reflash a Samsung phone
Several reliable reprogramming methods will be presented to your attention. mobile devices communications, the use of which is determined only by the modification features of the widely represented line of Samsung phones. In other words, each group of cellular devices has its own solution.
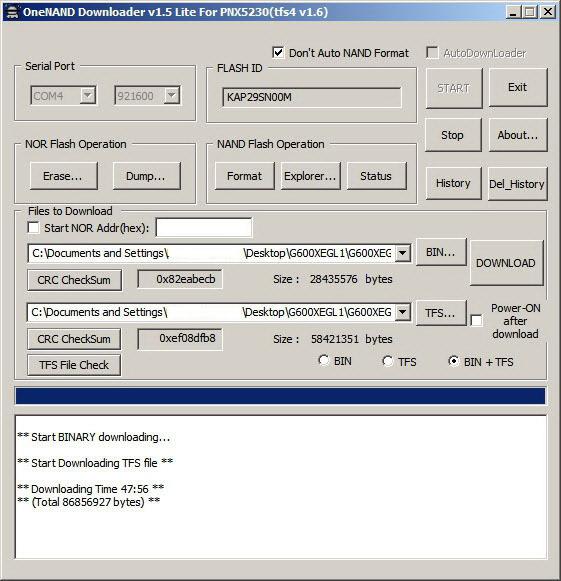
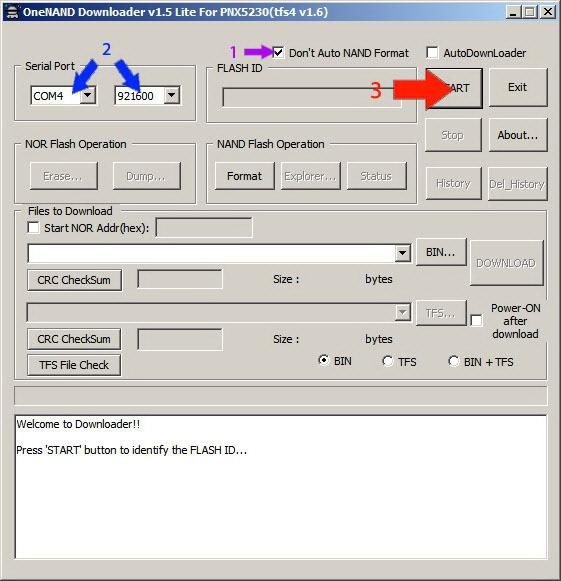
Method number 1: good old OneNAND Downloader
Phones of outdated models X100, C100, E620 and others that were removed relatively long ago are worthy of being software restored.
- Download and install the program presented in the title of the paragraph.
- Find and download the appropriate firmware for your software version.
The combination *#1234# or *#9999# allows you to find out the software used by the device. Often identification information about the device’s software is located on a sticker under the battery.
The phone battery must be charged at least 50%.
- Press the “Start” button and connect the switched off device to the computer. Briefly press the red button (hang up) on the device panel.
- Then activate the "Download" button. After a somewhat lengthy wait, the question “how to reflash a Samsung phone will be practically resolved for you.
Of course, many of the nuances of reprogramming old software were not taken into account in these instructions. Often, before flashing the firmware, the “Erase” function is used, and actions are also used that lead to the formatting of a separate area of the phone’s memory. However, you can study the issue in detail if you read a sufficient amount of any specialized literature. Nevertheless, the specifics are presented in full.
Method number 2: air connection
More modern mobile devices support the “FOTA” method.
- You need to go to the main menu of the phone.
- Then open the “Settings” tab.
- The next item is “Device Information”.
- And finally, activate “Software Update”.
It is worth noting that the battery must be at least half charged. The Internet connection must be activated and free memory must exceed 100 MB.
Method No. 3: “Odin” program
Android-based smartphones are incredibly versatile, and the variety of service software can confuse anyone who is interested in practical solution question about how to reflash a Samsung phone. At the same time, using this software, you won't be disappointed.
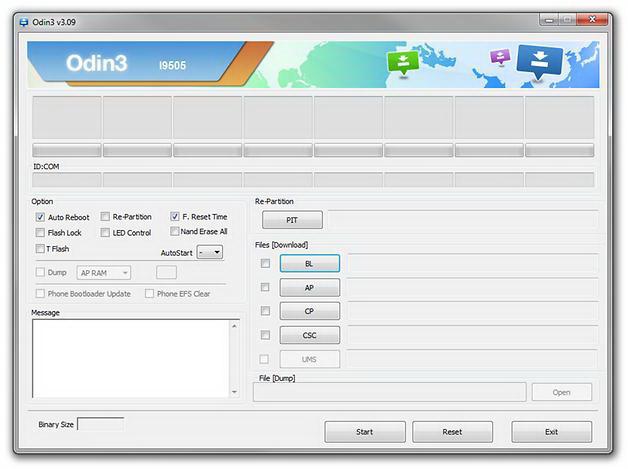
It is worth noting that smartphone software may have a different structure. That is, sometimes the software has up to 5 installation files. This program Samsung has five main checkboxes for flashing phone firmware:
- “Bootloader” - for a file with “ABOOT” in its name.
- "PDA" - if you see "CODE".
- “PHONE” - when there is a name “MODEM”.
- "CSC" is the component of the same name.
- "PIT" - Rarely applicable, but the file will also be abbreviated "PIT".
Now you know that flashing a Samsung phone is, in general, not a particularly tricky matter. However, it requires attention and careful actions on the part of the user. The most important thing is not to violate the sequence of strictly defined actions and to follow some mandatory rules associated with the preparatory and active moments of the firmware:
- First of all, the condition of the battery is at least 50% charge.
- The firmware cable must be known to be in good working order.
- Under no circumstances should the computer be turned off during the process of reprogramming the phone, that is, the presence of a source uninterruptible power supply Necessarily.
- Interrupting the firmware is strictly prohibited.
That's probably all. Don't be afraid of rumors and look at the world more optimistically!
Why does this Samsung have such impressive popularity even today? It's all about the cost of the device, brand recognition and convenience that it offers Android platform. Put everything together and you get this device. But any operating system can begin to fail over time, which causes certain inconvenience in using the device. You can correct this situation and completely restore operation by flashing the Samsung GT-S5230 firmware. There is nothing complicated, you just need to be careful and follow the instructions given.
It can be called a "pioneer" in the field of cheap workhorses, which massively flooded the market. Not a bad design, Wi-Fi available (in S5230W models), a separate LaFleur series for girls. It is very easy to use, does not require any special knowledge of Android, and is simply good-looking.
MultiLoader v.5.65: |
https://yadi.sk/d/0yfGwpNKpLcNQ |
|
Drivers: |
https://yadi.sk/d/kuRD-hRTpLcae |
Firmware archives
S523MXEKE1: |
https://yadi.sk/d/1dmM_jCApLcqq |
|
S5230MMGJK2: |
https://yadi.sk/d/S3eiMuB6pLcuM |
|
S5230MREKE1: |
https://yadi.sk/d/T_N-DJf7pLcx4 |
|
S5230MXEIL2_KeegRuEdition: |
https://yadi.sk/d/Ax-nJEBPpLd3G |
|
S5230MXEJF1: |
https://yadi.sk/d/TQq7YQzvpLd6H |
|
S5230MXEKD1: |
https://yadi.sk/d/jn2od9BhpLd8s |
|
S5230WXEIL1: |
https://yadi.sk/d/7tFh04impLdBa |
|
S5230XEII2: |
https://yadi.sk/d/uoi0Q_mxpLdEq |
|
S5230XEII4: |
https://yadi.sk/d/VRLiI-QZpLdJ9 |
Toolkit for firmware
In order to reinstall the system, you will need:
- The device itself, there is no other way. The battery charge should not be below 50%. The first startup after the firmware “eats up” a lot of energy.
- Drivers for your phone. You can also install New PC Studio. In addition to the necessary software, an application for working with the gadget will be added.
- Micro USB cable.
- Stitcher.
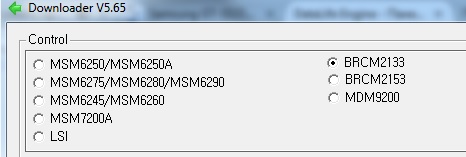
The latter is used MultiLoader_v5.65, since this is the most popular and stable version without failures or glitches.
Instructions for flashing Samsung GT-S5230 step by step
First, install the necessary drivers for subsequent work. The firmware can be easily downloaded from the link above; the files can be extracted to any folder on your local disk. Remember that there may be several model indices, so look CAREFULLY at the letter after the digital value of your specific model(S5230 (W,G,S, etc.)). Incorrect marking will turn the phone into a “brick”. You can find out the firmware version of your Samsung GT-S5230 using the combination: *#1234#
.
Samsung GT-S5230 configuration
- Depending on the smartphone model, dial the following combination of numbers: *#27236*# (or *#6984125*# or *#5239870*#).
- Next, select the item Pre-configuration and enter the password: *#73561*# (or *#7092463*#) and choose your country.
- To execute full reset, you need to dial the combination: *2767*3855# .
A few nuances
We strongly recommend checking the Micro USB in the device for serviceability. If it does not work correctly, or has been flooded with water, which can lead to oxidation of the contacts, the system simply does not recognize your phone. In most cases, simple mechanical brushing with a toothbrush helps.
In case of software failures, be it the inability to activate Boot mode or turn it on, you should contact a service center. You probably won't be able to do anything on your own.
I am the owner of the once top-end Samsung Galaxy S2. Lately it has started to slow down and become glitchy, which is why the question arose about rebooting and reflashing it. After re-reading many instructions with old and out-of-date data, I decided to write a short manual for everyone and myself too, from which you will learn how to reflash Samsung Galaxy any stamps quickly and safely.
This guide was tested on all Galaxy models, from the second generation to 5. I also had a chance to reflash a couple of Note 2 and 3 versions. But you can also apply these instructions to other Samsung phones.
How to reflash Samsung Galaxy
To reflash the phone we need:
- Required firmware. Download anywhere specifically for your model. If you need the Russian language, then the word SER must be present in the firmware name.
- Program Odin_v3.09. Download.
- USB Drivers so that the computer can see your phone via USB. We also download.
- Data cable.
Instructions for reflashing the phone:
Step 1. Download the firmware (single-file with the extension .md5) and unpack it to any location.
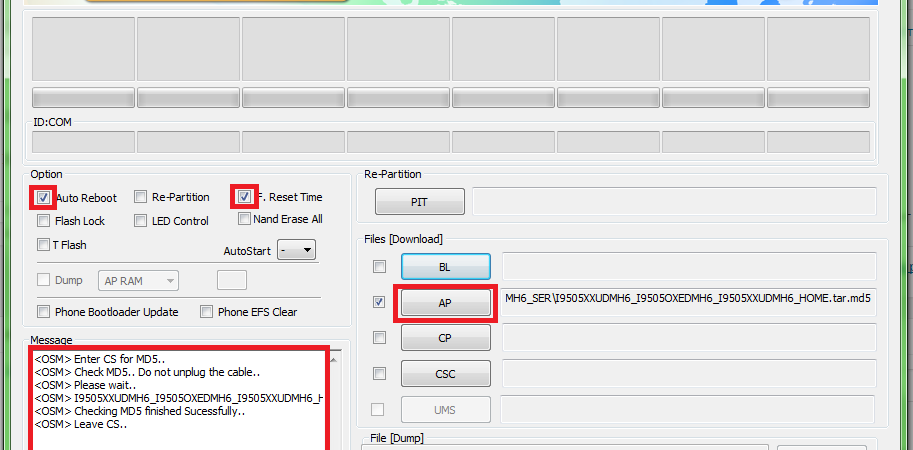
Step 2. Launch the Odin_v3.09 program, click on the AP button and select our firmware. The program will check it for several minutes, then write in the status window (small white window on the left) that the check was completed successfully (Checking MD5 finished Sucessfully).
Step 3. Preparing the phone for flashing. We enter ODIN MODE. To do this, turn off the phone and after turning it off completely, press the following buttons together: Volume (down, down) + center button + on/off button (Power). When you see a yellow triangle, press the button Volume (more, up).
Step 4. We connect the phone to the computer via a USB data cable. The Odin program will recognize your phone and write Added in the status window. After that, press the Start button and wait 10 minutes while the program uploads the firmware to your phone and installs it.
Step 5. Once everything is ready, the phone will reboot and Odin will tell you that everything is ready.
That's it, everything is so simple and easy. This is what the program window looks like, with what you need to work marked in red.
If you want to reset all parameters and format so to speak internal memory device to clean it of all garbage and other files, then this another story. I’ll say right away that it was this cleaning that helped me get rid of the brakes and lags of the device.
How to format Samsung Galaxy
The procedure is as follows:
- Turn off the phone.
- Press the following buttons together: Volume (up, more) - central button - on/off button. We are waiting for the menu to appear.
- We move through the menu using the volume button, and confirm our choice with the power off/on button. We need a line Wipe data/factory reset. We reach it and choose.
- Next, select Yes — delete all user data.
- We reboot your phone by selecting Reboot system now.
You have one of the class tablets in your hands Galaxy Tab or Galaxy Note and you find out that the company has released an Android OS update for this device, but the smartphone does not react to it in any way, and no entry appears about the possibility of updating the operating system. Even checking manually in the “about tablet” section, which is located in the settings menu, does not produce results. Well, well, this happens. You can try to do the following: format the data of the Google Services Framework - the application responsible for updates, or no matter how trivial it may sound - flash the device yourself.
For removing Google data Services Framework you need to open the settings menu of your tablet or smartphone and go to the “Applications” section, there is an “All” tab, you should find it in the list this application and click on it. In the window that opens after this, click “Erase data”, and, of course, after that you need to restart the device.
If after this the device does not see the presence of OS updates, you need to update the Android version with your own hands.
What is needed for this?! That's what:
1) Personal Computer with the presence of the Kies program, or rather with the device drivers, which are usually installed along with this program.
2) Odin program. You can download it from this.
3) Actually the firmware itself for the tablet. It can be found and subsequently downloaded in the section. Be sure to register on it in order for the download to become available.
4) USB cable, which is needed to connect the device to the computer.
If everything listed above is available, you can proceed with the firmware.
It is important to remember that manual firmware may void the warranty on the device itself, and also that the developers of the Odin program and our website bear absolutely no responsibility for damage to the smartphone in the event of incorrect firmware.
Step-by-step instructions for flashing devices with an updated version of Android using the Odin program.
Preparatory stage for firmware:1) Make sure your smartphone battery is charged at least 60%.
2) Disable everything on your PC antivirus programs and applications.
3) Check availability installed program Kies on your computer. Make sure it is not running. The best thing to do is simply end the program processes using the Task Manager.
4) If the Kies program is not installed, make sure that the PC to which the tablet will be connected has USB drivers companies
Firmware process:
1. Disconnect the device from the PC, turn it off and restart it into download mode by simultaneously pressing the power key and the volume down rocker. When the bootloader menu appears, confirm by pressing the Volume Up button to enter the “Download” download mode.
2. Run the Odin program on your PC, and be sure to make sure that Auto Reboot and Reset Time are checked.
3. Connect your device to your PC.
4. The Odin program will fix your tablet and one of the ID:COM windows will turn into a separate color.