Google account synchronization is not enabled on Android. Detailed setup of Gmail on Android - advanced mail management Deleting an account
If synchronization does not turn on for you Google account on Android, then you can forget about such a convenient feature as accessing contacts from any device with Internet access, or creating backup copy data.
This article is suitable for all brands that produce phones on Android 10/9/8/7: Samsung, HTC, Lenovo, LG, Sony, ZTE, Huawei, Meizu, Fly, Alcatel, Xiaomi, Nokia and others. We are not responsible for your actions.
Attention! You can ask your question to a specialist at the end of the article.
Reasons why Google and Android synchronization fails
Enable Google synchronization with Android
To understand the synchronization settings, you first need to know where to enable this feature.
- Go to "Settings".
- Open the “Accounts” section (“Personal data”, “Accounts”).
- If you don't have a Google account inside, you need to add one. You can create a new one account or add data to an existing one Google profile- login and password.
- Click on the added account to open its settings.
- To enable synchronization, move the switches next to the necessary services - contacts, Google Play Music, Google Fit, Google Photos, etc.
- To start synchronization right now, call up the additional menu and select “Synchronize” in it.
 Increase
 By default, app data, calendar, and contacts are synced. If you want to automatically sync with Google server photo, you will have to install Google app Photo. In its settings there is an item “Startup and synchronization”, after activation of which photos will be sent to cloud storage.
Automatic photo synchronization will work even after Google removal Photo. To disable it, you need to go to the application settings and move the “Startup and synchronization” switch to the inactive position.
 Increase
 Additional manipulations will also be needed to synchronize mail from the Gmail application. In order for data to be sent to the server, you need to check the box “ Gmail Sync" If mail synchronization isn't working, cleaning it up will help. internal memory phone from unnecessary files (if the storage is full) or deleting Gmail data.
Now let’s figure out what to do if your Android phone or tablet does not sync with Google accounts and displays an error.
This article is suitable for phones and tablets of all Android device manufacturers: Samsung, LG, Sony, Huawei, Xiaomi, HTC, ZTE, Fly, Alcatel and others. We are not responsible for your actions.
Synchronizing your Google account on your Android device is a very convenient feature. Thanks to it, part of the important information from a tablet or smartphone. When switching to a new gadget given information can be quickly restored.
For example, a list of contacts. When you apply account synchronization, when you switch to new phone the list of your contacts will be displayed on it in 1 minute and you will not have to manually enter everything again phone numbers. Let's look at cases with Google account synchronization errors on Android devices.
Causes of synchronization errors between Android and Google
When Android does not synchronize information with the Google server, the reasons must be sought primarily in the operation of your gadget. Errors can also occur on Google's side, but quite rarely. Such failures are quickly detected and corrected.
Increase
Users most often encounter a notification that indicates a failure, the exact cause of which is not clear. Perhaps it is with the actions of users or with incorrect settings to login. Devices with unofficial firmware may harm the system, so they will have to be removed and the gadget returned to the initial state.
The most unpleasant situation when a Google account synchronization error is displayed on Android may be “stuck synchronization.” In this case, the entire system freezes, and the error can be corrected after rebooting the tablet or smartphone.
A synchronization error may occur due to incorrect entry of personal data (login and password). You must enter the correct information that you received during registration. In extreme situations, you can recover your password.
Sometimes synchronization errors are due to incorrect system settings. You can reset to factory settings, but in most cases this is not necessary. Just go to settings and examine the included services.
Synchronization must be enabled for all accounts. First, you can deselect services that require authentication, and then reboot the gadget. Then, on the newly turned on device, you need to go to the accounts section and check the boxes next to the corresponding services.
In some situations, you will need to disable two-level authentication in your account security settings. You can also use the transfer of information to background and auto-sync.
If Android refuses to synchronize photos, mail, contacts and other information, perform the following steps:
- Reboot the device.
- Checking the stability of the Internet connection. We connect to Wi-Fi, if possible.
- We check that synchronization is enabled and the settings are configured correctly.
- Delete your Google account and add it again.
To delete an account, go to “Settings”, “Accounts”, then to “Google” and call up the additional menu (on the top right is a button in the form of 3 buttons). Now click “Delete”.

Increase
When deleting accounts, no data will be lost, as the account remains intact. We reboot the gadget, and the next time we turn it on, we add the Google profile again, specify the login and password.

Increase
If errors continue to occur during synchronization, you should add another Google account. If other accounts do not work normally, you need to reflash the gadget. It is recommended to use only official firmware, since custom assemblies have their drawbacks, which can lead to various system failures.
How to enable Google synchronization with Android?
To enable Google account synchronization, you must first go to “Settings” on Android. Then we scroll down the settings until we reach the block with the “Personal Data” settings. Go to “Accounts” or in other versions “Accounts”.

Increase
Then a list will be displayed with the accounts that you have logged into before on your Android. To enable synchronization, select Google account. If your Google account is not in the list, it means you are not logged in.
In this situation, you should click on “Add account”, this button is located at the bottom of the list, and then follow the instructions displayed on the screen.

Increase
After selecting a Google account, the user will be shown synchronization settings for of this account. Here you can disable or enable synchronization of many services, for example, Google Keep notes, Gmail, Chrome web browser and much more. To enable synchronization, move the switch opposite the required services to the “Enabled” position.

Increase
To start immediate account synchronization, you need to click on the button in the upper right corner of the screen. A menu will open where you should select “Synchronize”.

Increase
By default, information from applications, contacts and calendar are synchronized. If you want to automatically synchronize photos with Google servers, you need to download the Google Photos application. By going to the application settings, the “Startup and synchronization” line is available. When activated, photos will be sent to cloud storage.
Like most other operating systems, Android is not perfect. It may experience various glitches from time to time. Such failures can especially occur when installing applications not taken from PlayMarket. Problems may also arise when installing unofficial firmware. Account synchronization error is one of the most common. Let's try to find out how to get rid of this error.
Account synchronization error: typical failures
First of all, it is worth noting that when such problems occur, if the user is not always able to use some OS capabilities, you should not immediately blame everything on the device or operating system itself. Most often, users encounter such a message when some kind of failure occurs, the exact cause of which is not fully understood. However, it is worth noting that errors of this kind are usually associated with incorrect login settings, as well as with the actions of the user himself. In this review, we will not consider gadgets with unofficial firmware. In this case, the device itself may harm the operating system. The unofficial firmware will have to be removed and the device returned to its original state.
What should I do if an account synchronization error occurs?
In a situation where a Google Android account synchronization error occurs on a tablet or phone, the most unpleasant moment is “stuck synchronization.” As practice shows, in this case the entire system hangs. A simple reboot of the device can help fix the problem. This helps in most cases. Just remember how frozen programs in Windows start working again when you reboot.
How to fix the error?
Probably, an error synchronizing your Google Android account on a smartphone or tablet can be caused by incorrectly entering your password and login. Here you just need to correctly enter the data received during registration. The address is used as a login Email in G-mail. You can also try to recover your password.
How to check synchronization settings
In some cases, an error with account synchronization in Google Android may be due to incorrect settings of the system itself. You can try to return the device to factory settings, but in most cases such drastic measures are not required. You just need to go to the settings and check the enabled services. Synchronization should generally be turned on for all accounts. First, you need to uncheck all services that require authentication, and then reboot the device. Next, when the device is turned on again, you need to go to the accounts section again and check the boxes next to the corresponding services, including browser, data transfer, and the like. In some cases, it is mandatory to disable two-level authentication in your account security settings. In this case, it is necessary to enable automatic synchronization and transfer of information in the background.
Deleting an account
If all the methods described above do not help and the error associated with account synchronization appears again, you will have to take extreme measures, namely, deleting the existing account. To do this you need to use the settings menu. Here you need to select the accounts section. You should pay attention to your Google account. Log in, enter your Gmail address and confirm deletion using the menu command or button below. Now you need to reboot your devices. After this action, if there is an Internet connection, the system will prompt you to either create a new account or use existing registration data. You must enter your username and password and confirm your choice. If this method does not help resolve the problem, you will have to create a new account. At the same time, about restoring the contact list earlier installed applications you can forget.
Conclusion
Errors related to Google account synchronization are quite common. You can fight them with your own by simple means and methods, it is enough to use the mobile gadget itself. No connection to personal computer entering the installed control program is not required. It is also worth paying attention to the fact that this article did not address the problem of failures that may occur on devices with unofficial firmware. The thing is that when installing unofficial updates, a rather serious problem may arise related to their safe removal. This question requires special attention and maximum caution. Otherwise, the system can be rendered inoperable.
Like most others, it is not ideal. It goes without saying that failures may occur there, especially when installing applications not taken from the official service. Play Market, and installation of unofficial firmware. One of the most common is Google Android account synchronization error. Let's try to figure out how to get rid of it.
Google Android account sync error: typical glitches
First of all, we note that if such problems occur, when the user cannot use some of the system’s capabilities, you should not blame everything solely on the “operating system” or the device itself.
Most often, users encounter a message indicating a failure, the exact cause of which has not yet been clarified, but it can be assumed that it is associated solely with the actions of the user himself, as well as with incorrect login settings. Now gadgets with unofficial firmware will not be considered, since they themselves can harm the system and will have to be removed, returning the device to its original state.
Google Android account synchronization error: what to do?
The most unpleasant thing in a situation where a Google Android account synchronization error appears on a phone or tablet may be the so-called “stuck synchronization.”
In this case, as practice shows, the entire system hangs, and the failure can be corrected by simply rebooting the device. In most cases, this helps (think of frozen programs in Windows - when you reboot they work again).
Fixing a syntax error
It is likely that the Google Android account synchronization error on a tablet or smartphone may be caused by incorrectly entering your personal data (login and password).

Here you just need to enter the correct entries received during registration (the G-mail address is used as the login). As a last resort, you can try to recover your password.
Checking synchronization settings
Sometimes the Google Android account synchronization error is associated with incorrect settings in the system itself. You can, of course, try to return to factory settings, but in most cases this is not required. You just need to go to the settings and look at the enabled services.

As a rule, synchronization should be turned on for all accounts. To begin with, you can uncheck all services that require authentication, and then reboot the device. After this, when the device is turned on again, you should again enter the accounts section and check the boxes next to the appropriate services, including data transfer, browser, etc.
In some cases, it is mandatory to disable the two-level authentication system in your account security settings. In this case, it is also worth using auto-synchronization and data transfer to
Deleting an account
If all the methods given above do not help, and the Google Android account synchronization error appears again, you will have to take extreme measures - deleting the existing “account”.

To do this, use the settings menu, where you select the accounts section. Here we are interested in it, enter the Gmail address and confirm the deletion with the button below or the menu command.
Now, as is probably already clear, you should reboot the device, after which, if you have an Internet connection and try to log into Google services, the system will prompt you to either create new entry, or use existing registration data. Enter your username and password and confirm your choice. If this does not help (for example, on devices with installed firmware), you will have to create a new “account”, but in this case there can be no talk of any restoration of the contact list or previously installed applications.
Conclusion
Although errors of this type are very common, you can deal with them in the most simple methods and means that are not too complicated. It is enough to use only your mobile gadget. In this case, no connection to a computer with access to the installed control program is required.
In addition, it is worth noting that the problem of failures that occur on devices with firmware was not specifically addressed here. The fact is that when installing unofficial updates, a rather serious problem may arise regarding their safe deletion, which requires special attention and maximum caution. Otherwise, the entire system can be brought to a state of complete inoperability.
Otherwise, the standard tools considered are the simplest and do not cause any difficulties for any user. Finally, it can be noted that you can also delete the data and cache of the service itself, but these parameters are relevant to the account synchronization error, as they say, insofar as.
Mobile operating system Android, like almost any modern platform, provides functionality that ensures the safety of the user’s personal data. One of these tools is synchronization of contacts, passwords, applications, calendar entries, etc. But what if such an important element of the OS stops working properly?
One of the common problems in this case is the lack of synchronization of the user's contact list. Such a failure may be short-term, in which case after certain time Data exchange with the Google cloud is restored.
It's another matter when the termination of contact synchronization is permanent. We will talk further about how to correct such an error in the system.
Before performing the steps described below, you should double-check whether the device is connected to the Internet. Just open any page in a mobile web browser or launch an application that requires mandatory network access.
You should also be sure that you are logged into your Google account and there are no problems with its operation. To do this, open any application from the “Good Corporation” mobile application package, such as Gmail, Inbox, etc. Better yet, try installing any program from the Play Store.
And the last point - auto-sync must be turned on. If this function is activated, the necessary data is synchronized with the cloud in automatic mode without your direct participation.
To find out if it is enabled this option, you need to go to "Settings" — "Accounts" — "Google". Here in the additional menu (vertical ellipsis at the top right) the item should be checked "Auto-sync data".

If all of the above points are in perfect order, feel free to move on to ways to fix the contact synchronization error.
Method 1: Manually synchronize your Google account
The simplest solution, which in some cases can be effective.

If after performing these steps, synchronization begins and completes successfully, the problem is solved. Otherwise, we try other ways to resolve the error.
Method 2: Removing and Re-Adding Google Account
This option is even more likely to fix the problem with syncing contacts on your Android device. You just need to delete your authorized Google account and log in again.

Our next step is to add the newly deleted Google account to the device again.

By adding a Google account again, we start the data synchronization process from scratch.
Method 3: Force Synchronization
If the previous troubleshooting methods do not work, you will have to “cheat,” so to speak, and force the device to synchronize all data. There are two ways to do this.
The first method is to change the date and time settings.

As a result, your contacts and other data will be forcibly synchronized with the Google cloud.
Another option for forcing synchronization is using a dialer. Accordingly, it is suitable only for Android smartphones.
In this case, you need to open the Phone application or any other “dialer” and enter the following combination:
As a result, you should see the following message in the notification bar indicating a successful connection. 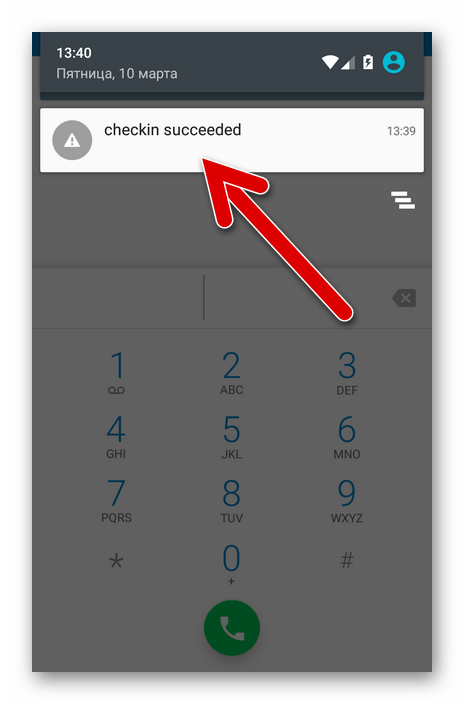
Method 4: Clear cache and delete data
Very effective method combating contact synchronization error is their complete removal and cleaning associated data.

Now let's start clearing the cache and contact list.

Method 5: Third Party App
It may happen that none of the methods described above will fix the problem with contact synchronization. In this case, we recommend using it from a third-party developer.
The “Fix for contact synchronization” program is able to identify and correct a number of errors that lead to the inability to synchronize contacts.

All you need to do to fix the problem is press a button "To correct" and follow further instructions of the application.