Installing unofficial android firmware. Everything you need to know about custom firmware for Android
OS popularity on Android based is constantly gaining momentum, becoming the most widespread among all mobile devices, but the giants Google and Apple are not going to give up their positions, which gives rise to relentless competition. Among the obvious advantages of Android, as a rule, is the ability to install custom ROMs, which significantly increases the performance of devices. This post will introduce you to all the intricacies of this process.
This guide will walk you through step by step universal way installing custom ROMs on smartphones or tablets with Android, so even if you are new to this, the information will be useful and very easy to understand.
One of the first nuances that is worth mentioning is the complete opposite of custom ROMs to official firmware and updates, which necessitates their manual installation. OTA from Google and any other manufacturers simply will not work here.
To install updates yourself, you first need to acquire root access on your device. Upon receipt, all factory restrictions will be canceled and access to the entire system will be opened. This means you can get rid of built-in applications, add new features, load complex applications, increase battery life, increase processor speed and change the system in other ways.
You need to be aware that when gaining root access, the user deprives his tablet or Android smartphone guarantees. Therefore, in the event of an unsuccessful operation on the device, there will be no one to turn to. There may be this option: you tried a custom ROM and didn’t like it, or you just want to restore the warranty. In these cases, it is possible to return to stock firmware. When you install it, you can again feel protected and your device, receive OTA updates, and all factory restrictions return to their places.
What definition can be given to custom ROMs? Essentially, these are unofficial versions of the stock operating system, which have all the standard features in their arsenal official firmware, plus a lot of new features and capabilities, tools and applications. Such firmware is optimized and has big amount settings; boast a completely unique interface. Among the most common this moment Custom ROMs include the following: ParanoidAndroid, AOKP, SlimBean, CyanogenMod, Omega and MIUI. In addition to the features mentioned above, they may include custom kernels, which in turn will allow you to overclock the processor of your device, thereby increasing its performance The reverse process is also possible, leading to a decrease clock frequency processor, which means lower power consumption. It is quite obvious that this will help increase the operating time Android devices.
Having decided to update your smartphone or tablet with a custom ROM, we begin with the mandatory preparation of our gadget for the operation. The standard set of actions used in this case is listed below:
Need to .
Install a custom recovery image ( or ). This will give you the opportunity to flash update files to the device. A stock image is not suitable in this case.
Make sure you have availability backup copies calls, SMS messages, Internet settings, installed applications, as well as media files. Move the latter freely to your PC. To save the current OS version, create a Nandroid backup.
Find USB cable from a smartphone or tablet.
Turn off security features on your device and computer.
Charge the device's battery to a sufficient level.
Run "Settings -> More -> Development Options -> USB debugging" on your Android device.
In this form, the device is completely ready for installing a custom ROM. We are looking for one suitable for specific device update file, then follow the steps below step by step guide. Be careful not to confuse the update file, otherwise you may break the device beyond repair.
Installing custom ROMs on Android devices (universal guide)
1. Download the update you need for Android.2. In case the custom ROM does not contain Google apps, you need to download Gapps.
3. Both files should be saved on your desktop, but not unpacked.
4. Connect the device to the PC.
5. For this action, use a USB cable.
6. Drag the above files onto your smartphone/tablet and onto your memory card.
7. Disconnect the device from the PC.
8. Turn off the device and wait a couple of seconds.
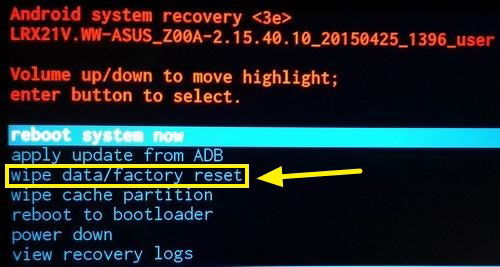
9. Boot the device into recovery mode.
10. Making a wipe: select the following options in the menu "wipe data factory reset", "wipe cache partition" and "wipe dalvick cache".
11. The system will be completely cleaned, which made it necessary to create backup copies before starting the process.
12. Return to the main recovery menu ( "+++go back+++").
13. Click on the option "install zip from SD card", and then "choose zip from SD card".
14. Find the update file and install it.
15. We do the same for Gapps.
16. We wait for the installation process to complete, return to the main menu by clicking "+++go back+++" and reboot the device - "reboot system now".
17. The operation is completed. Now the device should start in standard mode, but now with a new custom ROM.
Troubleshooting
It happened that the device froze during loading and did not respond to any actions for 10 minutes, then:
Reboot it again into recovery;
Click on the option" wipe data factory reset" and "wipe cache partition";
Go back to the main menu and reboot your smartphone/tablet.
If this method does not help, you can restore the Nandroid backup. In this case, you need to use the recovery mode again by clicking on the option " backup and restore".
But there is very little information on how to install them specifically on your smartphone or tablet model, or it is scattered across the Internet.
This article only applies to installing custom firmware using ZIP UPDATES, and not in any other way.
Briefly about the main thing...
operating room Android system, it will remain the same in Africa, whether you have Samsung, LG, HTC, Sony, Motorola or another manufacturer... There is a certain set of rules, a sequence of actions that are slightly supplemented depending on the manufacturer, but the process of installing custom firmware is similar to all devices. Here are the simple steps:
- Download the firmware
- Download Google services(not necessary)
- Make a backup (optional)
- Unlock Bootloader (one time, depending on the brand)
- Install Recovery (one time)
- Install the firmware and Google Services
- Reset data
- Waiting for first boot
There are a total of 8 steps (2 optional, 2 performed once). Of these, in the future you will repeat only 3 - 5 if suddenly you want to change the firmware.
Ready-made solution!
Website Android +1 I have prepared separate instructions for installing custom firmware for the following brands and manufacturers:
- Installing custom firmware on Nexus
- Installing custom firmware on Samsung
- Installing custom firmware on HTC
Where can you find custom firmware for your Android?
Unlock Bootloader
You are the happy owner of Sony, HTC, Huawei, Nexus, then you will have an additional procedure to install custom firmware - unlocking Bootloader.
- Unlock Bootloader Sony
- Unlock Bootloader HTC
- Unlock Bootloader Huawei
- Unlock Bootloader Nexus
This procedure is performed once and can be skipped in the future.
Find and download custom Recovery (or Kernel with Recovery)
You are moving by leaps and bounds towards installing your first custom firmware! Let's continue... You also need to download a custom Recovery, why do you ask?
There are several reasons:
- Some devices simply don’t have it (Recovery), but you need to install custom firmware and GAPPS from it
- It will not be possible to install custom firmware from the original Recovery (if there is one) due to the fact that there is no manufacturer’s signature there, and custom Recovery disables the signature and allows the installation of various ZIP updates, including custom firmware.
In some cases Recovery is built into the Android kernel (Sony, sometimes Samsung) so you need to look for a kernel with CWM or TWRP Recovery instead of just looking for Recovery.
For those who read to the end... Would you like to see a video review of the installation of Custom Firmware? Write a review in the comments!
Custom firmware is an unofficial version of software that is developed for Android by individual groups of programmers or users. Its installation is attractive because the device can be enriched with additional functions, some of them can be expanded, or, finally, more user rights can be obtained.
Unofficial versions of software often have additional features
In addition, many device owners on Android platform install similar firmware in order to increase speed and . Setting up custom software is quite simple, so we will look at a couple of options for carrying out this process.
Please note that if you have installed such software, your device will no longer be under official warranty.
Obtaining Root rights
If you decide to install new software on your device, then you need to obtain administrator rights to be able to make changes to system parameters. In the Android store you can download the z4root or Universal AndRoot applications. They will allow you to get root rights so that you can reflash the equipment in the future.
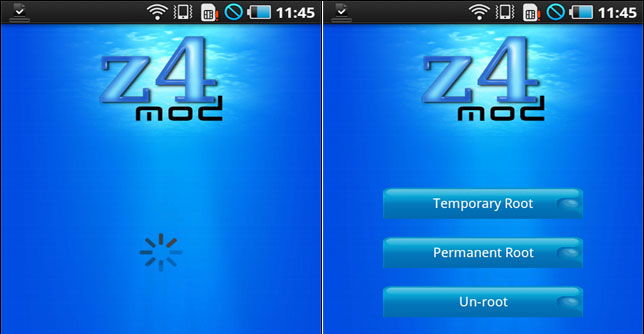
It is worth clarifying that when performing all these actions with Android tablet, contacts, etc., so follow them backup. But the multimedia files on the memory card will remain intact, you don’t have to worry about them.
Let's now look at which menus for Recovery can be used to install custom software easily and quickly.
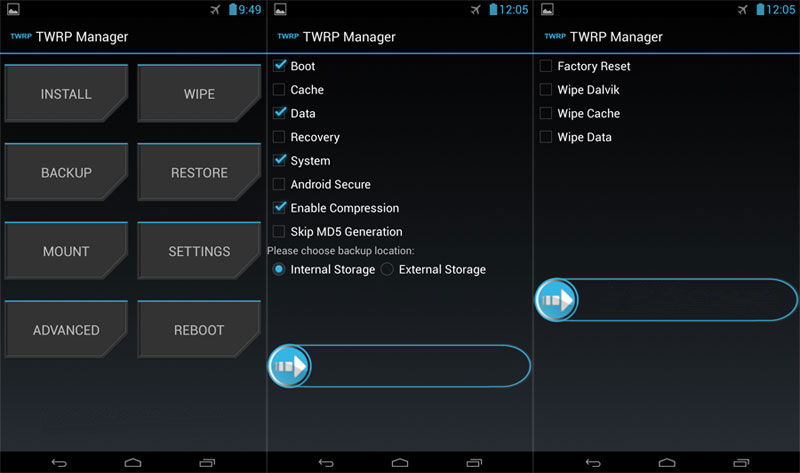
Installing custom firmware using Team Win Recovery Project
This utility is quite easy to use, so with its help you can quickly install firmware on Android. But before you start using it, download the firmware file or software that you want to install on the device and save it on a memory card.
Now let's move on to the software update process:
- Let's go to Recovery mode on an Android tablet - in most cases, you need to hold down the volume button to do this. The combination may be different for each individual equipment, so find out in advance. If you still don't find out, download the Quick Reboot app to your tablet. Give this application root rights so that it can enter Recovery mode;
- When you have successfully switched to this mode of operation, the first thing you need to do is go to the Wipe section and erase the partitions called /data and /system. To do this, at the bottom of the window you will see the corresponding functions that will allow you to return the equipment to factory settings;
Note. Do not use the formatting process to erase this data, as this will delete not only them, but also all other information from the Android tablet.
- Return to the main menu and open the Install section to download new firmware- to do this, find its file in the tablet’s memory.
After installation, your Android tablet will reboot, which may take longer than usual. Wait patiently for it to finish, after which the process of obtaining unofficial firmware is considered complete.
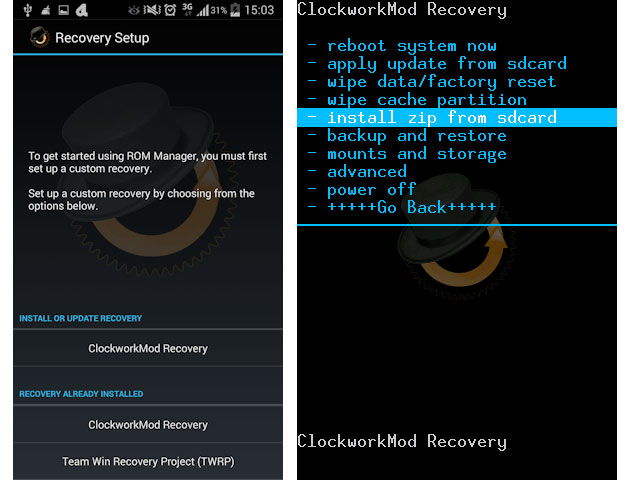
Install custom firmware using ROM Manager
You can download this application from the application Google Play for Android, after which you need to do the following:
- After launch, click on Recovery menu Setup - Clockwork Mod will load;
- Download from the Internet the firmware version that you want to install on your device, save it in the internal memory of the tablet;
- Next, we need to go to Recovery mode, for which hold down the volume and start keys or use another combination provided for a specific Android;
- The volume buttons allow you to navigate through the menu, and the power key is used to select a section or line.
Directly to install custom software, you should run the following commands one by one:
- In the wipe data/factory reset and wipe cache partition menu, you need to click confirm and execute the commands Wipe all user data and Wipe Cache in each of them;
- In the Advanced menu, select the Wipe command for Dalvik Cache;
- To download the firmware on Android, run install zip, after going into it you can specify the path to the file;
- When you found a file with software, return to the main menu of the Clockwork Mod manager and click reboot system now.
Thanks to these instructions, you can choose one of the methods to install custom firmware and download it to your Android device. As you can see, all this is done quite simply. If you want the performance of your Android equipment, you should install the unofficial version of the software for comfortable and convenient use.
Similar articles

Introduction It often happens that one of the Android users does not like the standard firmware of his smartphone or tablet. For example, due to unnecessary software, due to which the inner memory, or you simply don’t like the functionality of some programs and want to replace them with others. Intensified searches for custom firmware begin, but they do not always give the desired result. What to do?