How to remove the battery from a Samsung galaxy tab 2 tablet
This guide is a translation of the article: http://www.ifixit.com/Teardown/Samsung-Galaxy-Tab-Teardown/4103/1.
Warning
This article is not a guide to action! All responsibility for collecting and disassembling your device lies with you.
Many manufacturers do not bear warranty obligations if the device has been disassembled by the user. If you do not want to lose the warranty for your device, check the terms of the warranty in the documentation or with the device manufacturer.
Tools used
Let's take a look inside the 7-inch Samsung tablet at Android based! Many thanks to the Engadget portal and editor Richard Lai personally for providing this unearthly device.
It's time to start disassembling!
So, the Samsung Galaxy Tab tablet is in the hands of iFixit specialists.
There have long been rumors that this tablet will become the “iPad Killer”. Let's check how justified they are.
Specifications:
- ARM Cortex-A8 Hummingbird processor with clock frequency 1 GHz for multimedia devices, based ARM architecture v7
- Built-in memory module with a capacity of 16 GB or 32 G + external expandable memory microSD
- RAM 512 MB
- 3.2 MP main camera on the back and 1.3 MP front-camera.
- operating room Android system 2.2 (Froyo) + Samsung TouchWiz proprietary software shell

When devices actually consist of one touch screen, coming up with an original design is very difficult. However, Samsung succeeded: white back panel stands out against the background of the front panel a la iPad.

At the bottom of the bezel are the standard Android OS touch controls, like most touchscreen phones.

A 3.2-megapixel main camera with an LED flash is somehow not enough for a device of this caliber, because even much smaller devices like the Droid 2 phone now have 5-megapixel cameras.

Galaxy Tab interfaces: headphone jack, SIM card slot, card slot microSD memory(supports up to 32 GB) and USB docking station.


Let's put it side by side Galaxy tablets Tab and iPad for comparison.
The Galaxy Tab is much smaller than its rival in size: 190.1 x 120.6 x 12.0 mm. iPad dimensions: 242.8 x 189.7 x 13.4 mm.
In terms of volume, the Galaxy Tab takes up 275.1 cm3, while the iPad takes up 617.2 cm3.

It's enough to devour the tablet with your eyes. Let's look for screws on it.
We pry up the plastic cover on both sides of the Apple-style docking station and find under it 2 three-blade Tri-wing screws.

Three-bladed screws are not the strongest barrier to opening the tablet by craftsmen. We've got a 26-bit screwdriver set (including Tri-wing) to keep you busy with your tablet.

How much does the dock remind you of Apple devices? Here are the USB cables for a visual comparison.

Using plastic tools for opening cases and guitar picks, we pry the front panel around the perimeter and detach it from the plastic back of the case.


Luckily, the Galaxy Tab doesn't have any self-destructive copper clips, unlike the iPad.

Once all the plastic clips are loosened, you can remove the back of the Galaxy Tab.

On the inside of the rear of the case we see a heavy electromagnetic shield plate located above the processor and memory chips on motherboard.
The plastic design of the rear of the case undoubtedly contributes to good reception when in use. wireless communication. The use of plastic allowed Samsung to bypass the creative methods of designers Apple iPad to improve signal transmission.

Almost half of the Galaxy Tab's usable space is occupied by the battery.
The battery is secured to the back panel with a single Phillips head screw.

To disconnect the battery, you need to pull its connector out of the socket on the motherboard.

The GalaxyT ab 3.7 V lithium-ion battery has a capacity of 14.8 Wh, or 4000 mAh.
According to Samsung, the battery provides enough energy for 7 hours of watching movies.
7 hours is not enough to watch your favorite movie trilogy. But the iPad would easily provide such an opportunity.

The Galaxy Tab's battery weighs 81 grams and is approximately 55% the weight and 60% of the capacity of the iPad's giant battery.

As you can see in the picture, Galaxy battery Tab is about 2 times smaller than the iPad's battery.

Using a plastic tool, unfasten the main camera cable connector.


Goodbye main camera...

To remove the motherboard, you must first disconnect several cables:
- headphone/microphone jack cable (circled in red)
- Volume button cable (circled in orange)
- touch screen cable (circled in yellow)
- plume LED backlight control buttons (circled in turquoise)
- display data cable (circled in blue)

The motherboard is secured to the back panel with 7 Phillips screws.

To remove the motherboard, you need to unclip it from the back panel.

The front camera is easily detached from the motherboard. 13.
On the front side of the motherboard there are (according to the UBM TechInsights portal):
- NAND flash memory SanDisk SDIN4C2 16 GB MLC (circled in red)
- Maxim 8998 power management integrated circuit (circled in orange)
- Samsung S5PC110A01 + Samsung KB100D100YM (1 GHz processor for Hummingbird multimedia devices + 8 GB MLC Flex OneNAND memory, 1 GB OneDRAM and 3 GB DDR memory For mobile devices) (circled in yellow)
- Infineon PM9801 modem (X-GOLD 616 HSDPA/HSUPA/EDGE) (circled in turquoise)
- Wolfson Microelectronics WM8994 audio codec (circled in blue)
- Infineon PMB5703 RF transceiver (circled in pink)

On the back of the motherboard are:
- Broadcom BCM4329 Receiver (Bluetooth/FM/WLAN) (circled in red)
- STMicroelectronics L3G4200D gyroscope (circled in orange)
- ATMEL MXT224 Touch Screen Controller (circled in yellow)
- Broadcom BCM4751 GPS receiver (circled in turquoise)
- 2 speakers near the docking station form the Galaxy Tab's audio system (circled in blue)

So what makes the Samsung Galaxy Tab real? iPad competitor? The answer lies in the processor.
The Galaxy Tab has a multimedia processor Samsung devices S5PC110A01.
Like the A4 processor in the iPad, the 1 GHz Hummingbird processor is based on the ARM architecture. body-on-body» to improve the speed and efficiency of internal processes.
Luckily, the headphone jack is not attached to the motherboard. So it’s easy to replace it if damaged if you accidentally drop the tablet with the headphones connected.
Apple had similar ideas for the iPad.

Lightly pry the display data cable, unclip the self-locking connector, and disconnect the cable from the bezel module.

The Galaxy Tab features a Super TFT LCD display that offers improved image quality and viewing angle compared to a conventional LCD screen.

Although the resolution Galaxy screen Tab (1024×600) below, why iPad screen(1024 x 768), it has a higher pixel density (169 pixels per inch for the Galaxy Tab versus 132 for the iPad).
169 pixels per inch is good, but clearly not enough for us. We prefer the iPhone 4's Retina display at 326 pixels per inch.

Easy to repair Samsung Galaxy Tab tablet: 6 out of 10(10 points means maximum simplicity).
- All components can be reached without using a soldering iron.
- The battery is user replaceable.
- Tri-wing screws are designed to be intimidating to novice repairmen, but they can be easily dealt with with a good set of screwdrivers with bits like those from iFixit.
- A heat gun is required to remove the LCD display.
- Opening the Galaxy Tab is quite a difficult task; You can't do this with plastic tools alone.
Like the competing model, the iPad 3G, the Samsung Galaxy Tab tablet could not withstand the onslaught of the iFixit experts.
Disassembly complete!


Let's figure it out together newest tablet from Samsung, Galaxy Note 10.1, and let's see if there's anything worthy of attention inside.
This guide is a translation of the article: http://www.ifixit.com/Teardown/Samsung-Galaxy-Note-10-1-Teardown/10144/1.
Warning
This article is not a guide to action! All responsibility for collecting and disassembling your device lies with you.
Many manufacturers do not bear warranty obligations if the device has been disassembled by the user. If you do not want to lose the warranty for your device, check the terms of the warranty in the documentation or with the device manufacturer.
Tools used
So, we have in our hands a brand new copy of the Samsung Galaxy Note 10.1. Before we disassemble the tablet and reveal its secrets, let's look at some technical specifications:
- Quad-core processor clocked at 1.4 GHz
- Operating system Android 4.0
- Multi-touch display with multi-window interface, 1280 x 800 pixel resolution and 149 ppi density
- RAM 2 GB
- 16/32 GB of internal memory and up to 48 GB of external memory
- 5 MP main camera on the back and 1.9 MP front camera.


At the bottom end of the Galaxy Note 10.1 there is only a proprietary 30-pin dock connector and a microphone.

But on the top end of the Note 10.1 there is a bunch of connectors and other bells and whistles, including power and volume buttons, a MicroSD memory card slot, an infrared transceiver and a headphone jack.

At first glance it may seem that this is just a button on a plastic frame.

But no! Like a pencil inserted into a spiral bound notebook, the S Pen stylus is stored inside the tablet.
Developed in collaboration with Wacom, a leading manufacturer graphics tablets, S Pen stylus and touchscreen are designed to optimize note-taking.

At 8.9mm, the Note 10.1 is thinner than the 3rd generation iPad and almost as thick as the iPad 2.
By the way, a standard pencil has a thickness of 6.4 mm. So if compactness is what you value most when writing notes, paper and pencil are still your choice.

The Note 10.1's 10.1-inch screen is also larger than the iPad's 9.7-inch screen.

But paper and pencil win here too! Both the Note 10.1 and iPad are several inches shorter than a standard 13.9-inch piece of paper.

First, remove the panel painted silver. To do this, insert a case dismantling tool between this socket and the case and carefully move it around the perimeter of the socket, opening the latches that hold this socket in place.

We unscrew a few screws under the silver panel using a Phillips screwdriver, unfasten a few latches using a plastic tool and a guitar pick, and you're done!

We like the combination of screws and latches. The screws will provide a fairly good barrier if children want to tinker with the tablet, but they won’t hurt if something needs to be repaired inside.

At the first glance inside the Note 10.1, an abundance of connectors catches your eye. We counted 16!

A lot of connectors are a big plus in terms of repairs. When components are easy to reach and remove, repairs are greatly simplified.

The first component we extracted from Note tablet 10.1 – MicroSD memory card and vibration drive.
If there is a built-in Note memory 10.1 can support MicroSD memory cards with a capacity of up to 64 GB.

One by one, remove the front camera, LED flash and main camera.


Neither the 5 MP main camera nor the 2 MP front camera are remarkable in themselves, but what they are separate components, and not installed on one cable, very pleasing.
![]()


Although the Note 10.1's battery resembles Gulliver tied up by Lilliputians, these cables are very easy to detach.


The battery is actually very easy to remove, especially compared to the Nexus 7 model.

Exactly the same as in new iPad, the Note's battery makes up a significant portion of the tablet's weight. It weighs 136 grams. This is 23% of the total weight of the device, 594 g.
Still, we have a feeling that battery capacity had to be sacrificed to make the device so thin.
The battery has a voltage of 3.7 volts, a capacity of 7000 mAh or 25.90 Wh.

We happily disconnect the last of the remaining cables from the motherboard and remove the board from the device. Well, it wasn't difficult!


Sometimes electromagnetic shields are difficult and downright scary to remove, depending on how the manufacturer attaches them to the motherboard. In some cases, the shields are simply soldered to the motherboard (the worst option), in others, the frames of the shields are soldered, and their covers are removed.

...And in our case, the electromagnetic shields are simply screwed on. We love screws! Especially when they are used to attach components that usually have to be soldered off.
This is the first time we've seen a device with screwed-on electromagnetic shields. Respect to Samsung!

It seems that these shields serve not only to protect important components of the motherboard from electromagnetic interference, but also as heatsinks.

The green film on the inside of the electromagnetic shields covers a layer of thermal paste and thermal pads, which serve to remove heat from the motherboard through small holes at the top of the shields.

Main components of the motherboard:
- Samsung Exynos 4 Quad processor clocked at 1.4 GHz with integrated 3D graphics (circled in red)
- Wacom W8008 digitizer module (presumably for processing S Pen data) (circled in orange)
- Atmel mXT1664S touchscreen controller (circled in yellow)
- NAND Flash Samsung memory KLMAG2GE4A (circled in turquoise)
- Wolfson Microelectronics WM1811AE audio codec (circled in blue)
- Chip F0514A 430 1201KP411 (circled in pink)

Like the rest of the components that we unfastened earlier, the docking connector is easily removed - you just need to disconnect the cable and unscrew a couple of screws. Plus a few points for ease of repair!
It looks like at this point we have removed every possible screw from the device.
If you notice, there are only 5 screws of different lengths. This is good news, because in some devices the same amount is used just to attach the bottom panel.
The speakers were not held tightly in place by the adhesive tape, and we pryed them loose with a plastic spatula.

The Note 10.1's speakers aren't exactly glass-shattering, but they do a great job of producing a nice gurgling sound as you navigate the tablet's interface.
Hooray! Renovation enthusiasts everywhere, rejoice! The front glass and LCD display can be detached and replaced individually. iPhone developers should take note!

So, we removed the LCD display, let's look at its characteristics:
- diagonal size 10.1 inches
- resolution 1280 x 800 pixels
- density 149 pixels per inch
- support for multi-window interface and multi-touch input technology

While most of the tablet's small components can be easily pulled out without disassembling all the internal parts, the headphone jack held on long and stubbornly.
The headphone jack is not glued to the body very firmly, but until this stage it was difficult to get to it.
We pry it up with a plastic tool for opening cases and remove it.

Please note that this is the headphone jack.

There was a problem when trying to separate the LCD screen with frame from the bezel. It turned out that the frame was mounted on small plastic pins, threaded through the holes and secured on top with rings. It looks like you will have to break off these rings to remove the frame.
Fortunately, the frame is additionally secured with other latches and adhesive tape, so it should fit properly when assembled.

After fiddling with a plastic spatula, we pry up and separate the front glass from the display frame, confirming that the glass and digitizer can be replaced.


Simplicity Samsung repair Galaxy Note 10.1: 8 out of 10(10 points means maximum simplicity).
- Once the back panel is removed, most components can be replaced individually.
- The protective glass and LCD display can be replaced separately, which will significantly reduce the cost of repair if you "luckily" drop the Note on a concrete floor.
- All screws in the device are Phillips #0, and there are only 5 of them of different lengths.
- The components are standard. The absence of complex cables simplifies the replacement of individual components.
- The back panel is held in place by a number of latches and a couple of screws. No adhesive is used, but sometimes the latches are difficult to release properly.
- To remove the battery, you must first disconnect 4 cables and several strips of tape.
- The internal frame and some other components are glued tighter than we think is necessary.


How to disassemble the Samsung Galaxy Tab 2 7.0 p3100 / p3110 / p3113 tablet - disassemble
Instructions for subsequent repairs, for example, for replacing the display, touchscreen, cable, battery.
Here it is, the device that needs to be repaired:
![]()
1st stage of disassembly:
Allows you to access some cables and batteries.
At the first stage of disassembly, you can replace the tablet body and, for example, the battery.
The body is assembled with latches. Therefore, to first remove the back cover, you need to carefully unlatch all the latches around the perimeter.

This is best done using special openers -.


At the very beginning, after removing the cover, it is better to immediately disconnect the battery connector from the motherboard in order to de-energize all components, so as not to inadvertently short-circuit anything!!!

To remove the battery, you need to unscrew the screws in several places (five).
This is what the new one looks like:

2nd stage of disassembly:
Gives access to the motherboard, its removal and subsequent repair of components on the motherboard. Let's say soldering the charging connector and memory card slot (for p3100 and p3113 we also need to repair the SIM card connector).
First, unscrew all the screws.


Now let's say you can replace any cable or speakers. For example, quite often the and fails.


Removing the motherboard:

Of the failures of motherboard components, the most common: failure and
The following photos show the button cables, camera, antenna, and headphone jack.


3rd stage of disassembly:
At the final stage of disassembling the tablet, repair (replacement) or (other versions) becomes possible.
It is better to use gloves and be very careful not to scratch or damage working parts of the tablet.
Along the perimeter of the entire touchscreen there is an adhesive base (double-sided adhesive tape), due to which the sensor is tightly attached to the body. And due to this, dust does not get between the touch screen and the display.
To separate the touch glass from the body of the tablet, it must be constantly heated around the perimeter with a hair dryer ( Soldering Station), for example at a temperature of 120-250 degrees. And then, using spatulas, picks, openers, constantly poking in different places, gradually separate the touchscreen from the body panel.
There is a train in the middle, do not pull so as not to tear it off.
This is of course a very labor-intensive process. But there is no other way to replace the sensor and gain access to the screen.


After separating the touchscreen, we gain access to the display for its subsequent replacement.
And this is what the screen and touch look like:


You will be very grateful if you share this link to the instructions in your in social networks and blogs.
Original article in English:
http://www.ifixit.com/Teardown/Samsung-Galaxy-Tab-Teardown/4103/1.
Let's take a look inside Samsung's 7-inch Android tablet together! Many thanks to the Engadget portal and editor Richard Lai personally for providing this unearthly device.
It's time to start disassembling!
Here's what we need:
- guitar pick
- hot air gun or hair dryer
- special metal spatula (metal spudger)
- #00 Phillips screwdriver
- plastic tools for opening cases
- Tri-wing screwdriver
Important! Everything you do is done at your own risk. Remember: after disassembling the device you will lose the manufacturer's warranty.
So, the Samsung Galaxy Tab tablet is in the hands of iFixit specialists.
There have long been rumors that this tablet will become the “iPad Killer”. Let's check how justified they are.
Specifications:
- 1 GHz ARM Cortex-A8 Hummingbird multimedia processor based on ARMv7 architecture
- Built-in memory module with a capacity of 16 GB or 32 G + external expandable memory microSD
- RAM 512 MB
- 3.2 MP main camera on the back and 1.3 MP front camera.
- Operating system Android 2.2 (Froyo) + Samsung TouchWiz proprietary software shell
When devices essentially consist of a single touch screen, it is very difficult to come up with an original design. However, Samsung succeeded: the white back panel stands out against the background of the front panel, a la iPad.
At the bottom of the bezel are the standard Android OS touch controls, like most touchscreen phones.

A 3.2-megapixel main camera with an LED flash is somehow not enough for a device of this caliber, because even much smaller devices like the Droid 2 phone now have 5-megapixel cameras.
Galaxy Tab interfaces: headphone jack, SIM card slot, microSD memory card slot (supports up to 32 GB) and USB docking station.
Let's put the Galaxy Tab and iPad tablets side by side for comparison.
The Galaxy Tab is much smaller than its rival in size: 190.1 x 120.6 x 12.0 mm. iPad dimensions: 242.8 x 189.7 x 13.4 mm.
In terms of volume, the Galaxy Tab takes up 275.1 cm3, while the iPad takes up 617.2 cm3.
It's enough to devour the tablet with your eyes. Let's look for screws on it.
We pry up the plastic cover on both sides of the Apple-style docking station and find under it 2 three-blade Tri-wing screws.
Three-bladed screws are not the strongest barrier to opening the tablet by craftsmen. We've got a 26-bit screwdriver set (including Tri-wing) to keep you busy with your tablet.
How much does the dock remind you of Apple devices? Here are the USB cables for a visual comparison.
Using plastic tools for opening cases and guitar picks, we pry the front panel around the perimeter and detach it from the plastic back of the case.
Luckily, the Galaxy Tab doesn't have any self-destructive copper clips, unlike the iPad.
Once all the plastic clips are loosened, you can remove the back of the Galaxy Tab.
On the inside of the rear of the case we see a heavy electromagnetic shield plate located above the processor and memory chips on the motherboard.
The plastic design of the rear of the case undoubtedly contributes to good reception when using wireless communications. The use of plastic allowed Samsung to bypass the creative methods of Apple iPad designers to improve signal transmission.
Almost half of the Galaxy Tab's usable space is occupied by the battery.
The battery is secured to the back panel with a single Phillips head screw.
To disconnect the battery, you need to pull its connector out of the socket on the motherboard.
The GalaxyT ab 3.7 V lithium-ion battery has a capacity of 14.8 Wh, or 4000 mAh.
According to Samsung, the battery provides enough energy for 7 hours of watching movies.
7 hours is not enough to watch your favorite movie trilogy. But the iPad would easily provide such an opportunity.
The Galaxy Tab's battery weighs 81 grams and is approximately 55% the weight and 60% of the capacity of the iPad's giant battery.
As you can see in the picture, the Galaxy Tab battery is about 2 times smaller than the iPad battery.
Using a plastic tool, unfasten the main camera cable connector.
Goodbye main camera...
To remove the motherboard, you must first disconnect several cables:
- headphone/microphone jack cable (circled in red)
- Volume button cable (circled in orange)
- touch screen cable (circled in yellow)
- LED backlight cable for control buttons (circled in turquoise)
- display data cable (circled in blue)
The motherboard is secured to the back panel with 7 Phillips screws.
To remove the motherboard, you need to unclip it from the back panel.
The front camera is easily detached from the motherboard.


Let's take off these scary electromagnetic shields and look at electronic circuits Galaxy Tab.

On the front side of the motherboard there are (according to the UBM TechInsights portal):
- NAND flash memory SanDisk SDIN4C2 16 GB MLC (circled in red)
- Maxim 8998 power management integrated circuit (circled in orange)
- Samsung S5PC110A01 + Samsung KB100D100YM (1 GHz processor for Hummingbird multimedia devices + 8 GB MLC Flex OneNAND memory, 1 GB OneDRAM memory and 3 GB DDR memory for mobile devices) (circled in yellow)
- Infineon PM9801 modem (X-GOLD 616 HSDPA/HSUPA/EDGE) (circled in turquoise)
- Wolfson Microelectronics WM8994 audio codec (circled in blue)
- Infineon PMB5703 RF transceiver (circled in pink)
On the back of the motherboard are:
- Broadcom BCM4329 Receiver (Bluetooth/FM/WLAN) (circled in red)
- STMicroelectronics L3G4200D gyroscope (circled in orange)
- ATMEL MXT224 Touch Screen Controller (circled in yellow)
- Broadcom BCM4751 GPS receiver (circled in turquoise)
- 2 speakers near the docking station form the Galaxy Tab's audio system (circled in blue)
So what makes the Samsung Galaxy Tab a real iPad competitor? The answer lies in the processor.
The Galaxy Tab has a Samsung S5PC110A01 multimedia processor.
Like the A4 processor in the iPad, the 1 GHz Hummingbird processor is built on ARM architecture in a package-on-body design for faster, more efficient internal processes.

The headphone/microphone jack module is secured to the rear panel with a single Phillips screw.

You need to pry it slightly to unstick it and remove it from the Galaxy Tab case.

Luckily, the headphone jack is not attached to the motherboard. So it’s easy to replace it if damaged if you accidentally drop the tablet with the headphones connected.
Apple had similar ideas for the iPad.
Lightly pry the display data cable, unclip the self-locking connector, and disconnect the cable from the bezel module.
Unfortunately, it requires warming up to remove the front panel.
After heating the panel with a hot air gun and carefully prying it off, we separate it from the body.

The Atmel touchscreen is protected by a Corning Gorilla Glass front panel.

Apparently, the Galaxy Tab can also be used as armor protection.

The Galaxy Tab features a Super TFT LCD display that offers improved image quality and viewing angle compared to a conventional LCD screen.
Although the Galaxy Tab's screen resolution (1024 x 600) is lower than the iPad's (1024 x 768), it has a higher pixel density (169 pixels per inch for the Galaxy Tab versus 132 for the iPad).
169 pixels per inch is good, but clearly not enough for us. We prefer the iPhone 4's Retina display at 326 pixels per inch.
Easy to repair Samsung Galaxy Tab tablet: 6 out of 10(10 points means maximum simplicity).
- All components can be reached without using a soldering iron.
- The battery is user replaceable.
- Tri-wing screws are designed to be intimidating to novice repairmen, but they can be easily dealt with with a good set of screwdrivers with bits like those from iFixit.
- A heat gun is required to remove the LCD display.
- Opening the Galaxy Tab is quite a difficult task; You can't do this with plastic tools alone.
Like the competing model, the iPad 3G, the Samsung Galaxy Tab tablet could not withstand the onslaught of the iFixit experts.
Disassembly complete!
Whatever one may say, the Samsung Galaxy Tab 10.1 was born in order to create competition for the iPad 2... This tablet is the most thin tablet in the world, even thinner than the second iPad.
Instructions: how to disassemble Samsung Galaxy Tab 10.1
Let's start analyzing the Samsung Galaxy Tab 10.1.
- Use a spatula to pry the display around the entire perimeter and unclip the latches by touch. Then we take out the front module from back cover Samsung Galaxy Tab and turn it over.
- Using tweezers, disconnect the system connector cable, the sensor cable, and the display cable. Use tweezers to remove the battery connector. Unscrew the screws around the perimeter of the battery that secure it. Then remove the battery.
- Let's start analyzing the Galaxy Tab 10.1 motherboard. We disconnect all devices connected to it: coaxial cable, right polyphonic unit, left polyphonic unit, flash connector, main camera connector, 3G camera connector, headset connector, SIM receiver connector, side buttons connector (power and volume).
- Use a metal spatula to pry up the motherboard and remove it from the device case.
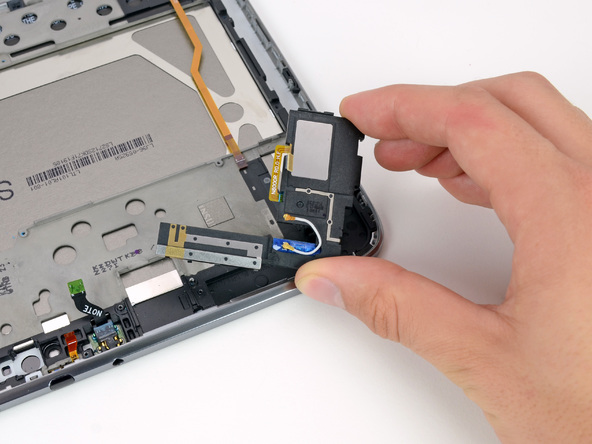
- Unscrew the screws securing the SIM receiver and remove it. Use tweezers to remove the headset jack. Next, use the same tweezers to remove the flash. Using a metal spatula, pry up the right polyphonic unit along with the GSM antenna and remove them. Then we pry up the left polyphonic unit along with the vibration motor and remove it. After this, remove the button covers.
- Using a screwdriver, unscrew the two screws securing the Galaxy Tab system connector. Use tweezers to remove the microphone from the frame. Use a screwdriver to pry and unstick the system connector.
- Use a metal spatula to pry up the display cable and remove it.
- We remove the protective screens from the system board. To do this, use a screwdriver to unscrew the screws securing the screens. We remove the remaining part of the screens using a screwdriver.
- On system board Galaxy Tab 10.1 are: processor, processor flash memory, user memory, radio module, power controller.
This is what it looks like completely disassembled Tablet PC Samsung Galaxy Tab 10.1.