Helpful tips for using the Galaxy S7 and Galaxy S7 Edge camera. How to maximize Galaxy S7 battery life. Capture action with burst mode
Make the most of your home screen
Both devices have displays with a resolution of 2560x1440 pixels. Thanks to this, you can place quite a lot of applications and widgets on your desktop. In fact, using a standard 4x4 grid is clearly a waste of precious space. Therefore, open the home screen settings by long pressing on an empty area of the screen, tap “Grid” and then select the 5x5 option. Confirm your selection by clicking the “Apply” button. There should be more space on the screen for the content you need.Select a topic
Some of you are already familiar with the theme store Samsung, since it was available on last year's flagships. Either way, we recommend choosing suitable topic perhaps dark shades. This way, the user interface will look different, plus you will save battery power since the Super AMOLED screen is more energy efficient when the color is black.
To find and install new topic, you need to again long press on any empty area to open the settings, but this time select “Themes”. Of course, you need a Samsung account, and I'm assuming you already have one. There are a huge number of themes available in the theme store of different subjects. Select any one you like, click the “Download” button, and then “Apply”. The device does not need to be rebooted.
Customize the panel with switches
These toggles are at the top of the notification panel, and you can arrange them the way you want. To do this, lower the curtain and press the triangle button, and then press “Change”. Next, drag frequently used switches to the first and second row as shown in the screenshots below. Don’t forget to save the changed settings by clicking on the “Done” button.
Select your preferred screen mode
Over the past few years, Samsung has begun introducing selectable display modes into its smartphones and tablets. The Galaxy S7 is no exception, but by default it has an adaptive mode selected, which does not display color accurately. Naturally, you can manually change the screen mode in the main settings of your smartphone. Open the Settings app, go to the Display section, and then to the Screen Mode item. Choose the mode that you like best. You will see the changes instantly, and you will be able to decide pretty quickly. The “Main” and “AMOLED Photo” modes will give you the best color reproduction.
Register more fingerprints
The first setting on the Galaxy S7 and Galaxy S7 Edge brings together many important settings. Once this process is complete, you will likely have at least one fingerprint already registered. But let's face it: you simply don't always hold the device in the same hand, and sometimes it will be necessary to unlock the device while it's laying on a table, for example.
Therefore, you need to register more fingerprints. The Galaxy S7 allows you to store 4 fingerprints at once, so why not take full advantage of this feature, right? Experience suggests that it is worthwhile to immediately register the thumbs and index fingers on both hands. This way, you won't find yourself in a situation where you can't unlock your phone.
To add more fingerprints, open the Settings app, then go to Lock screen & security. Select “Prints” from the list of options. If you have already added a fingerprint, then the system will ask you to place your finger on the scanner to log in, or enter a PIN code. Next, click “Add a fingerprint” and follow the instructions.
Disable Flipboard Briefing
Both the Galaxy S7 and Galaxy S7 Edge come with the Flipboard Briefing app, which we recommend disabling if you don't use it for any reason. This program is displayed as an additional screen, to the left of the main one. In some countries this service has a different name - Upday.
Place your finger on an empty area of the home screen to display settings. Swipe to the right as shown in the screenshots, and then turn the switch that appears to off.
Configure Always-On Display settings
Much has been written about new feature Always-on display on the Galaxy S7 and Galaxy S7 Edge, so let's get straight to setting it up. The main parameters of this function are located in the “Display” section.
Here you can choose the content that will be displayed on the off screen and how it will appear. Of course, the display can show the time, but if you are a busy person, then, for example, set your program for the day. It is also possible to install any picture, but it looks rather strange.
As it turned out, the always-on screen consumes much less energy than expected. Use this feature without worrying about battery life.
That's all?
Of course, there are still many possibilities for customization of new Samsung Galaxy S7 and Galaxy S7 Edge. Stay tuned to our website for more information.Smartphones became the best-selling flagship devices in the first half of 2016; the manufacturer barely has time to satisfy the demand for them. However, buying them is only the first step. You need to be able to get the most out of your expensive purchase, because the devices have no shortage of interesting and useful functions. Some of them will be listed below.
- Disable unnecessary applications (bloatware)
And operators mobile communications(in the West) they install unnecessary and often simply terrible applications and services on the devices they sell. But no need to worry! You can get rid of most of them with a few clicks. If applications can be deleted, they are available in the app drawer, from where you can drag them onto the delete icon.
If apps cannot be removed, there is a Disable icon at the top of the screen. Disabling prevents the application from running in background and show it in the application list. Another option is to open the application menu in settings and select the one you want from the list. Click on its name and the “Disable” button at the top of the screen.
- Setting up fingerprints
Galaxy S7 and S7 Edge have built-in Home button fingerprint sensor which is recommended for use. Thanks to Android 6.0 Marshmallow's support for the fingerprint sensor framework, there are applications and system functions to which the sensor adds security. To add and manage your fingerprints, open the Lock screen and security menu and the Fingerprints section. When adding a fingerprint, hold the device in your hands naturally, just as you would do it every day when unlocking it. The fingerprint can be used when making purchases in the payment system Samsung Pay, store Google Play and a number of other places.
Home samsung screen TouchWiz has become faster and more functional this year. On it you can customize the list of applications (app drawer). By default, the list lists the folders of some applications first, then everything else in random order. This makes the search difficult.
You can get rid of folders by clicking on the "Edit" button and then on the folder. This places the applications it contains in the main list. You can also create your own folders or change existing ones in the same editing interface. You can place applications in editing mode as you wish or use A-Z button for alphabetical order. New apps are always added to the end of the list, so you can press A-Z from time to time to restore alphabetical order.
- Disabling the Briefing screen
The Samsung Flipboard-based Briefing screen is arguably the worst part of the TouchWiz home screen, slow and unusable. Some carriers disable it by default. If your smartphone still has it, you will have to disable it yourself. This is done by long pressing on the home screen to switch to editing mode. You need to scroll left and uncheck Briefing.
When your home screen gets full, you need to free up space, resize widgets, and rearrange icons. This doesn't just apply to the Galaxy S7. There's a useful Move Apps icon at the top of the screen for this that appears when you drag an app.
You need to place the icon of the dragged application on the “Move applications”, a panel will appear at the top where you can temporarily place icons while the home screen is reorganized. Scrolling is available here, so the number of icons is unlimited.
- Moving and resizing home screens
As you add apps and widgets to your home screen, it becomes necessary to organize your icons. However, it is not necessary to change everything from scratch. You can simply place one of the panels in another place. A long press on the home screen opens edit mode, then another long press allows you to drag the panel to another location. If on home screen need more space, it can also be obtained in edit mode. You need to click on “Screen Grid” at the bottom and set the size to 4 x 5 or 5 x 5.
Samsung takes advantage of the power of the AMOLED screen with a new always-on mode. Some operators disable it, but you should still try it out and then decide. The always-on menu is located in the “Screen” settings.
You can choose to display the clock, calendar or wallpaper, but the main screen will be turned off. Various display styles are available.
- Setting the Edge Feed (Edge model only)
Edge feeds are only available on the Edge model with a side display and only when the device is in sleep mode. The panel is activated if you swipe it back and forth, news and other information appear. By scrolling (swiping) you can change panels. The panels can be helpful if you take a few minutes to set them up.Edge Feeds options are available in the "Edge screen" settings. Yahoo notifications and news may be set by default, but you can display stock quotes, step counter, download other news feeds and RSS from the store Samsung applications. You can change the order of panels.
- Customize Edge panels (Edge only)

The Edge model has several features not available on the standard Galaxy S7. One of the most useful is the Edge panel. It's a small tab on the right side screen. Scrolling across it will allow you to access screens with shortcuts and information, including a toolbar with a ruler on it. These screens can be customized by clicking on the settings icon in the lower left corner.
You can change the order of panels and remove unnecessary ones. A number of panels with application shortcuts have additional settings. IN Samsung store You can download additional panels. Edge can be removed completely or moved to another part of the screen, made smaller or transparent.
- Changing the display color mode
Samsung AMOLED panels offer very realistic colors - for some, even too realistic at the default settings. This can be corrected in the Display settings by choosing from four modes with different color ranges and saturation. These modes are adaptive, movie, photo and basic. The most realistic colors are produced by the Photo and Basic modes. Photo uses color range Adobe RGB and slightly brighter colors than the base one, which uses sRGB. Cinema and Adaptive reduce saturation to more “realistic” values.
The default camera mode produces great photos in automatic mode, but you can get even more out of the camera by turning on Pro mode. Click the Modes button in the bottom left corner of the screen and select Pro. This gives you complete control over focus, ISO, exposure and more. You can set some settings automatically and others manually.
Try the photos in RAW format. When enabled in Settings, you get a JPEG and an uncompressed RAW file that can be processed in apps like Lightroom or Snapseed.
- Quick camera launch
The Galaxy S7 has an excellent camera; the fastest way to launch it is by double-clicking the Home button. For devices of some operators, this function may be disabled by default. It is enabled in the camera application settings in the “Quick Launch” section.
The standard GS7 is good for one-handed use, but the Edge is a little big for this at 5.5 inches. Both devices have a useful feature called One-Handed Mode to keep objects on the screen within reach, which can be turned off by default.
To activate the mode, open " Additional features» in the main system settings. "One-handed mode" should be at the very top. After turning on, press the Home button three times and the mode will start. The screen will shrink down and to the right, but you can move it to the left using the arrow button. If desired, you can force the keyboard to move to the desired side. As a result, objects will be within the reach of your thumb.
- Front camera flash
Some smartphones like the Moto X Pure Edition have a flash for the front camera, but not the Galaxy S7. However, there is a replacement here. When switching to the front camera, check the flash option in the settings panel and the screen will light up white when shooting. Its brightness will allow you to illuminate the objects you are shooting.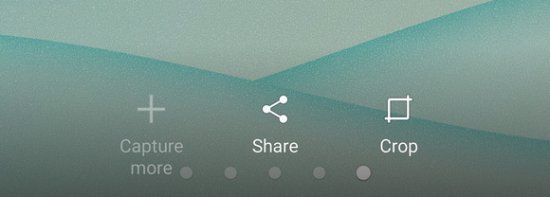
Galaxy S7 and S7 Edge received a feature that previously appeared in Galaxy Note 5 - Smart Capture. This is a set of functions available after taking a screenshot. Three buttons appear at the bottom of the screenshot screen to provide quick access to the ability to send a screenshot, crop, and a Capture more button. The latter allows you to scroll down the screen and take a new screenshot, and then combine the results into one image.
- Samsung Pay
Samsung Pay - exclusive to new Galaxy devices payment system. It has support in other contactless payment systems and works almost everywhere. Of course, not all banks are supported (in Russia, support for the service is promised in the middle of the year). If you have a supported card, Samsung allows you to pay at regular ATMs without NFC. Magnetic stripe data is transmitted over wireless network using a technology called MST. - Run multiple apps using multi-window mode

Until Android N came out, Samsung has the best multi-window implementation on Android. Not all applications support it, but they exist. The transition to multi-window mode is carried out by long pressing the “Browse” button. A scrollable list of applications will appear on half the screen from which you can select the one you need. The same thing happens on the other half, but if you were already in the application when you launched multi-window, then it will automatically be placed in the top half.
You can move back and forth in both applications. The dot in the center allows you to change the ratio of window sizes. Clicking on the separator opens options for repositioning windows, closing them, minimizing one to a floating window, and allowing you to drag elements between them.
- Game Launcher
Game Launcher is another feature that the operator can disable by default. To enable the feature, open "More features", "Games" will be at the top right. Enable Game Launcher and Game Tools.Game Launcher provides quick access to the screen with all installed games, which are found automatically. Unfound games can be added manually. Use Game Tools on the same screen to silence unimportant notifications during games and limit the frame rate to save power. There's built-in screen recording so games can be streamed online.
- Increase speed with download accelerator

When you need to download something as quickly as possible, the GS7 offers a Download Booster feature. It is disabled by default on all variants of the device, as it consumes mobile traffic. If you have it unlimited, you can enable the function in the “ Additional settings connections." This feature links Wi-Fi and Mobile Internet for increase bandwidth and speed up loading.
- Improve your sound with an equalizer
Samsung's mono speakers are nothing special, but you can buy expensive quality headphones. You can get the most out of them by using Samsung's built-in equalizer. It is located in the settings in the “Sounds and notifications” section in the “Sound quality and effects” subsection.There is a basic mode with preset settings, and you can also manually adjust the 7-band equalizer and set other parameters such as bass and reverb. There is also an Adapt Sound function that helps you customize the effects in your headphones.
Open the left navigation bar in the camera app. To do this, click on the arrow in the upper left corner (if the smartphone is in a horizontal position) or in the upper right corner (in a vertical position). Here you will find a huge number of settings that you can explore and experiment with. We will discuss many of them below. Also tap on "Mode" on the bottom right side of the screen to see the available shooting modes.
2. View your photos
When you click on the camera settings icon we mentioned in the first tip, look for the “Photo Viewer” option that you can turn on. Just like on a DSLR or compact camera, this feature allows you to quickly see how your photo turned out. This function is useful in order not to store a million unnecessary photos on your device.
3. Shoot like a pro
By selecting "Mode", you can select the "Pro" option to turn your smartphone into a professional camera with manual control over the settings. Pro mode is a paradise for photography enthusiasts. When enabled, the main camera screen is configured to show a second navigation setting on top of the camera app's main screen, plus changes options in the regular navigation bar. You can manually adjust autofocus, change white balance, change optical stabilization images (in auto mode ISO is 1250), adjust the speed of pictures and compensate the exposure. The navigation bar has been redesigned to add some context-sensitive functionality. You can choose between multi-point autofocus or center autofocus, three metering modes (center, matrix and spot). You can also select RAW shooting in the settings menu.
4. Ctake noteRAW
You can enable RAW shooting using the camera settings menu. With this option enabled, the S7 automatically saves each photo in two types - as uncompressed and raw RAW .DNG and JPG files. To view RAW images you will need additional software tool, For example, Adobe Lightroom. Such files cannot be viewed on the device itself, and they can quickly take up precious memory. However, with RAW files you get so much information about the image that many poorly taken photos can be easily saved with the help of an image editor.
5. Manual shutter speed adjustment (especially in low light conditions)
In Pro mode, manual adjustment can be especially useful for minimizing image blur. And that's why. Smartphone cameras often slow the shutter speed down by 1/5 to 1/15 of a second in low light conditions to maximize the amount of light entering. If you and your subject are stationary, you can get a good image, but these photos often turn out blurry. If you manually set the speed in the range of 1/30-1/60, you will have a better chance of getting a clear image. This tip will be even more useful if you shoot in RAW, as these images have more data and can be adjusted to compensate for poor exposure.
6. Turn on the lines
In the camera settings, turn on "Grid Lines" to get two options for the image. The first one allows you to use "Grid Lines" to follow the "Rule of Three". It means that you must place the object at the intersection point of the grid, since the viewer's eye will focus on them first.
The second option is for Instagram lovers with almost imperceptible square areas formed by superimposed lines. You can view the resulting image in its entirety, or you can select a square photo optimized for a social network.
7. Browse your compositions
While you are aligning the image to attract the primary attention of the viewer to the subject, keep an eye on what is located in its background. Avoid foreign objects, tangled wires, cutlery, or even people passing at the wrong time. Feel free to move elements around or ask those you're filming to move to the desired location. Cleaning up the background and optimizing the composition will help your subject fit perfectly into the frame and make the image itself more convincing.
8. Lock exposure and focus
For more exciting photos, lock exposure and focus by pressing and holding on your point of interest. This allows you to adjust the composition while you adjust the exposure. Pro mode gives you manual focus and fine-tuning for macro photography, as well as features that add versatility to the camera.
9. Take advantageHDRAuto
When you turn on HDR Auto, you get all the benefits of high dynamic range images. One click automatically takes the best of the bright and dark parts of the scene to create a balanced image. If the subject is backlit, it is great way improve the image without using flash.
10. Turning off the flash
You may actually need a flash for some shots. But in most cases, a flash on a smartphone is not the best solution and very often it produces light that is too bright for the given environment. This is especially true if the distance to the subject is small, for example, when photographing food. The Galaxy S7 has a relatively wide-open f/1.7 lens, meaning it's able to handle low light without resorting to flash. This is better than even the Apple iPhone 6s/6s Plus, which have f/2.2 lenses.
11. Experiment with focus and background
Photo enthusiasts have long exploited the lens's ability to create images with the subject sharply focused and the background blurred. Samsung lets you take advantage of this option by prompting you to take a photo, choosing a focus point, and changing the background. To select this feature, tap Mode and select Selective Focus.
12. Avoid digital zoom
You should avoid using digital zoom on your smartphone: it has the effect of cropping the photo so that when you zoom in, you lose clarity and detail. If there's a need for digital zoom, use your fingers to zoom or the S7's volume buttons when shooting. If you cannot do without magnification, use an additional case for an external lens. It has a thread on back cover to attach a wide-angle or telephoto lens. At around $120, the dual external lens makes photo scaling a viable option.
13. Take photos in motion
14. Create a moving panorama
15. Capture action with burst mode
While burst mode is interesting on other devices, the S7 comes in handy thanks to its blazingly fast autofocus. Press and hold the Volume Up button to start burst shooting. Keep in mind that this mode only works in good lighting; it will not work in a darkened room.
16. Take photos and videos simultaneously
Sometimes while shooting a video you notice something that you would like to save in the photo. Now you can take a photo of this frame without interrupting the video by clicking on the round camera button located under the video stop button.
17. BChoose your photo proportions and resolution
On the left navigation panel, next to your image at the bottom, above the gear sign, you will find an icon with the aspect ratio and resolution of the photo. Samsung lets you choose from six preset options, representing two photo resolutions and three aspect ratios: 4:3 (standard 35mm photo), 16:9 (widescreen photo), and 1:1 square. The latter is intended for those who like to post their photos on Instagram.
Changing the video resolution is also hidden in the settings menu. By default they are 1,920 by 1080 at 30fps, so if you want UHD 4K 3840 by 2160 video, you'll need to change that in the settings.
18. Take easy selfies and choose your selfie type
If you want to take a selfie, then you will need to switch to the front camera. Tap "Mode" in the lower right corner to choose from 4 options available for the front camera. We have already mentioned these shooting mode options to change the photo modes of the rear camera. A wide selfie allows you to take a panorama from left to right. But in low light conditions, you may end up with a blurry image. You can use front-facing flash, but this may affect the final color, so you'll need to experiment in different environments with the flash on and off. To take a selfie, place your finger on the heart rate monitor on the back or hold your smartphone upright. You can also choose one of the effects if you want to make your selfies unusual. For example, you can customize the shape of your face and eyes. The effects may be subtle, but they can benefit the final photo.
19. Organize a live broadcast
In the era of live video, you can use your smartphone to stream using the rear or front camera. Click the "Mode" button to select this function and organize direct posting of your content to YouTube.
20. Create video collages
The video collage feature can be used with both the front and rear cameras. It allows you to create short videos (3,6,9 or 12 seconds) that can be easily published on in social networks. You can choose one of 10 layouts. The final result can be saved and published as an MP4 file. The settings for this mode are located in the left navigation bar, where the timer button becomes contextual, showing length options and aspect ratios in the layout.
21. Use a timer
The timer button can be customized depending on your needs. Preset options are 2, 5 and 10 seconds, as well as 3 shots in a row. The last option is a guarantee that at least in one of the photos everyone will be with with open eyes and look at the camera, or at least in its direction.
22. Use a virtual photo to get a 360-degree view
Well, not quite 360 degrees, but pretty close to it. Virtual Capture mode is available for the rear and front cameras and allows you to rotate the subject, which creates a live image of the selected subject. The effect you get will depend on how long you take the panoramic photo around the subject.
23. Choose your filters
If you want to add effects while shooting, the S7 makes it very easy. Click Effect at the top of the left navigation bar and choose from nine default filters. Other effects can be downloaded additionally. If you are in Pro mode, you get a different set of effects, but they are not available in the left navigation bar, but at the top of the right Pro mode navigation bar.
24. Use the buttons
To quickly access the camera, go to the camera app's settings menu to enable quick access by double-clicking the Home button. This is one of the most convenient ways turning on the camera on smartphones that I have seen. You can take pictures by pressing the volume up and down buttons. This way, you can take pictures much faster, catching good moments. If you want to change the settings of these keys, for example to start shooting video or use them to zoom in on an image, you can change this in the camera settings.
25. Use built-in editing tools
The Gallery app for S7 has many editing tools built into the system. Some of them are quite standard, such as contrast, brightness and color tone changes. But there are others, in particular, the photo cropping tool allows you to cut out part of the photo and move it to another environment. I especially liked the drawing tool, which allows you to take notes on images.
In contact with
Classmates
The Samsung Galaxy S7 and Galaxy S7 Edge smartphones are very similar to the previous generation Galaxy S6, but there are differences in their operation. New features and additional tricks have appeared, hidden under the gloss of the screen and body. Below we list some of them.
1. How to use SD cards on Galaxy S7
To insert a microSD card into the Galaxy S7, take the SIM card tool and slide the slot halfway out. You will see that the top of the SIM card slot is the slot for microSD cards. Insert the card and slide it into the case.
To move downloaded apps to your SD card, go to Settings > Applications > Application Manager. Press the right application, Storage > Edit. This will transfer the application to the SD card. This does not apply to built-in applications.
Galaxy S7 doesn't support special storage mode Android systems Marshmallow, which displays the memory card as part of the built-in flash memory, but the device supports cards up to 200 GB. This will come in handy given the support for video recording at 4K resolution.
2. How to use Samsung Galaxy S7 underwater
The Samsung Galaxy S7 is IP68 rated, which means it is completely dustproof and can be dived into more than a meter of water. If you spill liquid on your S7, it is best to rinse the device and dry it with a paper towel or soft cloth. Touch screen Doesn't work underwater, but if you put it in camera mode while it's drying, you can use the volume keys to take photos.
3. How to use Motion Photos
 New camera feature in Galaxy S7. A bit reminiscent of HTC Zoe features or Apple's Live Photos, but it's actually different. To enable it, go to camera mode and press the adjustment wheel, then activate the function.
When viewing photos in the Gallery application, there will be a Motion icon. Click it and see the movement. You cannot export or use the video clip elsewhere. If you were a moment late or in a hurry and took a photo at the wrong moment, this function is designed to help. You can view the photo in motion and click on the “Capture” button on the desired frame. The resolution will be 960 x 720, but it's better than nothing.
There is no way to share Motion photos yet. When you try, you send the photo you captured in JPEG format. Let's see if Samsung develops this feature in the future.
4. How to take the best selfie
The Galaxy S7 has several new features to improve selfie photography. Front-camera brighter than before, which will help in low light conditions. Even more useful is the flash, like on some other smartphones. To turn on selfie flash, tap the flash icon on the left. When taking a photo, the screen lights up and acts as a flash. Afterwards, some rather strange editing tools are available in the S7 gallery. The Spotlight tool is most useful for highlighting a face in a crowd.
5. How to set up Always On display
The Galaxy S7 has an Always On feature where only part of the screen lights up to show the time and date. By default it shows time, date, time battery life and basic notification information. This functionality can be extended.
Open Settings > Display > Always On Screen; there is content available that can be constantly displayed on this screen. There are several clock styles, calendar clocks, several custom images. How to get more? Open Settings > Themes, load a new theme into Always On. By applying a theme, you will have a larger selection of background images. However, you cannot use your own images as backgrounds.
6. How to use the Edge side screen
 The side screen on the Samsung Galaxy S7 Edge is much more useful than the one on the S6 Edge. A number of functions are described below.
To use the S7's side screen, swipe from the right. Apps Edge will appear, where you can add the apps of your choice.
Swipe right to open Tasks Edge. Macros are supported here - for example, the ability to write text messages to contacts. You can also add shortcuts from your home screen here.
There are also custom edges - the well-forgotten old one from the Galaxy Note Edge. You can set the news panel, compass and ruler, weather. By clicking on the “Install” button, you can get other panels from the Samsung store. The sidebar development kit will be made available to third party developers, so the number of sidebars may increase.
7. How to maximize service life Galaxy batteries S7
The Galaxy S7 has better battery life than the S6, but you can optimize it to get even better.
If the battery is low, reduce the screen brightness. Then try power saving mode. It's located in Settings > Battery > Low Power Mode and turns off most background data. For example, your email won't automatically update until you log into the app.
For maximum savings there is an ultra mode. The screen becomes black and white, background data is eliminated, only the phone, Chrome, SMS, calculator, clock, notepad and native application are used Email from Samsung, not Gmail.
In contact with
In contact with
Several hidden features in the Galaxy S7 and S7 edge - you may not know about them. Perhaps they will be useful to you...
Some of the features we'll talk about are neatly hidden within TouchWiz's complex menu system. This shell is a real treasure trove of functions that never ceases to amaze us with one or another hidden trump card. Let's see what useful things can be found this time - time to discover the sophisticated user within you!
1. Smart Alert function - convenient, but somewhat energy-consuming
If you take yours Galaxy flagship and feel a slight vibration, it means the Smart Alert function is working. Vibration alerts you to an unread notification when you pick up your phone from a flat surface. This is a handy feature, but it may cause your device to drain faster than usual because it uses sensors to recognize when you pick it up. You can enable or disable the function in the Settings – Additional functions menu.

2. Compact screen mode
The hidden setting that . One user discovered it using Nova Launcher on his Galaxy S7. It turned out that a third-party launcher allows you to adjust the DPI scaling of the interface so that more information fits on the screen.

3. Automatic reboot
Your Galaxy S7 or S7 edge may reboot automatically from time to time to "optimize performance," as Samsung says. If you enable this feature, your device will restart when the screen is inactive, when you are not using it, when the charge is greater than 30%, and when SIM PIN protection is disabled. The function is available in the “Backup and reset” menu.

4. Energy-saving Material Black theme
The black color in devices with AMOLED screens is more battery-friendly than any other color due to the fact that individual pixels are not backlit. Therefore, downloading an all black theme can extend the life of your phone's battery. Find and download a theme from the Samsung store that changes all backgrounds to black, like this one.

5. Window fastening – well hidden, but still there
Window pinning is a feature that first appeared in Android Marshmallow and allows you to pin a specific application window on the screen so that it cannot be closed, activated by its interface or “Back” buttons. It hides deep in the depths of TouchWiz: go to Settings – Lock screen and security – Other security settings and scroll to the desired item. By turning on window pinning, you can pin any application from the recently launched menu. Very useful, for example, if you give your device to someone else and don't want them to start messing around with it.

6. Notification reminder
If you want your device to remind you of every notification you receive, this is possible in TouchWiz. The function is located in the Settings - Accessibility menu. Your device may vibrate after a certain period of time, set in seconds, if you have an unviewed notification. So you won't miss anything important.

7. Doorbell and baby crying detector
Did you know that your Galaxy S7 or S7 edge can detect doorbells and baby cries? But he can! Go to Settings - Accessibility - Hearing - Sound Detectors, and here you can activate these two interesting functions - Baby Monitor Sensor and Doorbell Detector.

8. Controlling the backlight of touch buttons
Unfortunately, Samsung removed the feature from TouchWiz that allowed users to control the backlight touch buttons. But this does not mean that they have completely lost this opportunity. With the Galaxy Button Lights app, you can control when your buttons turn off and when you want them to light up at all.
