USB port in BIOS. Tips for setting up the BIOS. Disable USB ports in BIOS settings
In this article we will figure out how to connect Android to a computer/laptop via USB as a flash drive and be able to transfer information without using a classic flash drive.
This article is suitable for all brands that produce phones on Android 9/8/7/6: Samsung, HTC, Lenovo, LG, Sony, ZTE, Huawei, Meizu, Fly, Alcatel, Xiaomi, Nokia and others. We are not responsible for your actions.
Before Android 4.4 KitKat, it was possible to connect via USB as a flash drive. The PC saw the device as a removable disk and provided the same rights: the user could also perform other actions.
Then in new versions of Android USB mode was replaced by MTP, in which only the data transfer function remained, and the same formatting did not work.
Setting up a USB connection
To manage the connection to a computer via USB, you need. To do this, add to Android settings section “For Developers” (if it doesn’t exist):
- Open settings.
- Go to the "About phone" or "About device" section.
- "Build number" or "MIUI version".
- Press (click) on this item until you see a message that you have become a developer (usually 7-10 clicks are enough).
After the developer section appears in the settings, you can enable USB debugging. The item is called that way, so you just need to move the slider to the “On” position and confirm the resolution.
 Increase
 Now you can connect the device to your computer via USB and select the operating mode. In recent Android versions the most used are:
- MTP - transfer any files from computer to phone and vice versa.
- PTP - transfer of photos, as well as transfer of files not supported in MTP mode.
- Charging only.
Connecting in USB storage mode
If you can't get used to using the media player, go back to using USB storage mode. For this you will need:
- Installed program USB MASS STORAGE Enabler.
This method may cause damage system files. In this case, you will have to reflash Android.
To connect Android to your computer as a drive:
- Launch USB MASS STORAGE Enabler.
- Grant superuser rights and agree to change how Selinux works.
- If the device is supported, the main application menu will open.
- Click "Enable USB MASS STORAGE".
 Increase
 Now, when connected to a PC, the phone or tablet will appear as a drive. To connect in MTP or PTP mode, just restart the device. Once you're done with mass storage mode, go back into the app and disable USB MASS STORAGE.
Every System Administrator should know how boot computer from USB flash drive. Most often, this skill is needed when installing an operating system. After all Windows distribution does not have to be on a CD. And, for example, it won’t even be possible to install Windows on a netbook any other way, because... it usually does not have a disk drive.
Today I will tell you how to set boot from a flash drive in BIOS various manufacturers. Regardless of which version you have, the procedure will be as follows:
1. We insert our bootable USB flash drive into the USB connector of the computer. It is advisable to insert it into the port located directly on motherboard, i.e. from the back of the system unit.
2. Turn on the computer and press the key Delete(or F2) to get into the BIOS. Depending on the manufacturer and BIOS version, other keys (Esc, F1, Tab) may be used, so you need to carefully watch the prompts on the screen.
In Bios, we can navigate through tabs and lines only using the keyboard.
Next, I will describe this process in detail using the example of different BIOS versions.
Settings Award Bios to boot from a flash drive
Award Bios: First, let's check if the USB controller is enabled. Let's go to “Integrated Peripherals”. Use the arrow on the keyboard to move down to the “USB Controller” item. Press the “Enter” key and select “Enable” in the window that appears (also using “Enter”). Opposite “USB Controller 2.0” there should also be “Enable”.
  Exit this tab by pressing “Esc”.
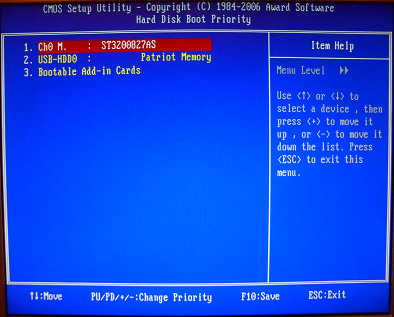
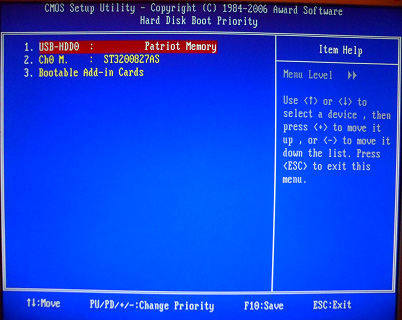
Then we go to “ Advanced BIOS Features” – “Hard Disk Boot Priority”. Now in my example the hard drive comes first, but the flash drive should be there.  We stand on the line with the name of our flash drive (Patriot Memory) and raise it to the very top using the “+” key on the keyboard.
  We leave here by pressing “Esc”.
Now on the line “First Boot Device” press “Enter”. We selected “CD-ROM”, but we need to set “USB-HDD” (if suddenly loading from a flash drive does not work, come back here and try setting “USB-FDD”). Let the second device be “Hard Disk”.  Exit this tab by pressing Esc.
Now exit the BIOS, saving the changes. To do this, click “Save & Exit Setup” – press the “Y” – “Enter” key. 
Setting up AMI Bios to boot from a flash drive
If, after entering Bios, you see such a screen, it means you have AMI Bios: First, let's check if the USB controller is enabled. Go to the “Advanced” – “USB Configuration” tab.
  Opposite the items “USB Function” and “USB 2.0 Controller” should be “Enabled”.
  If this is not the case, go to this line and press the “Enter” key. From the list that appears, select “Enabled” (also using “Enter”).
Then exit this tab by pressing “Esc”.
Go to the “Boot” – “Hard Disk Drives” tab.  Now my hard drive is in first place, but I need to put a flash drive here. We go to the first line, press “Enter” and in the window that appears, select our Patriot Memory flash drive.
  It should be like this:
  We leave here via “Esc”.
Select “Boot Device Priority”. Here, the first boot device must be a flash drive.  Press Esc.
Then we exit the Bios, saving all the settings made. To do this, go to “Exit” – “Exit & Save Changes” – “OK”. 
Setting up Phoenix-Award Bios to boot from a flash drive
If, after entering Bios, you see such a screen, it means you have Phoenix-Award BIOS: First, let's check if the USB controller is enabled. Go to the “Peripherals” tab – opposite the “USB Controller” and “USB 2.0 Controller” items there should be “Enabled”.
  Then go to the “Advanced” tab and opposite “First Boot Device” set “USB-HDD”.
  After that, exit the Bios, saving the changes. To do this, go to “Exit” – “Save & Exit Setup” – press the “Y” – “Enter” key
 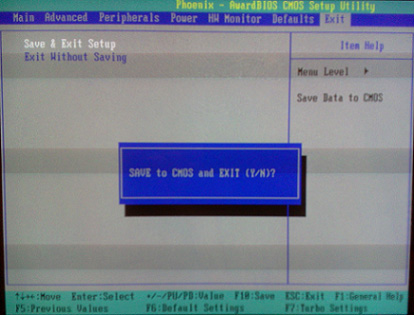 That's practically everything you need to know in order to boot from a flash drive. In my article, I described the process of setting up the BIOS of the most popular versions: Award And AMI. The third example presents Phoenix-Award Bios, which is much less common.
IN different versions The BIOS procedure described may be slightly different. But the main thing is that you understand the principle of setting itself.
By the way, I would also like to add: in order to choose which device to boot your computer from, it is not necessary to change the settings in the BIOS. You can immediately call up a special menu after turning on the computer to select boot devices (this can be done by pressing the F8, F10, F11, F12 or Esc key). In order not to guess with the keys, look carefully at the monitor immediately after turning it on. We need to have time to see an inscription like this: “Press Esc to selest boot device.” In my case, it was necessary to press “Esc”.  If on your computer BIOS UEFI, and you need to boot from a flash drive - you can check it out.
If you need reset forgotten password user using a bootable USB flash drive - how to do it.
You can enable USB ports on your laptop through the BIOS, Device Manager, Registry Editor, or Editor group policies. If access to the USB connectors was intentionally prohibited using special software, then you can unblock it in a program where the interface is blocked. All methods are available to ordinary users and do not require special training.
Disabling unnecessary devices
If the USB ports suddenly stopped working and you are now looking for how to turn them on, then the first thing to do is look to see if the device is connected to the laptop too much. When using a USB hub, the laptop may not be able to supply power to all devices, causing the USB ports to become unresponsive. Before you do USB setup in the BIOS, disconnect unnecessary equipment from the laptop and check if the ports work. If nothing has changed, then reboot the laptop and go into the BIOS.
Enabling ports in BIOS
For BIOS input When loading, press Delete, F2 or another key depending on the model motherboard. You can view it on the start screen. 
In the case of a laptop, this screen does not appear because the function fast loading. You can temporarily disable this technology in the power settings:

Restart your computer. Without quick launch you will see all the stages Windows boot and you can get into the BIOS. If this doesn't work on Windows 8 or 10 with UEFI BIOS, try the following method:

After reboot, select "Diagnostics", then go to " Extra options" and open the UEFI Firmware Settings. Click "Reboot", the next time you start, the BIOS UEFI interface will appear.
To configure USB ports in UEFI, you need to go to the “Peripherals” tab and set the “Legacy USB Support” parameter to “Enabled”. If support for USB 3.0 ports is required, activate the corresponding item (USB 3.0 Support). 
In the AMI BIOS, go to the “Integrated Peripherals” section and set the four options to “Enabled”:
- USB EHCI Controller.
- USB Mouse Support.
- USB Keyboard Support.
- Legacy USB Storage Detect.
In Phoenix AwardBIOS, you need to go to the “Advanced” tab and go to the “USB configuration” section. All parameters inside must be set to “Enabled” in order for USB ports worked. 
In all BIOS versions, to save the configuration, you must press the F10 key and confirm the selection by writing “Y”.
Windows setup
If the ports are enabled in the BIOS, but connected via the interface USB devices are not detected by the system, then check the Registry Editor, Device Manager and Group Policy Editor. It is possible that changes were made to the system through them, due to which the ports are no longer working. You should start with the Registry Editor.

If USB support is enabled in the Registry Editor, check the controller drivers in Device Manager.

If you see an icon next to the controller that looks like exclamation point, and you are sure that the interface is supported in the registry editor, then this means that there are problems with the drivers. First try updating the software:

If update software controller did not help, update the motherboard driver. Download it from the manufacturer's website and install it manually. Another way to update the drivers of all controllers at once is to remove them from the system. Click on the controllers right click and select "Delete". After a reboot, the system will automatically install controller drivers, so you no longer have to worry about how to enable the USB ports - they will work just like that. 
If only removable devices connected via USB do not work, check in the Group Policy Editor to see if a read ban is set.

Find the Removable Devices: Deny Read option and set it to Disable. The problem with identifying flash drives and external drives should disappear.
Hardware damage to ports
If your laptop's USB ports are damaged or south bridge on the motherboard, then no methods will help enable the interface. Therefore, if the connectors stop working after mechanical impact or liquid getting inside the housing, short circuit or other negative factors, you should take the laptop to a service center for diagnostics. 
In case of system unit Some USB ports can be replaced independently, but this is not possible on a laptop because all connectors are soldered to the motherboard.
Today I will tell you how to enable booting from a flash drive in the BIOS of various manufacturers. No matter what version you have, the order of body movements will be as follows:
1. We insert our bootable USB flash drive into the USB connector of your computer. I recommend inserting it into a port located directly on the motherboard, i.e. from the back of the system unit.
2. Turn on the computer and press the key Delete(or F2) to get into the BIOS. Depending on the manufacturer and BIOS version, other keys (Esc, F1, Tab) may be used, so you need to carefully read the prompts on the screen.
In Bios, we can only navigate between tabs using the keyboard.
Below I will describe this process in detail using the most commonly used BIOS versions as an example.
Attention! Please remember that if you install operating system from a flash drive or CD and selected the boot device in the BIOS, and not in the boot menu, then after the first automatic reboot Windows you need to enter the BIOS again and return to boot from hard drive. If this is not done, autoboot from a flash drive or CD will work again, and Windows will begin the first stage of the procedure again installations.
Setting up Award Bios to boot from a flash drive
Award Bios:
First, let's check if the USB controller is enabled. Let's go to “Integrated Peripherals”. Use the arrow on the keyboard to move down to the “USB Controller” item. Press the “Enter” key and select “Enable” in the window that appears (also using “Enter”). Opposite “USB Controller 2.0” there should also be “Enable”.
 Exit this tab by pressing “Esc”.
Then we go to “Advanced BIOS Features” – “Hard Disk Boot Priority”.Now in my example the hard drive comes first, but the flash drive should be there.
 We stand on the line with the name of our flash drive (Patriot Memory) and raise it to the very top using the “+” key on the keyboard.
 We leave here by pressing “Esc”.
Setting up AMI Bios to boot from a flash drive
If, after entering Bios, you see such a screen, it means you have AMI Bios:
 First, let's check if the USB controller is enabled. Go to the “Advanced” – “USB Configuration” tab.
 Opposite the items “USB Function” and “USB 2.0 Controller” should be “Enabled”.
 If this is not the case, go to this line and press the “Enter” key. From the list that appears, select “Enabled” (also using “Enter”).
Then exit this tab by pressing “Esc”.
Let's go to the tab “Boot” – “Hard Disk Drives”.
 Now my hard drive is in first place, but I need to put a flash drive here. We go to the first line, press “Enter” and in the window that appears, select our Patriot Memory flash drive.
 It should be like this:
 We leave here via “Esc”.
Select “Boot Device Priority”. Here, the first boot device must be a flash drive.
 Press Esc.
Then we exit the Bios, saving all the settings made. To do this, go to “Exit” – “Exit & Save Changes” – “OK”.

Setting up Phoenix-Award Bios to boot from a flash drive
If, after entering Bios, you see such a screen, it means you have Phoenix-Award BIOS :
 First, let's check if the USB controller is enabled. Go to the “Peripherals” tab – opposite the “USB Controller” and “USB 2.0 Controller” items there should be “Enabled”.
 Then go to the “Advanced” tab and opposite “First Boot Device” set “USB-HDD”.
 After that, exit the Bios, saving the changes. To do this, go to “Exit” – “Save & Exit Setup” – press the “Y” – “Enter” key
 That's practically everything you need to know in order to boot from a flash drive. In my article, I described the process of setting up the BIOS of the most popular versions: Award And AMI. The third example presents Phoenix-Award Bios, which is much less common.
The described procedure may differ slightly in different BIOS versions. But the main thing is that you understand the principle of setting itself.
By the way, I would also like to add: in order to choose which device to boot your computer from, it is not necessary to change the settings in the BIOS. You can immediately call up a special menu after turning on the computer to select boot devices (this can be done by pressing the F8, F10, F11, F12 or Esc key). In order not to guess with the keys, look carefully at the monitor immediately after turning it on. We need to have time to see an inscription like this: “Press Esc to selest boot device.” In my case, it was necessary to press “Esc”.
On some computers, when you connect HDD or USB flash drive 3.0, the error appears "The device is not recognized" (USB Device Not Recognized) or " Windows stopped this device because it reported a problem.(Code 43)" in Device Manager.
This article provides instructions on how to resolve the following issues:
- USB device not recognized/detected
- USB 3.0 flash drive not recognized/detected
- USB 3.0 does not work on Windows 7/10
How to fix: USB 3.0 port on computer does not work
Before we move on to fixing this problem, you should try the following steps:
- Use another USB cable if you connect a hard drive to the port computer USB 3.0.
- Connect USB 3.0 to USB port 2.0.
- Remove the USB device, turn off the computer, and disconnect the power cord (or battery if using a laptop). Wait at least 2 minutes and then plug the power cord back in. Turn on your computer and reconnect the USB device.
- If you are using Windows 7, Vista or XP, download and run the Microsoft Troubleshooter utility.
- Reset BIOS to factory settings.
Solution 1: Disable Fast Startup feature in Windows 8 and 10

Note: If the Fast Startup option has already been cleared, check it and restart your computer. After restarting, uncheck the box and restart your computer again.
- Reboot computer.
Solution 2: Disable USB suspend settings.

Solution 3: Reboot your USB 3.0 device.
- Open device Manager. For this:
- Press the " Windows» + « R" to open the window " Execute".
- In the window " Execute» enter: devmgmt.msc.
- Click Enter.
2. In Device Manager, expand "ControllersUSB» .

3. Right click on " RootUSB-hub (USB 3.0 ) " and select " Delete".
4. Windows will automatically find and install the latest drivers for your USB 3.0 port. 
Solution 4: Install the latest USB 3.0 drivers.
- Download Intel Driver Update Utility or AMD drivers.
- Run driver update utility and press " Further" on the first screen.

- Accept the license terms and click " Install".

- Wait while the driver update utility is installed.
- After installation is complete, click " Launch».

- Click " Start scanning".

- When the driver scan is completed, click " Download", to download latest versions drivers for your computer.

- Finally, click " Install".

- After installation is complete reboot computer.
Solution 5: Restore Windows to a previous working state
If the solutions above did not help with the problem of USB 3.0 not working on your computer, you should try restoring your computer to its previous working state. This can be done if you previously activated a Windows restore point.
Please write in the comments below if you managed to solve the problem with a faulty USB 3.0 port, and what solution helped in your situation.