How to enable usb ports on windows 7. Enabling USB ports on a laptop. Disabling USB ports in device manager
Why don't usb ports work? Reasons and solution
Usb interfaces are used in the PC robot so often that we cannot even imagine a computer or laptop without them. Various peripheral devices are connected to the USB interface: printers, web cameras, flakes and many others. But what to do if the usb ports are out of order. Let's look at the main problems with usb work and try to eliminate them.
USB interfaces disabled in BIOS
This problem is very common, because a sharply turned off light or a dead battery can throw off BIOS settings, thereby disabling USB interfaces.
To enable them, let's enter the BIOS, for this you need to quickly press the Del or F2 button after starting the computer.

Depending on the version and manufacturer of the software, enabling USB functions can be in different BIOS items.
- Main BIOS options:
- Enable/Disable - Disabled/Enabled
- Make all USB ports available - Both
- Make available ports that are hosted directly on motherboard-Primary
- Number of used USB ports - 2USB Ports, 6USB Ports
- Using USB 2.0 - USB 2.0 Controller.
- Changing the operating frequency of the USB bus - USB Speed.
Enabling Usb in AMI BIOS

Enabling Usb in Award BIOS

USB port driver removed from system
Errors of this kind occur after a virus attack on a computer or field. critical error Windows. To restore the functionality of the USB controller, it is worth installing or, if it does not work correctly, update USB drivers controller. Follow these steps to update the USB driver:
1.Open Device Manager from the Hardware tab in System Properties.

2. Find the USB controller item and right-click on it and select "Update driver".

3. In the launched hardware wizard, select the item " Automatic installation» to find the correct driver.

4. The wizard will find the driver we need and install it.
5. If the wizard could not find a suitable driver, we will need to download it from the Internet and install it from the specified location. To do this, when choosing the option to install the driver, you need to select the item "Install from a list or specified location". In the next window, we will be prompted to search for drivers in the specified locations. Check the box next to "Include the following search location" and click browse.

In the drop-down menu, specify the package with the downloaded drivers. The wizard will check the folder for a suitable driver and select the correct one. After that, for the correct installation, it is worth restarting the computer.
The USB controller burned out.
There are times when, due to high USB voltage the controller overheats and fails. The only way to help you solve this problem is to service center, since it is not possible to fix this at the program level.
USB ports can be disabled without using third party programs. Windows Tools you can disable all USB ports at once, or those that need to be disabled at the moment.
Theft of confidential information from users' computers is currently extremely relevant. You may need to disable USB ports to prevent data leakage. Very often we have to connect various external storage devices to the PC, in particular via USB ports. These external devices may contain malicious code, which actually is the reason for the “draining” of confidential data into the hands of “malware”. Today we will tell you how you can teach your computer to quickly disable USB ports without resorting to installing and using third-party programs.
To implement our plans, we need to make some changes to Windows registry. To do this, first we need to open it, for this in the search Windows line(in Windows XP-7, the search bar is located in the Start menu, in Windows 8 on the panel, as shown in the figure below) you must enter the regedit command, press the “Enter” key and select the regedit.exe registry editor in the search results.
In the registry editor window that opens on your screen, to start disabling USB ports, go to the “UsbStor” registry key, expanding the HKEY_LOCAL_MACHINE\ SYSTEM\CurrentControlSet\ Services sections in sequence. Find the “Start” parameter in the final section, click on it with the left mouse button and in context menu select “Change”, and change its value from “3” to “4”, where “3” is the default value of the parameter.

After the changes made to the registry, a flash drive connected to the computer via the USB port will, as before, be detected by the system, but will not automatically connect to it. In other words, it will be impossible to write data from a flash drive, or run any programs from it. If you need to return the settings of the USB ports to their original ones, before that, it will be enough to change the value of the “Start” parameter to the previous one, that is, “3”. In this case, you do not need to restart your computer for the changes you made to take effect.
Disable specific USB ports
There are cases when it is not possible to disable all USB ports in the system at once and you need to disable only some of the USB ports. In this case, you can use another method.
Launch “Device Manager” on your computer, then find it and go to the line “ USB controllers". By the way, to open the “Device Manager” just press the key combination “Win” + “Pause” and in the window that opens, click on the corresponding link in its left part.

Now in the newly opened window “Properties USB ports” Go to the “Drivers” tab and click on the “Disable” button in it. All is ready!

We hope that you have found the answer to your question - “how to disable USB ports” and now, depending on the situation, you can disable all of them at once, or only those that you consider necessary.
Today I will tell you how to enable booting from a USB flash drive in the BIOS. various manufacturers. It doesn't matter which version you have, the order of gestures will be as follows:
1. Insert our bootable flash drive into the USB port of your computer. I recommend inserting it into the port located directly on the motherboard, i.e. from the back system block.
2. Turn on the computer and press the key Delete(or F2) to get into the BIOS. Depending on the manufacturer and BIOS version, other keys (Esc, F1, Tab) may also be used, so you need to carefully read the prompts on the screen.
In BIOS, we can only navigate through the tabs using the keyboard.
Below I will describe this process in detail using the most used BIOS versions as an example.
Attention! Please note that if you install operating system from a flash drive or CD and have selected a boot device in the BIOS, and not in the boot menu, then after the first automatic Windows restart you need to enter the BIOS again and return the boot from hard drive. If this is not done, autoload from a USB flash drive or CD will work again, and Windows will again begin the first stage of the procedure. installation.
Setting Award Bios to boot from flash drive
Award Bios:
First, let's check if the USB controller is enabled. We go to "Integrated Peripherals". We go down with the arrow on the keyboard to the item “USB Controller”. Press the “Enter” key and in the window that appears, select “Enable” (also using “Enter”). Opposite “USB Controller 2.0” should also be “Enable”.
 Exit this tab by pressing Esc.
Then we go to “Advanced BIOS Features” – “Hard Disk Boot Priority”.Now in my example, the hard drive is in the first place, and the flash drive should be.
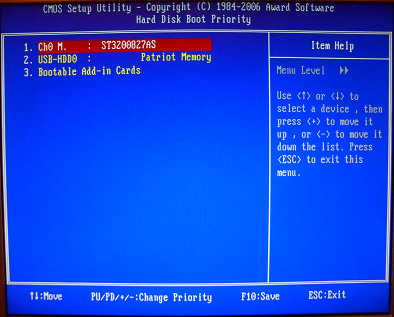 We stand on the line with the name of our flash drive (Patriot Memory) and raise it to the very top using the “+” key on the keyboard.
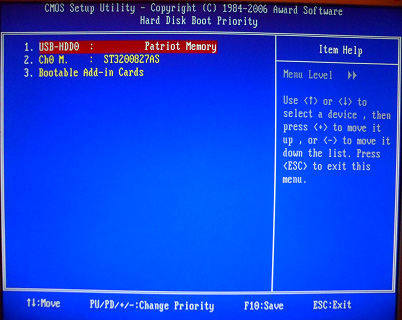 Exit here by pressing "Esc".
Configuring AMI Bios to boot from a USB flash drive
If, upon entering BIOS, you see such a screen, then you have AMI Bios:
 First, let's check if the USB controller is enabled. Go to the tab "Advanced" - "USB Configuration".
 Opposite the items “USB Function” and “USB 2.0 Controller” should be “Enabled”.
 If this is not the case, we stand on this line and press the “Enter” key. From the list that appears, select “Enabled” (also using “Enter”).
Then exit this tab by pressing “Esc”.
Go to tab "Boot" - "Hard Disk Drives".
 Now I have a hard drive in the first place, but I need to put a USB flash drive here. We become on the first line, press “Enter” and in the window that appears, select our Patriot Memory flash drive.
 It should be like this:
 We leave from here through "Esc".
Select "Boot Device Priority". Here, the first boot device must be a USB flash drive.
 Press Esc.
Then we exit the BIOS, saving all the settings made. To do this, go to "Exit" - "Exit & Save Changes" - "OK".

Setting Phoenix Award Bios to boot from flash drive
If, upon entering BIOS, you see such a screen, then you have Phoenix Award BIOS :
 First, let's check if the USB controller is enabled. We go to the “Peripherals” tab - opposite the items “USB Controller” and “USB 2.0 Controller” should be “Enabled”.
 Then we go to the “Advanced” tab and opposite “First Boot Device” we set “USB-HDD”.
 After that, exit the BIOS, saving the changes. To do this, go to "Exit" - "Save & Exit Setup" - press the key "Y" - "Enter"
 That's practically everything you need to know in order to boot from a USB flash drive. In my article, I described the process of setting up the Bios of the most popular versions: Award And AMI. The third example shows Phoenix Award Bios, which is much rarer.
IN different versions BIOS described procedure may be slightly different. But the main thing is that you understand the principle of tuning itself.
By the way, I would also like to add: in order to choose which device to boot your computer from, it is not necessary to change the settings in the BIOS. You can call up a special menu immediately after turning on the computer to select boot devices (this can be done by pressing F8, F10, F11, F12 or Esc). In order not to guess with the keys, we look carefully at the monitor immediately after turning it on. We need to have time to see an inscription like this: “Press Esc to selest boot device". In my case, it was necessary to press “Esc”.
(the computer is facing you). On the motherboard, look for small yellow or blue connectors, they are usually located at the bottom.
Each such connector has two rows of pins (needles): five in one row, four in the other. Let's call the left or right side connector, where there are both pins, side "A". The second, with one pin - "B".
Five pins, starting from side "A", are marked as follows (in series): VCC1 + 5V, Data -, Data +, Ground 1, NC.
The last pin - NC - is not used.
Four pins of the second row, starting from side "A", are marked as follows (in series): VCC2 + 5V, Data -, Data +, Ground 2. There is no fifth output (pin) in this row.
Consider the connector at the end of the cable coming from the USB port. It should have inscriptions: VCC1, Data 1 -, Data 1 +, Gnd 1. The inscriptions may differ slightly, but it’s easy to figure it out - VCC or +5 V is always indicated on the first socket under the pin, on the last Ground or GND.
In most cases, connector wires have standard colors:
+5V red
Data - white
Data + green
GND black
Connect the cable connector coming from the USB port to the socket on the motherboard to a row of five pins. The first - from side "A" - should be connected to VCC1 +5 V. The fourth - Gnd 1. The last fifth pin remains free. There is no pin in the second row next to it.
To simplify the connection, special adapters can be used that exclude the possibility wrong connection. They are suitable for connectors on the board, usually blue, with a small collar and a key and allowing you to connect the adapter in only one way.
The pins on such an adapter are marked as + 5V, P2-, P2+, GND. If you have such an adapter (they may come with motherboard), connect the cable connector to it in accordance with the marking, then insert the adapter into the socket on the motherboard.
By connecting everything USB ports, close side cover. If you are still not completely sure about the correct connection, then after turning on the computer, connect a mouse with a USB connector to the front port. If it works fine, then everything is connected correctly and you can safely connect flash drives and other equipment.
Sources:
- how to connect the front
When buying a computer, a beginner - a person who has little understanding of the PC in general - needs some help in assembling and connecting this device. If it is not possible to call a specialist or a friend, then this instruction will come to the rescue.
You will need
- Connect all interfaces and loops in the correct order.
Instruction
Take the main cable designed for the system unit from the network. On one side there will be a plug, on the other a trapezoid connector. It is necessary to turn the back (rear) side of the system unit towards you, a lot of "mother" and "father" type connectors. We take the power cord, from the side of which the "mother" connector is located and connect it to the "father" connector, located at the top of the system unit. Do not connect it directly to the network.

We put next to the system unit to connect the monitor to the system unit. To do this, we need the same power cable from the mains. The principle is the same, only now we connect the cable to the monitor. We also do not connect to the network.
We take the following cable - to connect the monitor and the system unit (VGA cable). We connect one side to the monitor, the other to the system unit, first you need to find the VGA connector on. After connecting this cable, tighten the plastic bolts with your fingers or a small screwdriver. This is necessary for a constant and stable signal.

Keyboard and mouse connections are very similar. The only difference is the color of the plugs and sockets designed for these devices. The keyboard and mouse (PS/2) jacks are located below the system unit's power jack. The keyboard is lilac, and the mouse is green.
Recently began to produce devices under the USB interface. In this case, everything is much simpler. You need to insert the plug of the device you need (