Beltelecom Wi-Fi settings on a laptop. Setting up WiFi on ByFly - maximum performance
Setting up Wifi on Byfly
Step 1. First of all, you need to connect the cable to your computer or laptop to establish a connection with the modem for further configuration.
Step 2. Open your browser and address bar register 192.168.1.1 - this is the modem address. Remember this address, because if you need to reconfigure your modem or your settings go wrong, this is where you will need to contact.
The following window will open:
You should enter the word "admin" in both fields.
Step 3. You are at home page your modem. Just look around, nothing needs to be changed here.

If you wish, you can go to the Maintenance tab and change the modem password there to protect yourself as much as possible.
Step 4. Go to the Interface Setup tab. Here, in the username and password fields, you must enter the username and password that are printed in your Byfly agreement.
In addition, you need to check the Bridge Interface and Default Route items - in the first, the Activated item should be checked, and in the second, Yes. After this, save the changes made.

Step 5. Go to the LAN tab. Here the DNS Relay must be set to USED USER DISCOVERED DNS. DNS addresses should appear automatically. If this does not happen, then fill out these fields manually depending on where you live:
in Minsk (Minsk GTS):
primary: 82.209.240.241
secondary: 82.209.243.241
in Minsk region:
primary: 82.209.253.2
secondary: 193.232.248.2
in Brest and Brest region:
primary: 82.209.195.12
secondary: 193.232.248.2
in Gomel and Gomel region:
primary: 82.209.213.51
secondary: 193.232.248.2
in Grodno and Grodno region:
primary: 194.158.202.57
secondary: 193.232.248.2
in Mogilev and Mogilev region:
primary: 194.158.206.206
secondary: 194.158.206.205
in Vitebsk and Vitebsk region:
primary: 82.209.200.16
secondary: 82.209.200.17

Step 6. This step in setting up Wifi is the most important. Let's go to the Wireless tab, and there we need to make a decent number of changes. The very first thing is to set Access Point Settings to Yes.
First of all, so as not to forget, change the Pre-Shared Key - this is the password for your Wifi connection. Only those who know this password will be able to access it, and if the password is generic or too simple, other people will be able to use your connection. You can change the SSID field if you wish - this is the name of your network. Finally, check the Authentication Type and Encryption fields to ensure they match what is shown in the image.

This completes the modem setup. Save the settings, disconnect the cable, turn on Wifi on your computer or laptop and update the list of networks - yours will appear among them. The first time you will need to enter the password that you specified in the Pre-Shared Key field, but then Wifi will connect automatically.
If you want to connect to a WiFi network through the Beltelecom operator, then you should take into account the fact that the connection occurs differently than when connecting to a regular wireless Internet. The algorithm of actions is almost the same: a person selects a wireless network from the list of proposed ones; then click on the “Connect” item, but unlike other WiFi networks, when connecting to Beltelecom the password entry window does not appear. This is followed by several unsuccessful attempts to load web pages. And, ultimately, the user is convinced that there is no Internet on the device. Many people, out of habit, blame it on a bad signal, but the only reason is the need to pay the provider for the service.
What needs to be done to connect to the Beltelecom Wi-Fi network using a tablet?
1. Buy a special card (similar in size to a bank card) at the Beltelocom service center, which allows you to use WiFi. On its reverse side, your login and password will be hidden under a protective layer. Cards have their own denomination: 60, 180, 600 minutes or 1, 3, 5 days.Since the network is charged per minute, Internet access is unlimited (there are no traffic restrictions). The time count starts from the moment of connection and ends after disconnection. When reconnected, the meter's operation resumes.
2. To connect to the network you need to do the following:
- use a coin to remove the protective layer;
- activate Wi-Fi search on the tablet where BELTELECOM or byflyWIFI operates;


Log in to any browser and try to load a website. You will be automatically redirected to the login page by entering your username and password;
- enter the data on the back of the card in the appropriate fields. After this, you will be able to fully enjoy the Internet from the Beltelecom provider for the period of time indicated on the card.
3. For regular subscribers of byfly, connecting to the Internet will be much easier. It is enough to use the login and password specified when concluding the contract for receiving services. You can also clarify this information in the Beltelecom service center if it has been lost. You just need to contact the same address where the contract was concluded. After this, the authorization data must be entered in the browser by opening any web page (that is, do three recent actions mentioned above in paragraph 2).

If you want to become a Beltelecom client, just contact your nearest service center company or send a request from .
What to do if the login page does not appear?
There are two reasons:1. You are using a browser that does not have an automatic redirection (redirect) function. Just open another browser.
2. Your gadget is trying to connect to another (private) wireless network. In settings, select a public hotspot. They are usually installed in public institutions (cafes, clubs, restaurants, cinemas).
Using step by step instructions described below, you can easily configure the ByFly router via the Promsvyaz M-200 A modem.
Connecting a modem to a PC
Before you start setting up the M-200A modem, you must:
- turn on the computer;
- check the network equipment on it;
- if necessary, update drivers on network adapters;
- Now you need to connect the power cable to the Promsvyaz router and connect it to the power supply;
- Insert a twisted pair cable into any port of the modem, which is larger than a telephone cable and has a thick connector, and connect its other end to the computer into the network port;
- Insert the phone cable into the corresponding connector of the router (LINE) and into the MODEM connector. And its LINE connector is in telephone socket. Connect the phone itself to the PHONE connector of the splitter.
Press the power button on the router, it is located with right side on the back of the case, near the antenna. Make sure all the lights are lit or flashing green as shown in the photo.
If the computer does not see the modem, then most likely it is on it old system or viruses. Reinstall Windows or update your antivirus.
The M-200A modem is configured by default in bridge mode, that is, it connects the computer and the Internet provider. But every time you access the Internet, you need to connect through a special shortcut. This brings some inconvenience, so it is better to configure a modem in the router. Then the computer and other devices will receive the Internet immediately from the M-200A.
Login to the interface
To start setting up the ByFly Promsvyaz router, you first need to go to its interface:


Setting up a router on ByFly
At the top of the page you will see the modem menu, and below it there are settings divided into blocks. To configure ByFly in router mode, in the page that opens, select the Interface Setup tab and then the Internet subtab.

Set all parameters:
- in Virtual Circut select PVC0;
- Status should be Activated;
- in VPI we write 0;
- VCI – 33;
- ATM QoS – UBR;
- click on the button next to PPPoE/PPPoA, then additional settings will open;
- in Username, enter your contract number and @beltel.by, without a break. Below is the password specified in the contract;
- Bridge Interface – Activated;
- Connection – Always On – never disconnect;
- Get IP Address – Default;
- Nat – Enabled;
- Default Route – Yes;
- Dynamic Route – RIP2-B or RIP2-M;
- Multicast – IGMP v2;
- Direction – Both;
- click SAVE.
Video: Setting up the ByFly router mode on the M 200A modem
Device in “router” mode
The router is designed to control other devices on the network. It distributes IP addresses, so several devices can access the Internet from one connection. Click on the Lan tab in the Interface Setup section to check DHCP settings. In general, it is configured automatically in 90% of cases, so it is better to double-check. It is DHCP that assigns IP addresses on the network, and DNS that converts domain names into ones that the browser can understand. Therefore, to configure the M-200A modem in router mode, compare the data on the tab and what is in the figure.

Main IP Address should be 192.168.1.1, Sabnet Mask – 255.255.255.0. Enable DHCP (click Enabled).
Check the DNS Server with your ByFly server at your place of residence:
- Minsk: 82.209.240.241;
- alternative DNS server: 82.209.243.241;
- Minsk region: 82.209.253.2;
- Brest and Brest region: 82.209.195.12;
- alternative DNS server: 193.232.248.2;
- Vitebsk and Vitebsk region: 82.209.200.16;
- alternative DNS server: 82.209.200.17;
- Gomel and Gomel region: 82.209.213.51;
- alternative DNS server: 193.232.248.2;
- Grodno and Grodno region: 194.158.202.57;
- alternative DNS server: 193.232.248.2;
- Mogilev and Mogilev region: 194.158.206.206;
- alternative DNS server: 194.158.206.205;
Click SAVE. Automatic distribution of IP addresses is enabled. Reboot the modem for the settings to take effect.
The Internet now connects automatically when you turn on your computer. At correct setting On the modem another light comes on next to the Internet sign. The connection is ready. You can check this by going to any browser, or pressing the key combination Win+r and typing ping f6.by –t in the line, and then pressing ENTER.
The following messages should appear:

Wireless Wi-Fi network
To distribute a Wifi network through a Promsvyaz router you need to:
- click on the Wireless tab in Interface Setup;
- in Acces Paint and PerSSID Switch, select Activated;
- in Wireless Mode set to 802.11 b+g+n;
- if you want to limit the number of connections to the network, specify the required number in Station Number (from 0 to 16);
- you need to put a password on the network so that someone else cannot connect to it without your knowledge;
- to do this, select Broadcast Ssid –Yes;
- in Ssid write the original name Wifi networks, which you will distribute through the router, and in the Pre-Shared Key - a strong password of at least eight characters. It is better to use the WPA-PSK/WPA2-PSK encryption type in the Authentication type item;
- in Encryption select - TKIP/AES.
- By activating the Wireless MAC Address Filter and adding allowed addresses to the list, you can turn off encryption within the network. Wifi will then be available only to those devices whose addresses have been registered.
- click SAVE. You can compare your filling with the example in the picture.

To check if Wifi is working, you need to turn it off. network cable from the computer, connect to the created wireless network and enter the password you created earlier by clicking the checkbox - they will connect automatically. The Internet should work. If suddenly the pages do not load, check the network card drivers or router settings.
The local network
The Promsvyaz M-200A modem is also used as a switch if you connect several computers to it via a cable. You can set up file sharing between them by creating local network. You can also configure ports for uTorrents to download different movies, audio and documents over the network.
In the Advanced Setup tab you need:

Setting up ByFly Internet
If you have completed all the above points, then ByFly Internet via the Promsvyaz modem is configured.
You can access the network simultaneously from several computers and distribute Wifi. If you connect the phone cable directly to network adapter computer or M-200A modem, but not configured, Internet access will also be available. But for this you need to connect ByFly for your Windows.
For the Windows 7 operating system, the Internet is configured as follows:
- open the Start menu;
- in it, click on Control Panel;
- then select Network and Internet;
- behind it is the Network Control Center and shared access;
- select setting up a new connection;
- and in it – Internet connection;
- check High Speed;
- Enter the username and password specified in the agreement with Beltelecom. Username – contract number + @beltel.by;
- check the box - Remember this password;
- You can write any connection name;
- and select – Connect.
Go back to the Network and Sharing Center and in the left corner of the window, click Change adapter settings. On the created connection, click right button mouse and in the window that opens, click Create shortcut. An icon will appear on the desktop through which you can connect to the Internet when needed. Now you know all the ways to connect the ByFly Internet and configure the Promsvyaz M-200A modem.
Wireless networks have become so familiar to us that we no longer really remember the time when it was necessary to tinker for hours in order to connect to the Internet. And then spend days on end “smoking” forums, trying to determine what is the cause of problems with wireless access to the network. Now it’s much easier - just press one button, and the whole world is in your pocket. However, before this, this wireless network must be configured.
Setting up WiFi on ByFly itself takes no more than 5 minutes, but how to configure a ByFly router for full Wi-Fi power? Go!
Where to start and how to set it up
It doesn't matter if you are interested in setting up wifi on byfly on a personal computer without directly going to network card wires, or you want to know how to set up byfly wireless Internet on a laptop - you need to start with one thing, namely, decide on the model and type of distribution equipment that you have installed.
The type of wifi equipment depends on many factors that will affect the quality of your network life:
"range" wireless device, distributing the signal - this factor determines how far you can be from the router and receive a decent signal level;
the ability of the router to transmit a signal with a minimal drop in level through walls and other obstacles;
ease and accessibility of setup wireless internet;
level of harmful radiation, because although it is not as strong as that of mobile communications– this indicator differs from model to model;
number of simultaneously connected devices.
As you can see, choosing the right router is a responsible task that should not be left to the provider. And more and more often, people leave the equipment that the provider gave them and suffer from the various disadvantages listed above.
Let's first look at the case of the Promsvyaz M200a modem.

In order to set up wifi, let's start by modifying the distribution device in router mode. In the sections of the top menu, click on Interface Setup, then Internet. In the Encapsulation tab, we specify the ISP modification in PPPoA/PPPoE, and after that the interface dialog box should look like the one in the bottom image. There we have to specify the username and password of the wifi user in the appropriate places. Username and Password Specifications wifi router you can look in your agreement with the provider. Change the Bridge Interface item to Activated, and set the Default Route to YES. Then we simply save all our modifications wifi connections byfly by clicking “Save” at the bottom of the window. 
Now let's set up the point Wi-Fi access byfly. In the same menu, select first Interface Setup at the top, and just below – Wireless. Appearance The dialog box will become the same as shown in the image. Set PerSSID Switch to Activated. The SSID item shows what network name you and everyone who wants to connect to your wireless network will see. The Authentication Type and Encryption items define network security policies, so set them strictly as shown here. In the place where Pre-Shared Key is written, write, preferably a complex, combination of letters of the Latin alphabet in upper and lower case, as well as numbers - at least eight in total and remember it. Now you can save. 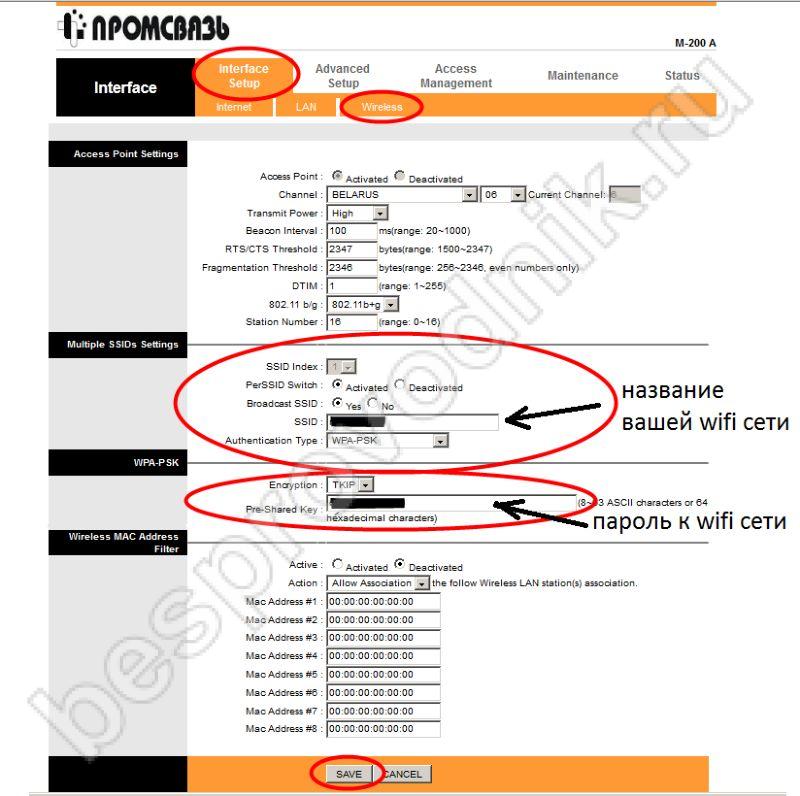
Using similar steps, you can also configure other equipment from byfly. These are modems zxhn h208n and zxv10 h208l from ZTE, as well as hg532e and hg8245a from Huawei. The same principles are used, only the shell interface of a particular router and the names of some menu items may differ slightly. But the sequence and principles of setting wireless access will be preserved.
byfly personal account
By logging into the User's Personal Account, you can perform many operations with your personal account, you will learn how to set up wifi on byfly, you can check your balance and change your password. You need to change the password for your personal account in the “User Account” section on the website byfly.by. To do this, when entering Personal Area Enter your contract number in the appropriate fields - this will be your login and password. There, go to the “Operations” tab, find “Change password” and change it to another one.
The byfly account also contains information on setting up wireless access from modems different manufacturers and you can configure network card your his personal computer, configure the modem itself, as well as the wireless connection to the Internet. 
Today, in every home and every family, the number of devices that need to be connected to the Internet is growing. wireless communication. If you are at home, then there is little point in wasting the “mobile” megabytes that the device receives via 3G connection. We can connect a phone, a tablet, and a laptop to one source: a wi-fi router, which is found in almost every home where the Internet is present. And if you don’t have a router, then you can easily purchase one (the cost of such a device starts from only $20), or get it for free from your provider (for example, Atlant-Telecom and Beltelecom have no problems with this).
Let's look at setting up a Wi-Fi router using a modem as an example.Promvsyaz M200A(M200B) , as the most common of all existing ones in Minsk. We will also find out the meaning of basic terms and concepts related to setting up a wireless network in your home or office.
First, let's switch the router to router mode (that is, the potential router to the actual routing mode :)): in any browser (for example, in Opera. In this article, the Yandex browser is used for examples) the address 192.168.1.1 and enter in the pop-up window login admin and password admin


Let's decipher:
1. We switch the modem to PPPoE (Point to point protocol over ethernet) mode, since in Bridge mode it is impossible to establish a simultaneous connection to the Internet of two or more devices, and you can completely forget about connecting phones and tablets.
2. Username - your user name specified in the agreement, be sure to indicate the suffix @beltel.by and password - your password, also present in the agreement if you have not changed it yourself.
3. Bridge Interface in activated mode
4. NAT - enable
5. Default route - yes
6. Dynamic route - RIP2-M
7. Check all other parameters, compare them with the picture, and save with the save button.
A few seconds after saving and updating the page, try logging onto some Internet resource to check if the settings are correct.
If it doesn’t work - BYFLY technical support - short number from landline 123.
If it works, then you did everything correctly and you can start setting up wifi.
In the same window, switch to the Wireless tab and again follow the steps:

Let's decipher:
1. Acess Point in activated mode is a general enable/disable of the router’s wireless broadcasting.
2. Broadcast SSID - yes. SSID is the name of your network. The checkmark in this item will determine whether your network name will be freely displayed in the list of all available networks.
3. We indicate the actual name of the network, you can invent anything, the main thing is not to forget.
4. Pre-shared Key - this is the key/password for connecting to your network. Used to protect against neighbors :) We recommend using 8 characters as a key, be it letters or numbers. The main thing is, again, to remember or write it down.
5. We check the remaining settings with the picture and save with the save button, which is located in the usual place.
Now your router “distributes” wifi and it’s time to connect your laptop to it.
First, you need to make sure that wifi is turned on on your laptop.
If you don’t understand this at all, then type in the Yandex search the query “how to turn on wifi on a laptop Your Model”, where “Your Model” is the model of your laptop indicated in the documents, warranty card or on back cover laptop.
As a rule, in older laptop models, wifi is turned on with a lever, which can be located anywhere - on the end or on the front panel next to the keyboard.
A few examples:


In new laptops, usually, to enable or disable wireless communication, the key combinations Fn + a button with the corresponding wifi icon are used (usually it is located in the row of F-keys above the numbers). Here's an example:

In any case, there will be some kind of light indicator for turning on/off the laptop's wifi module.
If, after all your attempts, you cannot turn on the wi-fi module of your laptop, do not despair. You can always contact us. The problem may be with the wifi card drivers. And even if the module itself fails, you can always install a USB-wifi card. It costs about 15-20 dollars and is much cheaper than repairing and restoring the original wi-fi module.
Let's return to establishing the connection. Wi-Fi is turned on in the laptop and at the bottom right (in the system tray) of the desktop we see:

All that remains is to select your network (we discussed the network name and password earlier) and connect to it.

WITH It's worth noting that Wifi is a capricious thing. For no apparent reason, you may encounter a situation where it stops working, and then suddenly turns back on itself. When setting up Wifi, you must be prepared for what it is not. reliable connection, like wired. These problems lie in the features of routers, in antiviruses, in Windows settings, And that is not all. Think about why Byfly specialists do not guarantee the operation of wifi and are very reluctant to help set it up? Because the user himself is primarily responsible for the operation of the wireless network. And even after competently setting up all its aspects, the user can even accidentally break it.
Be careful when using a wireless network, try to understand how it works, and then it will work!