Asus rt n12 wifi connection. KerchNET customer assistance center. Configuring the Asus RT-N12 router with L2TP, PPPoE, or PPTP connection types
High quality ASUS products have made this company very popular among computer equipment users. Modems produced by Asus are also no exception and are widely used due to their reliability and ease of use. The very first position in popularity has deservedly been consistently held for more than ten years by the ASUS router version RT N12 VP. Below are instructions on how to connect, reflash and configure this one of the most common and universal routers.
Brief description and characteristics of the device
The device has relatively compact dimensions: 179 x 128 x 28 cm. The device supports almost everything existing standards: IPv4, IPv6, IEEE 802.11b, IEEE 802.3u, IEEE 802.11g, IEEE 802.3, IEEE 802.11n. It has high speed data transfer up to 300 Mbps. Two external antennas provide a large range of the created Wi-Fi zone. Operates at a frequency of 2.4 GHz. High security of the router owner's network is ensured by Wi-Fi encryption support: WPA-Enterprise, WPA2-Enterprise, 4-bit WEP, WPS support, 128-bit WEP, WPA-PSK, WPA2-PSK.
Preliminary activities
Before you begin entering parameters into the router interface, you must connect it correctly.
To do this you need to do the following:

Login to the interface
To enter the router settings interface, you will need to be authorized.
The action algorithm consists of just a few steps:

Factory reset
If the user, for example, when entering the standard “admin” and “admin” was unable to enter the interface, and also if frequent malfunctions occur in the device, etc., then you will need to reset the parameters to the default values. This can be done using the following two methods: 1) through the settings menu, 2) mechanically.
Note: if the user does not know the exact password and login for authorization, then the second method should be used.
Method 1: Through the interface
The following steps should be taken:
- Follow all steps 1 to 5 from the instructions described above and enter the device settings menu;
- Next, go to the “Administration” tab;
- Go to the “Management” subsection;
- Click "Factory settings".
Note: some versions software There may be slight differences in the router, but the principle of performing actions during a soft reset is the same for all firmware modifications.
Method 2: Mechanical
To perform a hardware reset, you need to do the following:
- On the back panel of the device, find a special recessed “Reset” button;
- Press the button using any thin pointed instrument, such as a piece of wire;
- Hold down for ten seconds;
- The light indication on the front panel of the device should blink;
- Ready!
Setup procedure
The procedure for entering settings is not very complicated, but different communication service providers require different data entry. 
If the provider is Rostelecom?
The following actions must be taken:

If the provider is Beeline?
The setup procedure consists of the following steps:

Setting up Wi-Fi
The process of setting up a wireless network consists of several sequential steps:

Procedure for updating router software
For a new router model “RT N12”, flashing the firmware is not necessary, but if some malfunctions occur, the flashing procedure should effectively eliminate most of the problems. Before updating the firmware, you must download it and save it in the computer's memory.
It is available for free on the official website of the device manufacturer. It is recommended to download the one suitable for specific device firmware The software modification for the device is indicated on its body itself (at the bottom) - “Hardware Version”.
The following actions must be taken:

The procedure for restoring a router after an incorrect update
Sometimes it happens that the owner, due to his carelessness, downloads firmware that does not correspond to the device, or he is not satisfied with the functionality of the standard software, and he intends to install an alternative one. Alternative software from revision n12 d1 can be downloaded from the link: https://ivstar.net/download/RT-N12D1_3.0.0.4_374_4230.trx. Especially for such cases, the router manufacturer has developed the “Firmware Restoration” application, which is used for flashing.
You will need to take the following steps:
- Using the above instructions for resetting the router, bring its parameters to the default values set by the manufacturer;
- Next, launch the device interface, enter IP for the local network: “192.168.1.10”, mask: “255.255.255.0”;
- Then remove the adapter from the 220 V network (cut off the power supply to the device);
- Press the “Reset” button and at the same time, without releasing the pressed button, reinsert the power adapter into the power outlet;
- Wait until the “Power” indicator light on the router case blinks, and only then release “Reset” (the blinking of the above light will indicate that the router has entered recovery mode);
- Open the “Firmware Restoration” application;
- Click “Browse”;
- Specify the path to the downloaded software;
- Wait for the update process to complete;
- Restart the router.
Step-by-step setup of RT-N12 C1 (B1, D1) for any provider: MTS, Beeline, Rostelecom and TTK, also Dom.ru. Indicates how to properly install a VPN server. And the result of three tests is given.
ASUS routers called RT-N12 are presented in three models: B1, C1 and D1. New firmware with a black interface is installed on the D1 router, and for C1 it is easy to update. Model B1, in turn, simply cannot be purchased. That is, for C1 and D1 the setting looks the same, and there are also HP B1 and VP models that have the same black interface. This is what we will talk about further - it is interesting to configure the ASUS RT N12 in a new version. Your firmware number must start with a three.
Equipment and appearance
Appearance of the device
The ASUS website lists the following equipment: LAN power cord, router, power supply, two antennas and a warranty card. For models B1 and C1 there is also a CD-ROM, and their power supply produces 9 Volts. And for D1 you need 12 Volts! The current strength is 1 Ampere in the first case and 0.5 in the second.
Specifications
Each of the three routers under consideration is built on the same processor. The amount of memory and ROM is also the same:
- Processor – BCM5357, 300 MHz;
- FLASH – 8 MB;
- RAM – 32 MB;
- Wi Fi – 802.11n, 300 Mbit/s.
It does not follow from the above that the firmware from routers of one revision is suitable for others. Whoever forgets about this will receive a “brick”.
The hardware revision number is printed on the label in the top line. Example: “H/W Ver. B1".
Options and functionality

3 modes, 4 networks
Each of the three devices, from B1 to D1, operates in router, access point or wireless repeater mode. You can create not one, but four WiFi networks with different names. And can be adjusted throughput each of the networks. In reality, we are talking about one network, it’s just that all subscribers will see four SSID names, and depending on their choice they will receive different traffic. Well, the speed of “300 megabits” is, of course, a theory.
All characteristics are summarized in the table.
| Parameter | B1 | C1 | D1 |
|---|---|---|---|
| Case dimensions, mm | 179 x 119 x 37 | 190 x 125 x 37 | 179 x 128 x 28 |
| Ports | 4LAN + WAN, 100 Mbit/s | Same | Same |
| Ability to configure LAN as WAN | + | + | + |
| VPN | IPSec, PPTP, L2TP, PPTP server* | IPSec, PPTP, L2TP, PPTP server | |
| WPS button | + | + | + |
| Mode selector (router, etc.) | Tumblr | Tumblr | Program |
Quick Setup Wizard
The asterisk means “only after updating the firmware to version 3.X.” Further, LAN as WAN is configured normally in the third firmware, but not in beta. But for B1 it still needs to be found. However, in the “old interface” they do this: select the IPTV STB port, and use it as a WAN. This method has a drawback - the WAN indicator on the router will not light up.
Work in the "master"
When you first connect to a PC, the router turns on the “master”, and all you need to do is go to the website “192.168.1.1”. No password is needed. Click “Go”, set a password and click “Next”. Then the router will configure the WAN connection itself. But reviews say that this option does not work for everyone.
Most likely, the connection type will have to be set manually. “Special requirements” include MAC cloning. The “wizard” will ask for parameters, and you must fill out the fields correctly. “Router settings” is the third section where you set the password for the WiFi network.
Indicators and connectors
When designing its routers, ASUS did not invent anything. On the case of the RT-N12 router there are 7 LEDs indicating the presence of voltage, as well as the activity of 5 ports and WiFi. A short press on the Restore button will reboot the router, and pressing for 5-7 seconds will reset the settings. This is how any ASUS router works!

Rear panel of the router
Yellow ports are home network, and the provider's cord is plugged into the WAN port.
If the WAN port on the router burns out, you can use the LAN port instead of the WAN. ASUS is a good company, but additional configuration is needed.
Video: setting up the Internet, Wi-Fi network on ASUS RT-N12
How to connect Wi-Fi router ASUS RT - N12 to a computer
Preparation
On the computer, the network card is configured for “automation”. The LAN port of the router is connected to the PC via a patch cord, and the provider’s cord must be connected to the WAN port. Next, power is supplied to the router: in a minute it will boot, and after 2 minutes the computer will update the address of its card. And you can open the site “192.168.1.1”. In the “wizard”, click “Go”, set a password, click “Next”, “Next”. The router will display the Network Map tab.

WAN setup
To set up an Internet connection, open the “Internet” -> “Connection” tab in the router interface. By default, the router is configured in Auto IP mode. For subsequent logins, the admin login is suitable, and the password will be the one that was set. If something doesn’t work out, the router settings are reset: a minute after turning it on, press Restore for 7 seconds.
Setting up the ASUS RT N12 router for Rostelecom
Rostelecom uses different cables - Ethernet, telephone or optical. In the latter cases, you need to know what the VPI and VCI parameters are equal to. And the WAN port of the router must be connected to the modem, where the VPI/VCI numbers are already set. There are no these parameters inside the router interface.
PPPoE
Go to the tab for setting up WAN. Select a protocol.

PPPoE Rostelecom
You need to specify the parameters:
- NAT – “Yes”;
- UPnP – “No” for starters. This is how the router works for everyone, and then you can fix it.
- Automatic IP address – “Yes”;
- DNS automatic – “Yes”;
- The name and password are clear from the contract;
- Time is better than “0” so that the router does not turn off!
- MTU is better than 1450, and if it works, try 1492;
- MRU – 1480, etc. (until 1492).
Let the rest be by default. Press the “Apply” button, and the connection appears on the “Network Map”.
The “VPN + DHCP” option can be disabled.
PPPoA
There is no PPPoA support on the RT-N12 router. By opening the “master”, you can make sure that this protocol is missing.

Internet setup
The same will happen with most other routers, including non-ASUS ones. It is not clear why Rostelecom needs PPPoA.
The efficiency of PPPoA compared to PPPoE will be 1% higher. But it’s easy to choose the MTU - always 1500.
Setting up the ASUS RT N12 router for Beeline and MTS
The easiest way would be to configure PPPoE. It is used by MTS. And the L2TP protocol “from Beeline” is now used by all ASUS routers. But with MTS the question is open, although it has the PPTP protocol, with which there are no problems either. We must remember that in addition to PPPoE, MAC cloning on the router is performed for all protocols! A PC with which the Internet was connected is connected to the router, and the “Clone MAC” button on the settings tab is easy to find.
PPPoE
On the “Internet” -> “Connection” tab, select the desired protocol.

There is no need to change anything - the router is almost configured:
- NAT – “Yes”;
- UPnP - “Yes”;
- IP address, DNS auto – “Yes”;
- Username and password – see agreement;
- Time – “0”;
- MTU, MRU – 1492;
- “VPN + DHCP” – “Yes”.
The new settings are “applied” and the “Network” icon appears in the upper right corner. That is, the router connects to the Internet.
Most often, MTS uses the PPTP protocol (see below).
L2TP
The line vpn.internet.beeline.ru is the name of the server for Beeline subscribers. The router has a “VPN server” field for such names, which is located on the “Connection” tab. The L2TP protocol is selected on it.

Options:
- NAT – “Yes”;
- UPnP - “Yes”;
- IP address, DNS auto – “Yes”;
- Name – starts with 089, see contract;
- Password - from the agreement;
- VPN server - see the beginning of the chapter;
- “VPN + DHCP” – “Yes”.
After cloning the MAC, click “Apply”. The router will establish a connection in 30-40 seconds.
You can try setting up the router for MTS. Server name – l2tp.e66.ru or l2tp.local (depending on the region).
PPTP
We are talking about the MTS provider. On the router, set the server name or one of the addresses:
- 172.19.1.1;
- 172.19.1.27;
- 172.19.1.26;
- 172.19.1.21.
Numbers may vary in different regions. And the name is vpn.local.
By setting the address in the settings, you make life easier for the router, but not for yourself. On the “Connection” tab, the setup is almost done - just set the protocol.

The main parameters for the router are login and password, server name or address, and nothing more. You need to clone the MAC, click “Apply” and wait 10 seconds.
Setting up a router for Dom.ru and TTK
The Dom.ru provider always checks the MAC address, even on the PPPoE protocol. And TTK does the same, but only using the PPTP protocol. This means that the WAN port of the router must receive a suitable MAC address. For this purpose, there is a “Clone” button.
PPPoE
For TTK and Dom.ru, the setting differs in “cloning”.

PPPoE TTK and Dom.ru
Only login and password are specified. All this is done on the “Connection” tab. The settings need to be “Apply”, and the router connects to the Internet.
Before applying the settings, clone the MAC (for Dom.ru).
L2TP
On the “Connection” tab, select “L2TP”.

- Fill out the password and login field (271XXXX);
- The router needs to know the server name (one);
- Other settings are default.
Click “Apply”. After 30 seconds, the router will create a valid connection.
The names of TTK servers depend on the region: l2tp.svg.ttkdv.ru, l2tp.kms.ttkdv.ru, etc.
PPTP
Both TTK and Dom.ru like to issue a static IP for the PPTP protocol.

Setting up a router will be difficult. On the “Connection” tab, select PPTP, then install:
- Your own IP, mask and gateway (see contract). Example for TTK: 10.10.3.200, 255…0, 10.10.3.1.
- DNS (both);
- Login and password;
- Server IP address. Example: 10.10.3.1, 10.10.3.36 – only one.
Clone the MAC, click “Apply”.
The contract contains 8 parameters! Or 7 if the server and gateway are the same.
Setting up the ASUS RT-N12 D1 PPPoE wireless router
How to set up WiFi on the ASUS RT N12 router?
You can make changes on the start tab. Change SSID, set password.

"Network map"
The router also has a special tab with settings. Her name - " Wireless network» –> “General”.
It is better to write down all data.

WiFi, shared
The settings themselves are set like this:
- Name – any;
- Hide – “No”;
- Mode – N;
- Width – “40” (300 Mbps) or “20” (150), but not “Auto”;
- Router channels (I and II) – both “Auto”;
- Method – WPA2 or WPA for older Android devices;
- Encryption – AES or TPIK for WPA;
- Key – 8 characters.
Click “Apply”. The router will reboot.
ASUS RT N12 IPTV setup
All settings are contained on the “ The local network» –> «IPTV».

Select a name for the Internet connection. Then:
- Select a port for the set-top box (does not work with the Internet via ADSL);
- For a PC or Smart TV, you need to “Enable” the last two options.
Click “Apply”.
The router will not transmit traffic intended for the set-top box to the local area.
ASUS RT - N12 VPN server setup
The router can be a server.

VPN server
To configure, open the “VPN” tab:
- “Server”, “Enable” – “Yes”;
- “More details”: “LAN to VPN”, MPPE, IP pool;
- “Server”: “+Add” and password with login.
After each step, click “Apply”. The router is designed for 10 subscribers.
When the router was a PPTP subscriber, it used MTU/MRU = 1450.
Local LAN and DHCP
On the “Local network” -> “IP address” tab, set the router address.

The DHCP Server tab contains other settings:
- Router name in LAN;
- Auto-issuing address pool (for PlayStation set X.9-X.254);
- Gateway address, by default equal to the router address.
It is better not to turn off the server. The main thing is to click “Apply”.
IP values in LAN and WAN networks must not overlap!
How to reset your router?
Two equivalent methods:
- Turn on the router, wait a minute, press Restore for 7 seconds;
- Select “Administration” -> “Manage Settings”, click “Restore”.
The router will forget the settings. Then it behaves like new.

The photo shows “method 2”.
If you have forgotten your password, do as stated above.
Protecting the settings of the Asus RT-N12 router
All settings are saved on the PC. You need the “Manage Settings” tab.

The latter is needed to download the settings to the router.
Update to the latest firmware
You can download the firmware on one page:
- B1: www.asus.com/ru/Networking/RTN12_ B1/HelpDesk_Download/;
- C1 and D1: change the letter B to C or D.
The ASUS instructions do not contain this information. Then on the router go to the “Update...” tab.

Firmware
Select a file and click “Submit”.
After pressing, you have to wait 5 minutes. And the router cannot be turned off!
Tests
WAN-LAN transmission speed is almost 95 Mbit/s.

Testing
- WiFi 20 MHz – 21 and 16 (some have 52);
- WiFi 40 MHz – 40 and 30 (90).
The router also coped with L2TP. The result was slightly higher than 70 Mbit/s.
The main advantage of RT-N12 is its affordable price.
Video about ASUS RT-N12: connection and setup
In this article we will look at detailed information about setting up the Asus RT-N12 router. But so that you do not make a mistake in choosing a router, then Here you can find detailed characteristics, photographs, comments, as well as various reviews.
In the instructions below we will be able to quickly cope with all the work ahead of us. You can find out how to connect it correctly initially, get to its settings, select the correct Internet configuration, rename Wi-Fi router, assign your own password. Also, just below there will be a link, if you go through it, you can get to the firmware update site. IN general work will take a little time, in a few minutes you will have own center distribution of the Internet, which will be ready for use.

The characteristics and reviews of this router were presented above, but it is worth highlighting that this router looks very elegant and even very attractive. What is worth saying about the operation is that it works without any glitches and will always give you access to the Internet. Such an Internet distribution center is ideal for home use, as it will give you the opportunity to connect all your devices in your home to the Internet network. However, it happens that the devices do not connect, then you can connect 4 devices via cable at once.

We will configure the Asus RT-N12 according to the following scheme:
- Turning on the power and selecting “Configurations”
- Selecting the correct configuration of the Internet distribution center through the window for automatic configuration.
- If unsuccessful using the previous point, we will consider the settings manually
- Managing basic router settings - name and password

Before we start setting up, we need to configure the router, but for this we need information about the connection types of your provider. All this he must tell you which provider your provider uses. It also passes your data through MAC address. If your ISP lists types as PPPoE, L2TP, or PPTP, then you'll need even more detailed information. For example: user name, IP address, password, etc.
Power supply and configuration item in Asus RT-N12+
First, provide power to the Internet distribution center. If connected correctly, the light should light up indicating that there is power. If nothing lights up or blinks, then check which word the button on the router is on - on or off. Then you need to connect a cable from your provider or from your modem to the WAN connector. Then you need to connect a cable to connect your computer via the LAN connector. However, there are users who do not have a single device that has a LAN connector, and if you are one of these people, then you can configure it via Wi-Fi, but this is not advisable. After setting it up via a LAN cable, you won’t need it and can unplug it as it is no longer needed.
In the second option, in which you cannot connect via a LAN wire, you will need to connect your device via a Wi-Fi wireless network. To do this, just turn on the router and then connect the wireless network to your device. It will be called Asus and it will not have anyone's password.
If you try desperately and still nothing works, then look article about connecting a laptop to Wi-Fi .
Sometimes it happens that someone before you has already chosen the configuration of your router. Then your router will have some other name and some kind of password. In such cases, it is recommended that after connecting the router, immediately reset all settings. To do this, just hold the button on rear housing router for 10 seconds. The picture of this button was shown in the photo above. After 10 seconds, all the lights will stop lighting, and the router will reboot and everything will turn on again.
Go to the control panel of Asus RT-N12
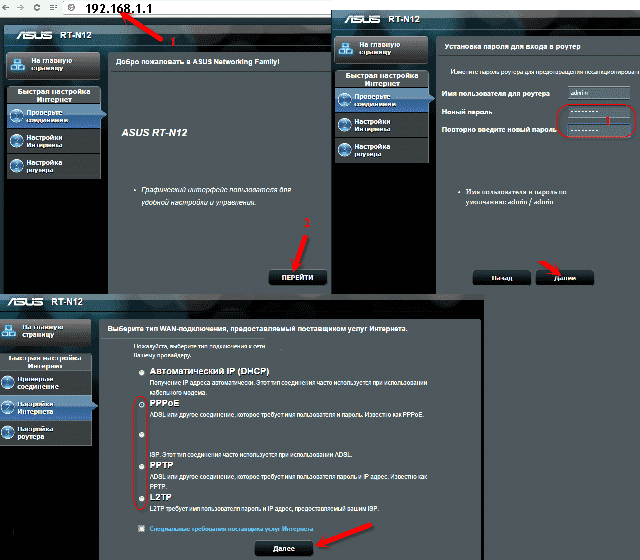
After successfully connecting your device to a network called Asus or a wired Internet network, you will need to open any of your browsers and type this address 192.168.1.1. After loading the address, you should see your configurations, but there are times when this does not happen. All you need to do is view this one. The photo below shows the configuration window. In the first step, you will need to click the " Accept" If you have problems logging in, read the general article about logging in and fixing errors -
Step by step, you are given a choice for a password in order to protect all your data and configurations in the Asus router. This item is mandatory. Enter the password 2 times, remember it, and for greater security, write it down. As suggested, press the button “ Further».
Once accepted, your router will turn off and then turn on again. After which it can be found in the list of all available networks with its new name. Now you need to connect to your named router and the corrupted router.
After connecting, return back to the previous settings site. You should now see a window with detailed information about your router. Now click " Further»
A window should pop up asking you to enter your username and password. You specified all this at the very beginning of the setup.
That's all. This type of setup is suitable for people whose connection type is " Automatic IP" If this is the case, then the router configured everything itself. Now you can use the Internet.
If your provider uses a different type of connection (as described above), then your setup will look slightly different than described above.
Setting up other connection types
Some providers do not use automatic IP connection technology and use PPPoE, PPTP, L2TP, or Static IP. Then you need, after updating the connection data, to indicate your connection option. (You can find this out from your provider).
Next, a window will pop up asking for a user and password. This information can be obtained from the agreement concluded on the Internet connection, as well as from the provider. All you have to do is call him and find out this information.
But this is if one of the types is selected that requires only this data. There are types that require an IP address, service name, and the like.
You need to remember that you are the commander of all settings! Depending on your needs, you can choose your own settings WAN. To do this, just go to the initial settings window and select Internet Connection.
On the loading page, you can select the settings configuration you need at any time. If you followed all the points and didn’t miss anything, then everything should work for you. If so, then you can now safely use your wireless connection. Below you will find information on how to change frequently changed configurations in the router.
How to change the network name and set up Wi-Fi yourself
If you, as a friend, want to change the name of your network, as well as the password provided to it, then you can do this directly on the loading settings page through the configuration window. Just enter new variables and click the “Apply” button.
To select and also edit, more large quantity configurations you need to click " Wireless network»
When you have changed the network name and password, reconnect your device. If your attempts are in vain, you will only need to remove the network from the “Known” list and then connect to it again.
Security of all router settings
If hacked or if you want to change the password and user name in the security of the router, go to the “ Administrator", Further " System" After which you can edit all the data you need and Apply their.
After the change, you will use the data you provided to log in to the system.

In order to get to the router’s web interface, you need to open your Internet browser and type 192. 168.1.1 in the address bar, Username - admin , Password - admin(provided that the router has factory settings and its IP has not changed).
Setting up Wi-Fi on the router
In the router interface, you need to go to the tab on the left Extra options Wireless network.
We set the parameters as follows:
- Field SSID: Enter the name of the wireless network. The value in this field cannot be changed.
- Authentication method: WPA2-Personal
- WPA encryption: TKIP or AES
- WPA Preshared Key: you must enter any set of numbers from 8 to 63. They also need to be remembered so that you can specify them when connecting to the network.
- Click the button below Apply

Setting up an Internet connection
In the router interface, you need to select the tab on the left Extra options, in the list that opens, select WAN.

Setting up a PPPoE connection
- WAN connection type: PPPoE
- Get a WAN IP address automatically: Yes
- Username: Your login according to the contract
- Password: Your password according to the agreement
- MTU: 1472
- Save the settings with the button Apply.
Setting up an L2TP connection
- WAN connection type - L2TP
- YES
- automatically- put a point on YES
- Username and Password- login and password from the contract
- VPN server -
- The remaining parameters can be left unchanged. In the hostname, write something in English. Save settings.

Setting up PPTP (VPN) when automatically obtaining a local IP address
- WAN connection type: PPTP
- Enable WAN, Enable NAT, Enable UPnP - set it everywhere YES
- Get an IP address and connect to DNS automatically- put a point on YES
- Username: Your login according to the contract
- Password: Your password according to the agreement
- enter the IP address or name of the VPN server according to the contract
- Save the settings with the button Apply.

Setting up PPTP (VPN) with a static local IP address
- WAN connection type: PPTP
- Get an IP address and connect to DNS automatically- put a point on No
- IP address: We enter your IP address according to the contract
- Subnet mask: We hammer in the mask according to the contract
- Main gate: We drive in the gateway according to the contract
- DNS server 1: And DNS server 2: enter your provider's servers (Rostelecom Omsk DNS 1: 195.162.32.5 DNS 2: 195.162.41.8)
- Username: Your login according to the contract
- Password: Your password according to the agreement
- Heart-Beat or PPTP/L2TP(VPN) server: enter the IP address or name of the VPN server according to the contract
- Save the settings with the button Apply.

NAT when automatically obtaining an IP address (DHCP)
- WAN connection type: Dynamic IP
- Save the settings with the button Apply

Checking Internet connection status

Saving / restoring router settings
After setting up, it is recommended to save them so that if problems arise, you can restore them. To do this you need to go to the tab Additional settings, menu Administration;, Restore/Save/Load settings tab.
- To save the current router settings, you must press the button Save. The settings file will be saved to the specified location on your hard drive.
- To restore settings settings from a file, you must click the button Choose File, specify the path to the settings file, then click the button Send.
Attention! Button press Restore will restore factory settings!

This step-by-step instruction is dedicated to how to configure the Asus RT-N12 Wi-Fi router to work with providers:
- Beeline (L2TP)
- Rostelecom, Dom.ru (PPPoE).
The guide will include the following important setup steps: correctly connecting the router, how to enter the Asus RT-N12 settings, setting up an Internet connection, setting up wireless network security (Wi-Fi password).
How to connect Asus RT-N12
Despite the fact that this seems obvious, I start all instructions with exactly how to connect the router correctly, because even here there are mistakes that can later lead to Wi-Fi connection does not work.
There are five ports on the back of your router - four LAN ports and one WAN (Internet) port. It is to the last one, which differs from the other four ports, that you should connect the cable of your Internet provider - Beeline, Rostelecom or any other.
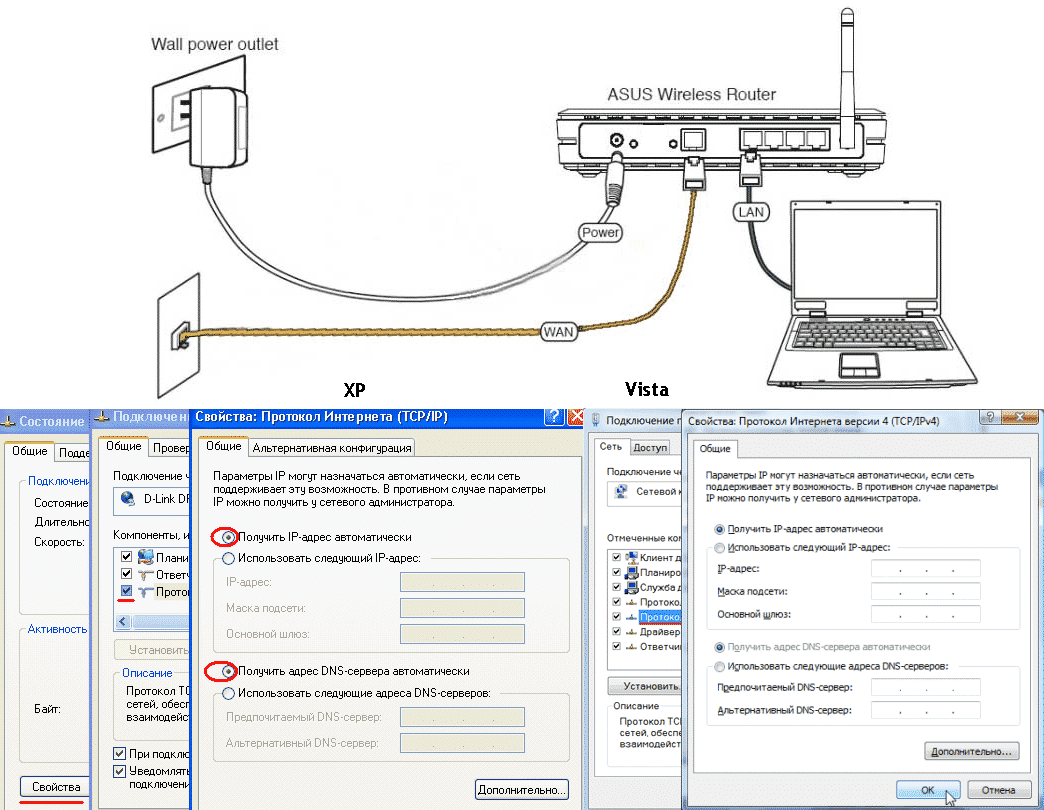
In addition, I recommend setting up a wireless router from a computer or laptop that has a wired connection to it, for which you should connect one of the LAN ports on the router with the same port on network card PC.
And the last point: it is advisable to check the connection settings in Windows () - you can skip this step now, but if you are unable to access the router settings, return to it first.
Don't forget to plug the device into a power outlet. And also, for all subsequent steps, turn off the Internet on your computer (if you have “ High speed connection", "Beeline" on the PC itself) only the local network connection should be active.
How to enter the router settings
On the back of the Asus RT-N12 (as well as on other routers) there is information about the address, login (username) and password - they must be used to enter the settings web interface. To log in, launch your browser and address bar enter the specified address, for Asus routers it is 192.168.1.1.

When you are asked to enter your username and password, enter admin for both (provided that you did not change them during previous attempts to set everything up).
Now attention: If this is the first time you have come here after purchasing or if you have just reset the router, automatic setup will begin - you will need to click “Next” and fill out the fields provided.

You will be asked to change the password to enter the “admin panel” of the router (the one that was admin), after which an attempt will be made to determine the type of connection and, if it is determined, you will be asked to enter your Internet login and password, and then set a name Wi-Fi networks and Wi-Fi password.
I won't describe automatic setup. If it is successful (and this may be the case for Rostelecom and Dom.ru), then you do not need my instructions - as a result you will be taken to the main page of manual Asus settings RT-N12, and the Internet will work. If after this the Internet does not work, then next I will tell you how to configure everything manually.
Setting up a Beeline connection
In order to set up Internet Beeline on Asus RT-N12, on home page settings, click “Internet” on the left, and on the page that opens, fill in the parameters of your connection as follows:

- WAN connection type - L2TP
- Username - your Beeline login
- VPN server - tp.internet.beeline.ru
And save the settings. If you entered everything correctly, and the Beeline connection on your computer is disconnected (this is necessary), in half a minute the router will establish a connection to the Internet and in a separate browser tab you will be able to open any sites, and those connected via Wi-Fi phones, tablets and laptops will also have access to the Internet.
You can go to settings wireless wifi network if you want to change something in its parameters (below in these instructions).
Setting up a connection to Rostelecom, Dom.ru (PPPoE)
To set up Rostelecom or Dom.ru Internet on this router, click “Internet” in the menu on the left, then fill out the suggested fields as follows:

- WAN connection type - PPPoE
- Obtain an IP address automatically - Yes
- Connect to DNS server automatically - Yes
- Username - your Rostelecom or Dom.ru login (for the Internet)
- Password - your password for the Internet.
There is no need to change any other parameters. Save the settings and, if everything was done correctly, then after a short time the Internet will be connected to the router, and you will be able to open the site and everything else with of this computer, as well as from other devices connected to the router (in this case, the High-speed connection on the computer must be disabled).
If required, also configure the wireless network settings - its name and password.
Configuring Wi-Fi wireless network settings

For Wi-Fi settings, select “Wireless Network” from the menu on the left, and then set the necessary parameters.