Three ways to open the Windows Registry Editor. How to open Windows Registry Editor Windows 8 registry path user
Then we create three folders on the hard drive with simple names: 1, 2, 3 and unpack the Windows 8.1 ISO image into each folder. I will create these folders on the drive (D:).
I will unpack the contents into folder 1 ISO images of Windows 8.1 64bit.iso.
Contents in folder 2Windows 8.1 Single Language 64bit.iso
In folder 3 contents Windows 8.1 PRO 64bit.iso

In subsequent actions, we will export Windows 8.1 64bit and Windows 8.1 Single Language 64bit to image fileWindows 8.1 PRO 64bit, located in the folder 3 .
Open command prompt as administrator

Any Windows ISO image 8.1 contains an image file install.esd, which contains the packaged setup files operating system. There can be several operating systems in the image and each has its own index . To find out how many systems are in the image install.esd and what indexes they have, open the command line and enter the command:
1\sources\install.esd
Where D:\1\sources\install.esd, this is the path to the file install.esd, which belongs to the Windows 8.1 64bit.iso operating system.
As you can see, the image file install.esd contains only one operating system Windows 8.1 64bit , which has an image index - 1 .
We determine the contents and image index of the install.esd files located in folders: 2, 3.
Enter the commands in sequence on the command line:
DISM /Get-WimInfo /WimFile:D:\ 2 \sources\install.esd
DISM /Get-WimInfo /WimFile:D:\ 3 \sources\install.esd
Windows 8.1 Single Language 64bit also has an image index 1 .
Windows 8.1 PRO 64bit too 1 .

Enter the following command:
DISM /Export-Image /SourceImageFile:D:\1\sources\install.esd /SourceIndex:1 /DestinationImageFile:D:\3\sources\install.esd /Compress:recovery
Where D:\1\sources\install.esd- the path to the file install.esd from the distribution Windows 8.1 64bit, and
Index:1- file image index install.esd from the distributionWindows 8.1 64bit.iso. This command exports Windows 8.1 64bit to file
Export image
The operation was completed successfully.
Enter the following command:
DISM /Export-Image /SourceImageFile:D:\2\sources\install.esd /SourceIndex:1 /DestinationImageFile:D:\3\sources\install.esd /Compress:recovery
Where D:\2\sources\install.esd- the path to the file install.esd from the distribution Windows 8.1 Single Language 64bit, and
Index:1- file image index install.esd from the distribution. This command exports Windows 8.1 Single Language 64bitto file install.esd located in the folder D:\3\sources\ and belonging to Windows 8.1 PRO 64bit.
Export image
[==========================100.0%==========================]
The operation was completed successfully.
Friends, we have created a distribution containing all editions of Windows 8.1 using command line! Let's check if this is true with the following command:
DISM /Get-WimInfo /WimFile:D:\3\sources\install.esd
Where D:\3\sources\install.esd- path to the install.esd file from the Windows 8.1 PRO 64bit distribution.

Image details: D:\3\sources\install.esd
Index: 1
Name: Windows 8.1 Pro
Description: Windows 8.1 Pro
Size (bytes): 12,868,729,263
Index: 2
Name: Windows 8.1
Description: Windows 8.1
Size (bytes): 13,131,438,018
Index: 3
Name: Windows 8.1 Single Language
Description: Windows 8.1 Single Language
Size (bytes): 13,136,752,145
The operation was completed successfully.
In other words, the image file install.esd from the Windows 8.1 PRO distribution, now contains two more operating systems: Windows 8.1 and Windows 8.1 Single Language.
Friends, the last thing left is to create a file ei.cfg and upload it to the Windows 8.1 PRO 64bit distribution ( D:\3\sources\)
The ei.cfg file unlocks additional configuration files that can be used in the process Windows installations 8.1, that is, we will be able to select its edition during the installation of the operating system!
Create a configuration file Windows release (ei.cfg).
This file is a simple text file with the name ei and extension .cfg. Create a text file, open it and enter:
Retail

then save it as ei.cfg right on your desktop.

Add the ei.cfg file to the Windows 8.1 PRO 64bit distribution, located in the D:\3\sources\ folder.

The smallest thing left is from the folder D:\3 with filesWindows 8.1 PRO createAn ISO image containing all editions of Windows 8.1, you can do this usingWindows Assessment and Deployment Kit (Windows ADK)
Download the Windows Deployment and Assessment Kit (Windows ADK) for upgrading to Windows 8.1 from the link
https://www.microsoft.com/ru-ru/download/details.aspx?id=39982

and install it

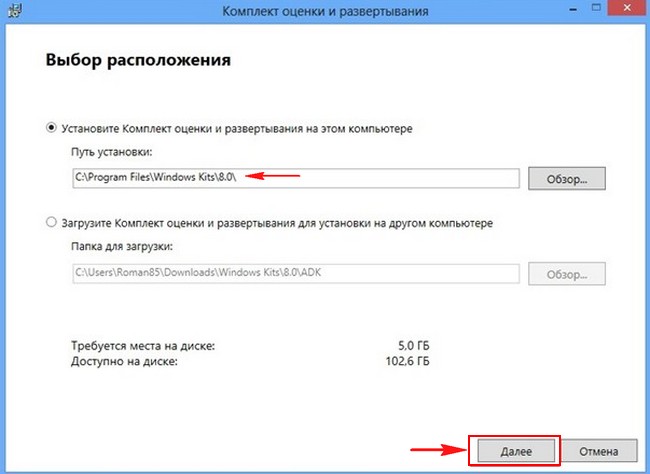
After installation we find in Windows applications 8.1 deployment tool environment, which is a command line window and launch it.

We enter a command that will create a common ISO image with three editions of Windows 8.1.
From this image you will succeed, with which you can install Win 8.1 on laptops with UEFI BIOS and on simple computers with normal BIOS:
Oscdimg /u2 /m /bootdata:2#p0,e,bD:\3\boot\Etfsboot.com#pef,e,bD:\3\efi\microsoft\boot\Efisys.bin D:\3 D:\ 8all.iso
u2, This file system UDF, and m- image size without restrictions.
b - boot sector write etfsboot.com, file path etfsboot.com when indicated b(boot) written without a space /bD:\3\boot\etfsboot.com
D:\3- create an image from files and folders located on partition D in folder 3
D:\8all.iso- place the created image on partition D
assign a name to the ISO image 8all.iso.

The ISO image containing all editions of Windows 8.1 is ready and located on drive (D:).

Instead of a conclusion:
If you want to create an ISO image only for installation on simple computers with a regular BIOS, then the last command will look like this.
oscdimg /u2 /m /bD:\3\boot\etfsboot.com D:\3 D:\8all.iso
If only for UEFI, then so
Today's topic is about the eight. As you already know, this OS has changed a lot GUI, and even experienced users found it difficult to find familiar elements. For example, due to the redesign of the start menu, not everyone could, and many such situations arose. To make it easier for users, let’s take a closer look at how to enter the registry in Windows 8 in several ways.
Remember, any changes made through the registry editor may negatively affect the stable operation of your computer. Before editing, make a system restore point, through which, in case of an error, you will return the PC to a working state. You can also make a copy of the registry section that you are editing. After all the preparations, you can start running regedit.
Ways to open the Registry Editor in Windows 8
The first method uses search. Click "start" and you will be taken to the start screen. In this area, move all the way to the right, then click the magnifying glass icon located next to the power control (shutdown) button.
Note: You don't have to go to the start screen, just press Win + W where you are now.
A panel with a search form will appear in front of you, where you will need to enter regedit.exe. After successful entry, click the Enter key or select Registry Editor from the list that appears below.
If you see a UAC window, click “yes”. This way you can access the registry on Windows 8.
In order not to enter the name of the editor file each time, I suggest placing the regedit file shortcut in a visible place. While typing the file name, when regedit appears in the list, click on it right click and select one of the following:
- Pin to Start Screen - Pins the Windows 8 Registry Editor as a tile to the work area of the Start screen.
- Pin to taskbar - The most productive of these two methods, a registry shortcut is placed on the taskbar.

The second method is to click on the item context menu. Windows 7 does not provide this function, so in the previous article we added this item manually. Right-click on an empty space on your desktop. IN open menu Select the item called “registry editor”.

In the third method it is necessary. This is done by a combination Windows keys+ R, after which the familiar construction regedit.exe is entered into the line, then Enter or OK is pressed.

By following 1 of 3 recommendations, you can enter the Windows 8 registry in a way convenient for you. All the described recommendations can be used equally, and there is no clear leader here. Sometimes a picture emerges that after trying all the steps, the Windows 8 Registry Editor does not open, showing an error that, follow the link to fix the problem.
Windows 8 is widely popular among PC users. But not everyone knows how to open the Registry Editor. There are several simple and effective ways to start editing it.
detailed instructions
Option 1
A shortcut using the Win+R key combination will open the Run window.
Write the regedit command there and confirm the action with OK.

Option 2
We call the Task Manager with the well-known combination Ctrl+Alt+Del.


At the end of the procedure, enter the already familiar regedit request and confirm the action.

Option 3
If you hold the mouse cursor on the right side of the screen, the so-called Curtain will appear, which we will need. On it we look for the Search line.

Under the Applications item there is a Search line, where we write the word regedit.

All that remains is to activate the application.

Option 4
In the upper right corner of the My Computer window there is a Search line, which is what we will need. There you need to write the regedit command.

Among several shortcuts, you need to select the one that is saved in the C:\Windows directory.

Option 5
Go back to My Computer and open drive C.


Among the abundance of shortcuts, you need to find regedit with the Application type. Open it by double clicking.

These are the methods available to clearly see how to launch the registry. These instructions also apply to Windows 8.1. Each option only takes a few minutes.
When I hear the phrase Windows registry, I imagine the program icon regedit.exe - a half-disassembled green cube consisting of smaller cubes. What exactly is a registry? I think many Windows users have heard about it, but not many have seen it and understand what kind of miracle it is.
The Windows 8 registry is a database containing operating system and program settings. So, the registry is a database. Like any other database, the registry is stored in files on the hard drive. There are several registry files, the main part is located in the C:\Windows\System32\config folder (%windir%\system32\config). If you look into this folder, then all the files opposite which the type “File” is indicated will be the same registry files.

Another place where registry files are stored is in the root folder of user profiles and along the path C:\Users\\AppData\Local\Microsoft\Windows (%userprofile%\AppData\Local\Microsoft\Windows). Each profile has its own registry files, since each account uses its own unique hive (section) Windows registry, because the settings for all profiles are unique. To open your profile, press the WIN+R key combination, in the window that appears, type %userprofile% and click OK. These files will probably be hidden from you; you need to enable the display of hidden and system files to see them. In the screenshot below you can see that the registry file is NTUSER.DAT, the rest are logs necessary for recovery in case of an unexpected failure.

What do we have on this moment? The Windows 8 registry is stored in files scattered across folders. In order to view or edit some settings of the operating system or programs, you can use the regedit.exe program. It is stored in the C:\Windows folder, but you can launch it by pressing WIN+R and typing regedit. In general, Microsoft does not recommend making changes to Windows settings directly through the registry, and use the existing user interface of the operating system. If you ran regedit, I recommend not making any changes, but just familiarizing yourself with the database structure.

Since all Windows settings are stored in the registry, in the absence of that same user interface (which is typical for stripped-down Windows versions such as Windows 7 Starter), many settings can be changed through the registry. For example, you can use regedit to change the desktop background by specifying your path to the image file, although this cannot be done through the Control Panel.
That's all I would like to tell you.
There are 2 methods of cleaning the registry in Windows 8: manual and automatic. The latter involves the use of auxiliary programs. There are free and paid, simple and difficult to learn, as well as with and without the Russian language. We looked at many such programs and have currently selected two good options- CCleaner and Wise Registry Cleaner. CCleaner has been described several times on our portal, so we will look at the Wise Registry Cleaner program. Its advantages: it is free, easy to use, available in Russian and a full range of functions for working with the registry. With Wise Registry Cleaner, you can not only clean the registry, but also defragment it.
Method 1: Standard Windows 8 Tools
Most often, users are faced with a situation where a program has been uninstalled, but it continues to be listed in the system and in the list of installed utilities. Fortunately, all of its remaining files can be deleted manually using the Registry Editor from under account Administrator. To do this, click Win+R and write the command regedit:

We indicate Entire registry→ indicate the file name (it is better to indicate the time and date here) → Save:


The editor will find the corresponding file. Select it and press the key Delete. Confirm deletion:

Be careful as damage to system files can cause errors and crashes. You only need to delete application program files that are not directly related to Windows OS and system drivers.

We repeat this process until there are no files left in the registry associated with the deleted program.
Method 2: Automatically clean your registry with Wise Registry Cleaner
Let's start with cleaning. To get started, click on the button Scan to get a list of problematic registry keys:

Now, before we start cleaning, let's create a system restore point and a registry backup. Generally, backup copy The registry should be enough, but it is better to use both options, because a system restore point may always be needed in the future. 

Next, click on the button Cleaning and the program corrects all errors and inaccuracies.
The registry defragmentation function is located on the third tab, which is called Registry compression. Here the scheme is exactly the same: first analysis, then defragmentation. As a result of defragmentation, empty areas of the registry are removed, it becomes more compact and begins to weigh less, which is why the tab has this name.


The middle tab contains system optimization functions, but they are not relevant to this topic.