Download system recovery android. Instructions. How to restore original factory settings or wipe the Android operating system on phones and tablets
Intensive use of a mobile gadget leads to the fact that over time its operating system begins to “glitch”. Errors appear in the operation of certain applications, the device freezes, and functions may become unavailable. This material will allow you to find out in what cases it is necessary to restore the Android system and how to do it correctly.
First, let's look at the reasons why you can determine the need for restoration standard settings platforms:
- Infection of a mobile gadget with viruses and malware. This happens as a result of the fact that the user did not think about the security of the device and did not install antivirus program. The likelihood of a gadget being infected will be high if the user constantly clicks on suspicious links from emails. This happens due to the installation of unofficial programs and applications or software developed by hackers. Viruses can also enter your phone from suspicious Internet resources.
- Platform littering. This problem is relevant for active users who regularly download new software and applications to their phones. The official store offers users a large selection of applications and programs, but this does not mean that you need to download everything. A large number of installed programs will lead to a decrease in the efficiency of the operating system, as a result it will “freeze”, making it almost impossible to work.
- Software malfunctions in the phone. There are no viruses on the smartphone, the programs only contain the necessary software, but the phone does not work efficiently. The reason may be a malfunction in one of the installed utilities. Moreover, sometimes the malfunction lies precisely in the operation of system applications.
Recovery procedure
The recovery procedure is not a particularly complicated process that a schoolchild can handle today. To do everything correctly, consider a few nuances described below.
If this is your first time encountering the need to restore the operating system on your phone or tablet, it will be useful to learn about the function Reserve copy. When you completely update the platform and return it to the factory configuration, all user information, account information, contacts, etc. will be deleted from the phone. Therefore, you will have to re-find and install the programs and applications necessary for normal operation. It is almost impossible to remember the list of all installed programs on your phone; it is especially difficult to find applications. You can use the copy account option, this will allow you to register all programs in Google Play.
The backup procedure is performed as follows:
- First, go to your phone's settings menu.
- Here you will see the Recovery and reset tab. Select Information Reservations (backup).
- Check the appropriate box next to the item. This will save the information to a cloud service.
- Next, you will need to specify account Google for data backup.
- Below you can see the inscription - Auto recovery. Check the box next to the item.
- When the actions are completed, all your information will be restored to automatic mode to factory settings after you perform a restore (video published by Android Software channel).
Please note that after recovery you must provide the login and password of the account that was used to register on Google Play.
How to reset Android settings
If the operating system on your mobile gadget has crashed, but you can still access the settings, then you can try to perform a recovery.
How to restore the device's operation with your own hands:
- First, you need to go to the phone settings option and find the tab for Restore settings and reset them.
- Go to the reset option. The gadget will warn you that the information will be deleted from the phone. If necessary, back up your data or select the files and transfer them to external storage. Just below is the red reset button for the mobile computer.
- Select Reset settings. A warning will appear that data will be deleted from internal memory. If there are important files or documents in the internal memory and you don’t want to lose them, you need to copy all this data to an external memory card or to cloud storage. At the same Google Drive, For example. Below is the “red button” Reset the mobile computer.
Write down your account login details separately on paper, if you don’t remember them by heart, this will allow you to quickly access your account after recovery. - During the reset, you will need to put the phone on charge by connecting the wire to it. The recovery process itself is performed automatically and does not require user participation.
- When the procedure is completed, you need to log in Google services, to do this you will need to enter your username and password for your account.
- When you successfully log in, the system will begin to check and install all programs that were installed before the settings were reset. If you want the installation process to be completed faster, connect your mobile gadget to the Internet via Wi-Fi, since it will be restored when connected via mobile internet the programs will take a long time. This completes the restoration.

1. Click on settings.

2. Select the third option.

3. Confirm the selected action.
But what if the operating system does not even respond to touch touches and you cannot enter the settings menu? In such cases, you can use the physical configuration reset function, which is provided by almost all mobile device manufacturers.
In accordance with the technical and design features, recovery options may be different, so we recommend that you familiarize yourself with the service book for the phone:
- A mobile device can be equipped with a special small hole on the device body. Typically this hole is located next to the power button; on tablets it is often located on back cover, near the camera or speaker. There is a small button in this hole; you need to press it with a pin or needle. Essentially, this is a reset button, like on a computer.
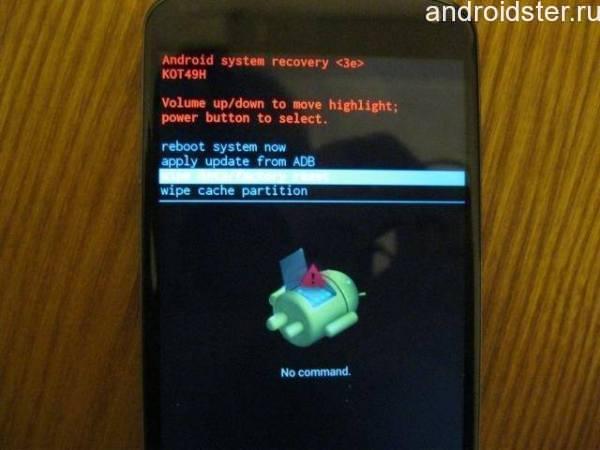
- You can try to turn off the device and at the same time press the power key, as well as the volume up or down button (usually down). In some devices, you can hold down the power button and briefly press and release the volume key. Ultimately, a menu should appear on the display where you need to select the “wipe” item data factory reset" and then click on "yes - delete all user data".
Mobile devices are so intertwined with everyday life that not having a smartphone at hand can cause panic. And if it’s broken, then there’s nothing to say. For many, this threatens the loss of thousands. nerve cells. In this article we will look at how to restore Android work device in case of some “breakdowns”, we will learn how to partially restore its functions before purchasing a new one and get important information from a broken phone.
The ideal option for the recipes described in the article is a phone with an unlocked bootloader, custom TWRP recovery installed (CWM has not been updated for a long time), with root rights and the “USB Debugging” checkbox in the developer settings. Such a little thing as this very tick will allow in case broken screen not only retrieve data from the memory card, but also retrieve contact databases or SMS using the ADB plugin for Total Commander.
I recommend doing these manipulations right away so that it won’t be excruciatingly painful when problems arise with your phone. All examples will be given for the Nexus 5, as the most common reference Android smartphone.
PROBLEM #1. PHONE WILL NOT LOAD UP
Let's start with the most common problems. The phone stopped booting. The Google logo is constantly hanging, and things don't go any further. We have a classic bootloop (bootloop - loading in a circle). It can occur after a monthly device security update, even for users with stock firmware who have never accessed the system. There are three solutions:
- do a reset from stock recovery (will lead to the loss of all data) or from TWRP (data will not be lost);
- flash the full OTA image in ZIP format from stock recovery via sideload, which Google began uploading for common use, which has greatly simplified life for many users (the data will not be lost);
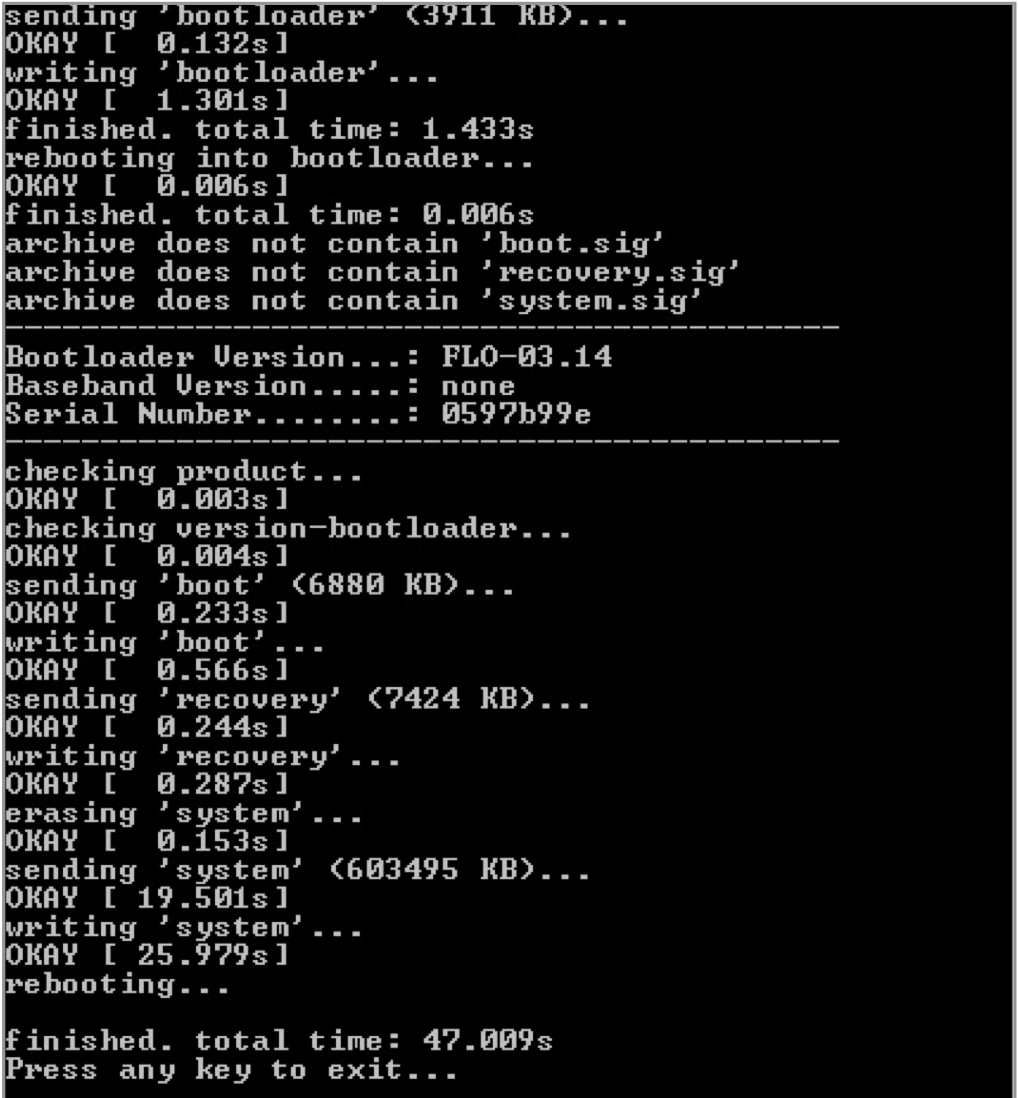
- flash the full firmware image, having previously removed -w from the flash-all.bat script so as not to lose data.
PROBLEM #2. PHONE WILL NOT TURN ON
If the battery is completely discharged, the phone may not turn on even after connecting the charger: when the charge reaches a few percent, the smartphone will begin booting, during which it will drain the battery and turn off again. There may be several solutions.
- Connect a charger from another device with a high current, ideally 2A.
- Go to the bootloader (usually volume down + power), then use the “Power” button to confirm the selected Start item. If it doesn’t help, then in bootloader mode select Power down with the volume, then confirm with the power button. Next, you should disconnect the charger and connect it again within ten seconds. A battery icon should appear on the screen. After this, you can try to turn on the device, after letting it charge for at least an hour. You can read more on the official support page.
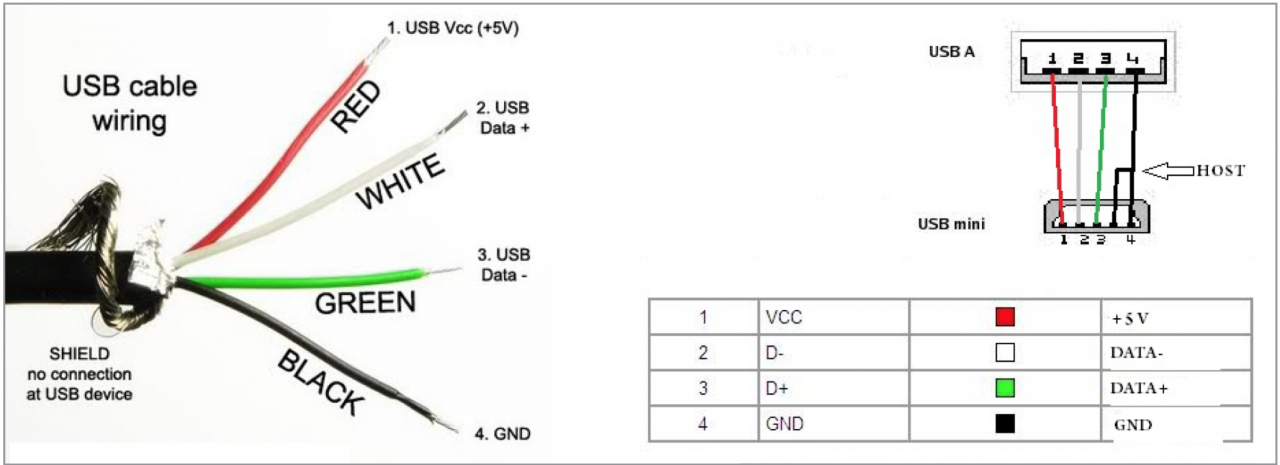
- Power your smartphone from the USB output of your computer using a homemade frog. To do this, just find any USB cable (also suitable for a mouse), cut it off, and then connect the red wire to the positive of the battery, and the black wire to the negative. Next, the battery should be put in place (with the wires connected) and the smartphone should be turned on.
 PROBLEM #3. PHONE DOESN'T RING
If you can’t make a call or your smartphone doesn’t see it at all mobile network, then first of all you should check the IMEI. You can do this by dialing *#06#. If zeros are displayed instead of the number, then the IMEI has been lost. The easiest way is to restore it from a backup, so I recommend doing it after reading the article and uploading it to the cloud. IN Play Market There are a lot of programs for creating and restoring such backups, so I won’t dwell on them. You can do the same with your hands. For example, for Nexus 4, in the terminal emulator or from the console, you need to enter the following commands:
Backup IMEI:
$ adb shell > su > dd if=/dev/block/mmcblk0p8 of=/sdcard/m9kefs1.img > dd if=/dev/block/mmcblk0p9 of=/sdcard/m9kefs2.img |
Repair IMEI:
$ adb shell > su > dd if=/sdcard/m9kefs1.img of=/dev/block/mmcblk0p8 > dd if=/sdcard/m9kefs2.img of=/dev/block/mmcblk0p9 |
The Nexus 5 does not have a dedicated EFS partition. Therefore, you need to backup sections 12 and 13 in their entirety:
$ adb shell > su > dd if=/dev/block/mmcblk0p12 of=/sdcard/modemst1.img > dd if=/dev/block/mmcblk0p13 of=/sdcard/modemst2.img |
Restoration is carried out as follows:
$ adb shell > su > dd if=/sdcard/modemst1.img of=/dev/block/mmcblk0p12 > dd if=/sdcard/modemst2.img of=/dev/block/mmcblk0p13 |
But what to do if there is no backup? There is a way to restore IMEI in this case too. You need EFS Professional and QPST utility sets, as well as Qualcomm drivers for your device. First, the modified kernel is loaded, then the phone is rebooted into diagnostic mode with the commands
$ adb shell > su > setprop sys .usb .config diag , adb |
After this, IMEI can be changed. Detailed instructions. If you don’t have the box at hand, you can find out the IMEI from Google at personal account on the Android tab.
Additionally, you will need to know the SPC code - a six-digit number required for the operation of service programs. You can do this as follows. Download from the market and launch Nexus 5 Field Test Mode, click three dots, then Settings (view), then select LTE, edit, a window will pop up asking for a code. After this, you need to enter in the console:
Flashing a full image on Nexus 7 via flash-all.bat without the -w parameter
Red - plus, black - minus
> adb shell > logcat - d | grep "commandId 200" |
The response will be lines like:
> 08 - 02 10: 16: 27.140 14401 14401 D LG_SVC_ITEMS: getCommands commandId 200 - START |
> 08 - 02 10: 16: 27.185 14401 14401 D LG_SVC_ITEMS: getCommands commandId 200 = 353662 - END |
where the six digits at the end are the required code.
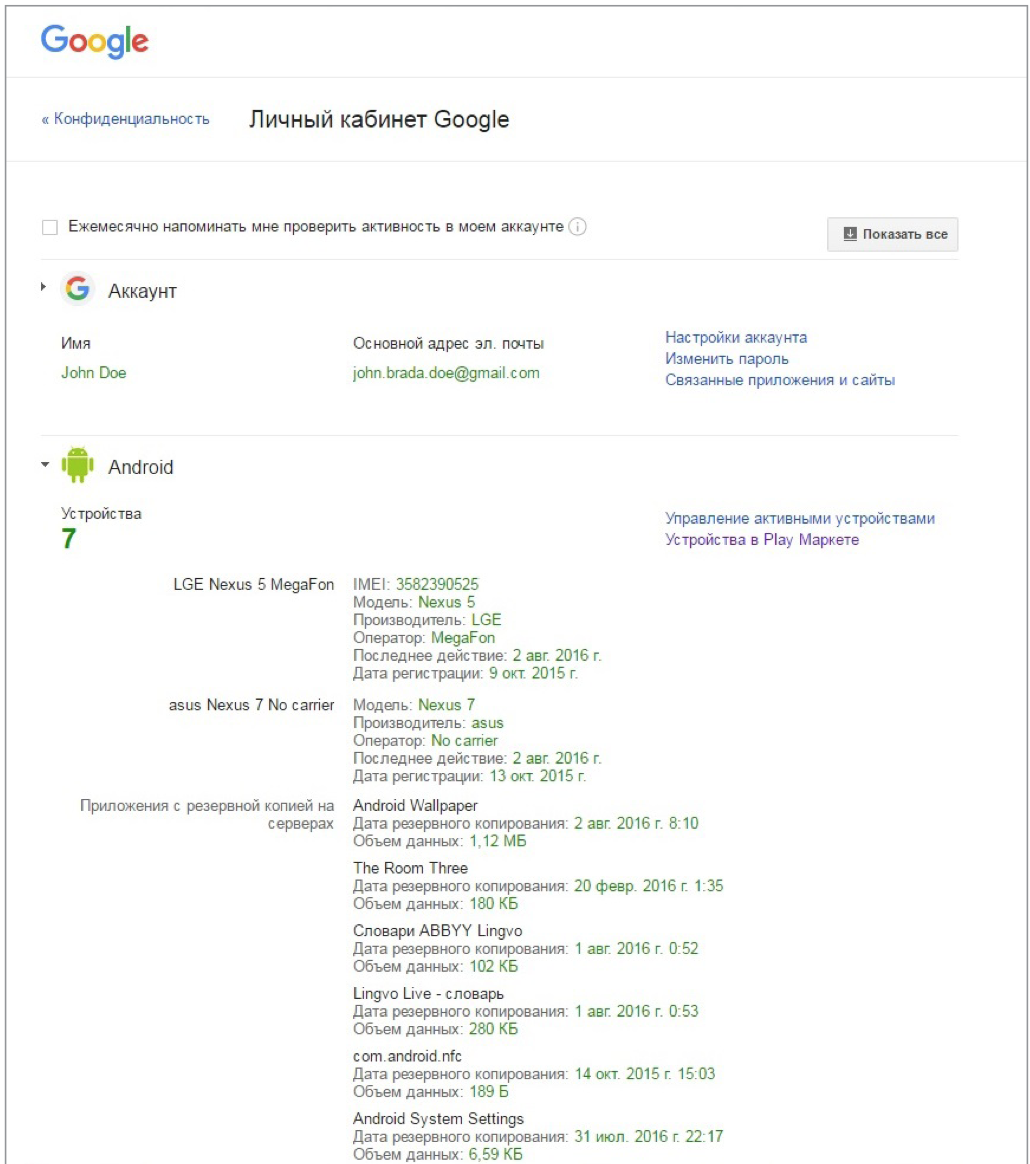
Android tab with IMEI in your personal account
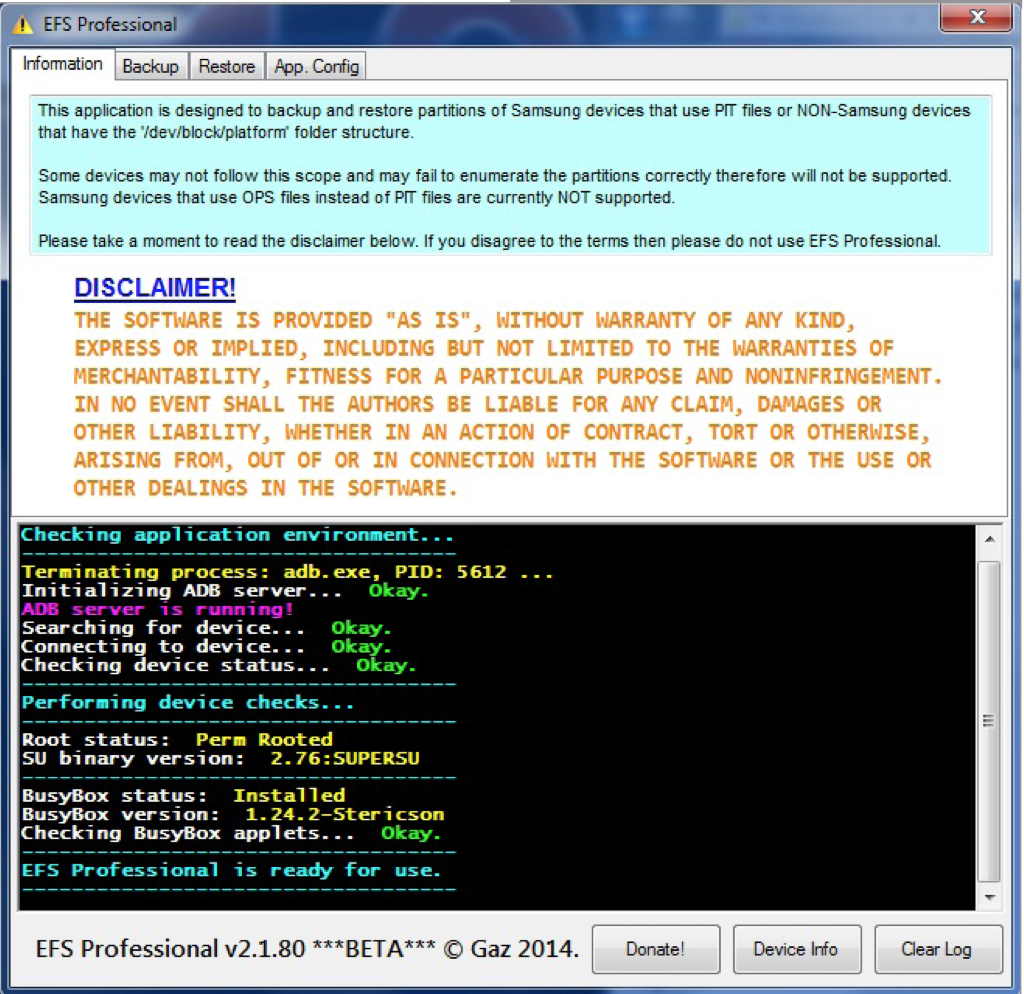
Connecting the EFS Professional program
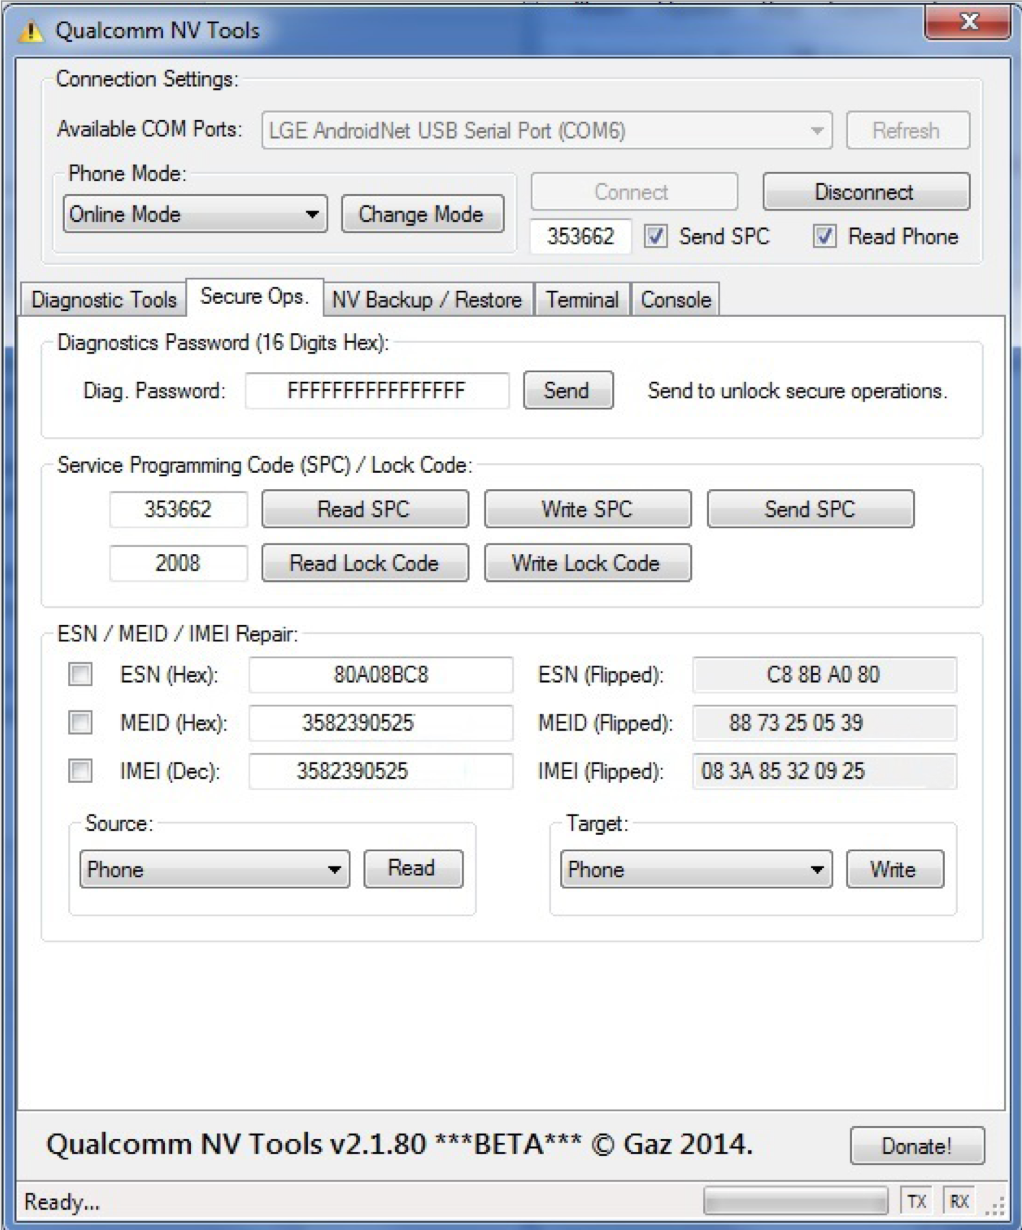
Operation of the Qualcomm NV Tools utility included in the EFS Professional kit
PROBLEM #4. TOUCHSCREEN DOES NOT WORK
If you accidentally drop your phone, you can damage the screen and, as a result, the touchscreen. In this case, a mouse connected to the smartphone via a USBOTG adapter will help. You can also connect the device to your computer and use the console and ADB for control, which I wrote about in the article. ADB will allow you not only to launch applications, send SMS and even make calls, but also to emulate taps on the screen. The commands look like this:
Text - enter a string;
keyevent - emulate pressing a hard button;
tap - tap on a specified location on the screen;
swipe - swipe from x1, y1 to x2, y2.
Using QPST, you can activate LTE frequencies suitable for use in Europe on the Nexus 5 of the American model D820.
For example, you can pull out the curtain with notifications like this (coordinates are counted from the upper left corner):
If only part of the screen does not work, you can arbitrarily move the displayed image through console command wm overscan or Screen Shift program.
PROBLEM #5. USB DOES NOT WORK
If according to USB phone It charges, but when connected, the computer does not see the device; you can manipulate the phone via Wi-Fi. To do this, you need root rights and the WiFi ADB application. We launch the application, press the button and connect to the smartphone using the connect command and the IP address shown by the application:
The phone will boot. To ensure functionality, you can install the GravityBox module for the Xposed framework and enable the “Wake up with volume” option or install a kernel with DoubleTap2Wake support. To be able to turn off the screen (lock), you must activate the “Double tap to sleep” option in GravityBox.
Other hardware buttons can be reassigned by editing one of the files /system/usr/keylayout. There are few hardware buttons on the Nexus 5, so I’ll give an example with the Micromax Q415 smartphone. It has a very poor placement of the Back and Menu buttons, but they can be easily swapped if you edit the ft5x06_ts.kl file:
key 158 BACK
key 139 APP_SWITCH key 172 HOME
key 217 SEARCH
key 249 MENU
It is enough to indicate the keycode 249 in the first line, and 158 in the last line. You can similarly change any other buttons, including the volume buttons (their settings may be in another file).
PROBLEM #7. WHAT TO DO IF YOU FORGOT YOUR PIN CODE
Let's say you forgot your PIN or set a pattern key not entirely sober, or your friends joked and turned on facial recognition. So, if the device is locked for some reason, the lock can be removed (provided USB debugging is enabled and root rights are enabled) through the same console:
$ adb shell > su > cd/data/system > rm*.key |
The command will remove all passwords and graphic keys. The files themselves, depending on the firmware and model of the device, can be: gesture.key, password.key, cm_ gesture.key, personalpattern.key, personalbackuppin.key. The files locksettings.db, locksettings.db-shm, locksettings.db-wal are also responsible for blocking.
After this, just reboot the device and enter any key or password. If this doesn't help, you can try the following:
$ adb shell > cd/data/data/com.android.providers.settings/databases > sqlite3 settings.db > update system set value = 0 |
PROBLEM #8. REQUESTING A GOOGLE ACCOUNT AFTER A FACTORY RESET
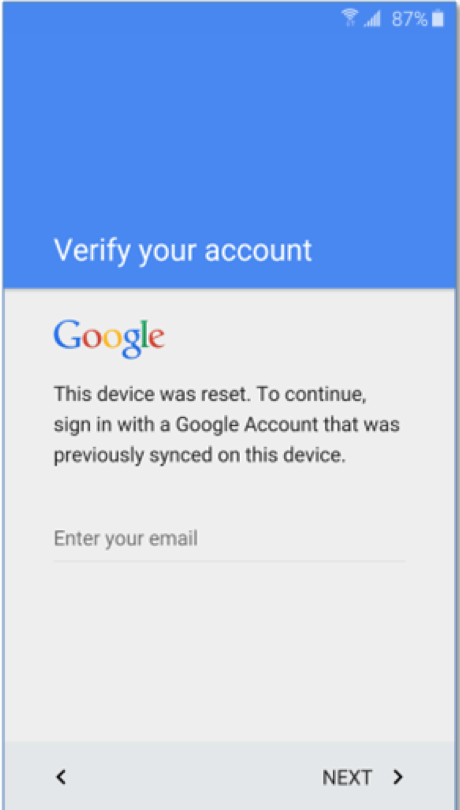
On all Nexuses starting with Nexus 6, as well as on many modern ones Google phones and manufacturers introduced new system protection of user data, called Factory Reset Protection (FRP). Now, after resetting the device to factory settings, at the initial setup stage the user will be required to enter data (email address and password) from the previous account to which the phone is linked.
According to Google, such protection makes stealing a phone pointless: an attacker who fails to guess the password will be able to reset the device to factory settings through stock recovery, but will run into this screen when loading.
But what should honest users do if they have forgotten their login and password on their device? You set up the phone for your parents and forgot your email and password. will come to the rescue YouTube channel Rootjunky.com. The channel has a lot of video instructions on how to bypass protection on different devices, including the June 1, 2016 security update and Android firmware N developer preview 4.
They boil down to the fact that you need to get to the browser, download and install the QuickShortcutMaker program, find Google Account Manager in it, select Type Email and Password, click Try, three dots, then Browser sign-in. After which you can enter the data of any account and reboot the device. Once the setup wizard starts, it will no longer require Verify your account.
adb shell make_ext4fs /dev/block/mmcblk0p16After this, the device should work normally. The only negative is that the /persist directory will be empty, and the MAC addresses for Wi-Fi and Bluetooth will change with each reboot. If this is critical, then additional steps can be taken:
As you can see, even in the event of major breakdowns, you can still work with the device, albeit with difficulty, or at least extract important information from it. And it’s almost impossible to kill Nexus. You have to try very hard to deliberately flash a file from another device or pull out the cord at the time of flashing. I hope that with this article I will encourage you to study the insides and principles of operation of devices and help you save your nerves in future breakdowns.
Last updated by at November 18, 2016.
In the first case, there is nothing much to worry about, since, most likely, the cause of the trouble was a conflict in some applications or widgets, and everything can be corrected by returning to the factory settings. If the smartphone still works, albeit with various “artifacts,” you can also fix this yourself. In the third case, get by “ little blood"It’s unlikely to succeed and you’ll either have to restore your smartphone via a computer using a special software, or contact a service center or a familiar computer guru who knows how to restore Android after unsuccessful firmware.
How to restore factory firmware on Android
First of all, you need to find it. This will not be difficult to do, since popular manufacturers of mobile gadgets post the latest firmware versions for all models of smartphones and tablets on their official websites. The necessary software and detailed guide, how to return the factory firmware to Android. If there is none, you can easily find it on the Internet by indicating the exact name and model of the device.
Rollback "raw" new version updating the firmware to stable is the easiest way to fix a smartphone after an unsuccessful upgrade. If, of course, the user has a backup copy made in advance. It should be noted that even Google has recently been insistently recommending making a system backup before each update, and this suggestion should not be neglected. Moreover, all the necessary functionality is included in the firmware, and if desired, you can use special programs from Google Play. This will not take much time, but it will protect the user from the loss of valuable data and other problems that may arise if the update is unsuccessful.
Popular utilities for creating backups and restoring Android systems
Titanium Backup
One of the oldest and most popular programs for data backup and recovery. It has very broad functionality, which is both its advantage and disadvantage. The latter is that if you accidentally activate the wrong process, you may not get the desired result or cause even more harm. Therefore, before you restore the firmware on Android using it, you need to find suitable instructions and strictly follow them.
Important note: the program only runs as superuser ().
Easy Backup & Restore
Also very a good option. The capabilities of this utility are even wider than the previous one, since you can copy everything from applications to contacts, bookmarks, calendar events and language layouts on the keyboard. Moreover, the “backup” can be either saved on a smartphone or sent to the “cloud” or to a PC. In general, everything is provided.
How to flash Android through recovery
ClockworkMod Recovery is a “must have” application. It is a much more advanced alternative to the standard utility (recovery), which is included in the operating system by default. If the latter can only clear the cache and perform updates, then ClockworkMod Recovery allows the following:
- edit system components via Android SDK;
- create a full system snapshot and use it as a backup;
- install third-party firmware;
- update hotel system utilities;
- create and edit partitions in the file system.
Download ClockworkMod Recovery for Android
CMR is popular app, so there are versions for almost all smartphone models. How to flash Android through recovery using ClockworkMod Recovery? The instructions are actually very simple and all the work is done in a few steps:
If there is, then through the Recovery mode (where you can save and restore all the data), from a flash drive. And so through a computer using prog.
An excellent program for recovering lost data on Android is... After installation, Undelete for Root Users for Android will scan the memory card and...
Android cannot collapse (like Windws).
This means there is nothing to restore.
As already said, there is nothing to restore
Well maybe...
Standard call to the recovery console - ON button + volume key (down)
if you need to restore the system state, then use Titanium Backup (root)
all questions about the machine HERE
Hello! Previously, this page was intended to help dead Android devices. The project is currently closed due to lack of support and any gratitude from those asking for help...
How to recover deleted files? Android and what to do if the recuva program does not see the phone?
You can download Undeleter Recovering files deleted from SD cards and internal memory on Android using the link below.
Android tablet repair addresses
Google - tablet repair in Mukhosransk.
Android phone is usually used to access various data on the Internet and... Recover deleted data Android data using a PC.
How to restore photos on Android after returning to factory settings?
If the photos were on a memory card, then take it out, insert it into a card reader or adapter, put it in a laptop or computer and use the Rekuva program to restore it, if the photos were on the phone itself. then connect the phone using a USB cable to the PC and use the same program (provided that the program sees the phone’s memory). In theory, you can try working with a memory card via the cable
List of Android applications for data recovery. DiskDigger version of the utility for Android smartphones and tablets to recover deleted photos...
How to restore hidden applications on Android 5.0.0
The same way I hid it - only in reverse order.
How to recover deleted files on android? ... 6.After waiting for the data search to finish, select the files that require recovery by checking the boxes in front of them...
How to restore deleted system applications on Android?
Look at the website undelete-file.ru, everything there for recovering deleted files.
Backup and restoration. Sort by... Absolutely another necessary utility for every Android smartphone or tablet.
Tell me how to restore Android OS from a disk on an Acer D257 aspire one netbook
Only by reinstalling, or restoring from recovery, if available
Archos 101 IT - restoring Android on a tablet. June 13, 2011, 14 53. ... Archos 101 IT has a recovery menu Archos A101IT Recovery.
How to restore the Android system on a Samsung galaxy tab 4 tablet?
In this article, we will tell you how to recover deleted files on Android quickly and effortlessly. ... So, let's begin the recovery process
How to restore an application on Android I accidentally deleted the game, now I don’t know how to restore it and I don’t want to play again
It depends where you downloaded from. If from the play market, then no way. If from some site, then look in the downloads. But you'll probably have to start the game over again
All applications for android All about os android Instructions for os android How to recover photos on... Therefore, you will have to pay for data recovery.
Better study Russian. it will be more useful than some game crap
It is forbidden! Download again only
How to recover a file on an Android phone?
WHERE the file is important, and WHAT is the phone. If it opens like a flash drive, then Recuva is elementary: https://yadi.sk/d/mmBN_ZTs7YhxE
And if not, and the file is in the phone’s memory... there’s dancing with a tambourine (((
Recovering data on a tablet in service center It will only take a few minutes. ... How to delete history on an Android tablet?