How to make a speaker from a phone speaker. DIY music speaker for your phone. Speaker for computer from phone
If you don’t have a ready-made board with ULF, just solder it according to this scheme. You can read it here. I checked - everything worked perfectly.

The power output is about a watt. Therefore, I took on a more reliable design of the structure. But first things first...

1. Introduction. I had Chinese speakers - genius. But they bought me a subwoofer and powerful speakers, and threw these geniuses into a drawer.
But one day, after watching a video on YouTube of how people make speakers in a cardboard box, I decided to make a portable speaker for my mp3 player myself.
2. Dad taught. Everything is fine with the electronics and I figured out what to do to make the speaker portable - exclude the transformer that converts 220V to 9V from the power supply circuit of the speaker amplifier. And directly connect the crown battery.
3. Ololo. I made a demo version, assembled on the table: HURRAY EVERYTHING WORKS! But a problem arose: after three hours of operation, the speaker began to wheeze and grumble (as it turned out, there was not enough current). Almost the entire forum helped me solve this problem - thank you all very much! In fact, you just had to connect the second crown to direct connection(not sequential). When turned on in this way, the current increases, but the voltage remains the same.
4. Design options. When I watched a video on YouTube about mobile speakers, I was ashamed. Because quite good inventors made the housing for the speaker out of cardboard. I decided not to embarrass myself and assemble a decent plexiglass case. This decision was made for several reasons:
A) plexiglass is transparent and paint can be applied from inside the case, then it will not be scratched.
B) this is the only material I had (except cardboard).
5. Frame. I had a piece of plexiglass stained with paint. I had to scrape off the paint, which left scratches, but I found a way out: clean the plexiglass with scratch pad (sandpaper). And make it matte. Having completed these operations, I marked the body on a sheet of cardboard, where, as always, I made mistakes: I did not take into account the thickness of the plexiglass. Having cut the plexiglass into pieces, I trudged into the garage to finish the parts on the grinder. The next day, having previously assembled the case and tried on the speaker, I took into account all my mistakes and... again trudged to the garage... Finally, the case was assembled!
6. Painting works. Having disassembled the body for painting, I degreased the inner surface of the body and applied masking tape. Carefully, using an office knife, I cut out semicircles on the tape and “removed everything unnecessary.” Next I painted the surface.

7. Assembly. The painted body was assembled like this: first I taped all the junctions of the corners with masking tape from the inside. Then he began to twist the sides. Having assembled the box, I placed a rubber “mat” on its bottom so that the amplifier contacts did not short out to the bolts. Next I installed the amplifier itself. I didn’t want to think about fastening the speaker, so it is attached to the bottom of the box with two studs standing diagonally. The wire came out from the side.
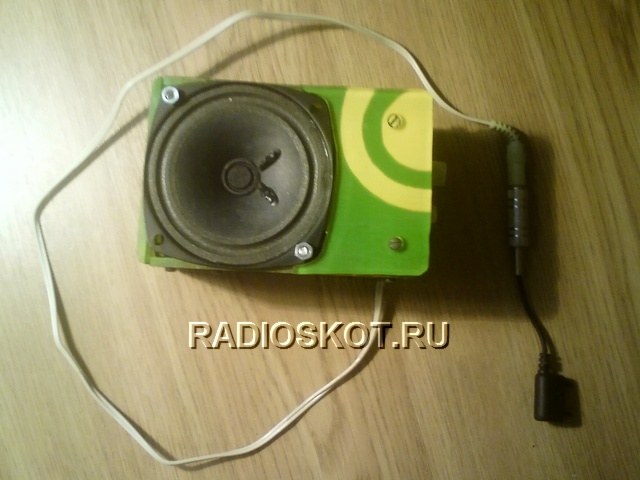
8. Characteristics. Dimensions of the finished speaker: height 6.5cm, length 11.5cm, width 8cm. Weight 200+/-10g. It is powered by two “crown” batteries with a total cost of 35 rubles. It is advisable to remove the batteries after each use of the speaker. Access to the insides of the speaker is gained by removing the speaker.
9. Manufacturing Features. Replaced two capacitors on the amplifier. One wall of the case cracked after falling from a workbench in the garage into an inspection hole. I was fiddling with the output contacts (the sound was distorted). Nevertheless, I was pleasantly pleased with the result - they play no worse than store-bought ones, plus pride in the device I assembled with my own hands :)

A video clearly showing the speaker assembly process and the final result.
Of course, speakers housed in a wooden case will have a much more pleasant sound, but with such a low power of the speakers this is not critical. Author of the design: Romanenka
Discuss the article HOMEMADE PHONE SPEAKERS
Hello, dear radio amateurs, guests site. I present to your attention an article about how to make DIY phone speaker. Described here simplest option, which uses a minimum of parts and preserves good quality sound. You can connect a phone, mp3 player, laptop, etc. to this speaker.
The figure on the left shows the circuit diagram of a low (audio) frequency amplifier ULF, performed on 2-channel, stereophonic microcircuit TDA7050, connected via a bridge circuit, i.e. the output signal is removed by one speaker from 2 channels simultaneously, hence the increased output power of the amplifier. Fundamental email scheme amplifier available upon download free video lesson.
The main feature of the microcircuit used is efficiency and low-voltage power supply, minimal, please note 1.6V; maximum - 6V, i.e. one 3.7V telephone battery is more than enough (instead of a whole package of as many as 3 pieces in the case of TDA2003 and similar ones, where the U supply is 12V. How to charge? Each one in turn or assemble a 12V charger).
It’s a completely different matter - I connected the speaker to a phone from which the battery was removed, and let it charge, and the battery charge level is always visible on the display!

The circuit is soldered by surface mounting - the simplest and in a fast way without production printed circuit board. But there is also a minus that reduces the reliability of the device, namely, if one wire from the speaker is soldered to the 6th and 7th legs of the MS (see diagram), then several wires plus a signal wire shield are soldered to the 4th or 5th leg. This is the difficulty: when you solder the next one, the previous one is unsoldered. If you twist the wires and solder them to one leg, a short circuit to the adjacent ones is possible. In addition, due to the thickness of the twist, the thin leg of the MS cannot withstand the rigidity of the twist and bends at the slightest inclination, resulting in a possible short circuit. How to avoid this, see. The video tutorial shows the order in which to assemble. In general, the ideal option is to solder one wire to each MC leg.

Used in design chip TDA7050(in DIP-8 package) does not require installation on a heat sink, this is very important for portable speaker . After all, the heat sink is a rather large part, and the space in the case is limited. Yes, and you will have to attach it somehow.
A few words about power. Even an average volume is quite enough for individual listening, and if you turn on the speaker at full volume, then the music and lyrics can be clearly heard on the street within a radius of 8-10 meters, even in windy weather, see video. Evaluate the speaker’s performance in the field, its volume, sound quality, ease of use, and portability. This is especially true for children who are fond of sports, lovers of cycling and outdoor activities.


The microcircuit (MC) is also available in a more compact form: package type SOP-8. The key against which the legs are counted is a point on the body near the 1st pin or a chamfer along one of the sides. If you look closely, you can see it. It is very difficult to work with an MS in this design due to its small size. The strain on the eyes is quite sensitive, and experience and precise movements of the soldering iron are also required. I strongly advise beginner radio amateurs not to use a MS in a SOP-8 housing; moreover, it got noticeably hot during operation - I had to make a heat sink from an aluminum sleeve from an electrolytic capacitor and glue it to the MS with a drop of glue. The photos are posted to inform you that this option is also possible. It's not worth repeating. There is no need for unnecessary difficulties.

Speaker- small-sized, coil resistance or impedance 8 Ohm, 1W, 1GDSH-9; 8 Ohm, 2W, 0.5GDSh-2; 8 Ohm, 3W, 1GDSH-6; broadband 8 Ohm, 3W, 3GDSH-7 or Chinese equivalent 8 Ohm, 3W, YD103-04; as a last resort, rectangular 4 Ohm, 3W from Genius computer speakers. It is the speaker that determines the dimensions of the future speaker; it should be compact, lightweight, easy to use, and simply attach to a belt or belt.
It is best to make the body with your own hands. I decided to make it from 3mm thick plywood and varnish it. When making the case I used desktop woodworking machine. Mini circular. You can solder anything and any way you want, but the finished look of the structure is still given by the aesthetic body, the parts of which are made on a machine, and not manually with a jigsaw or hacksaw. Although... you can do it manually to begin with.

Resistor- R1 adjusting. Used to change the volume and turn off the power source. It is advisable to use small-sized resistors, such as SPZ-3 or SPZ-4vM from 10 kOhm to 47 kOhm. SPZ-3 with a switch (one pair of contacts) requires installation on the board. It’s labor-intensive, but it’s worth it: on the board you can place an input coupling capacitor C1, a mini-connector for connecting a battery, a smoothing power capacitor, low-pass filter parts, an LED limiting resistor, the ULF chip itself, etc. Over time, as a rule, there is a desire to improve and add new capabilities to the design. Resistors of type SPZ-4vM with a switch (two pairs of contacts) and are secured with a nut into the hole in the housing. It's much easier. However dimensions more, and the handle will protrude beyond the column. You can do without an adjustment resistor; then the volume will have to be changed in the mp3 player or on the phone.
Regarding the battery, I will note the following: it will fit almost any old mobile phone. I used MOTOROLA C350, which is also charger after minor modifications.
Battery capacity is 800 mA/hour (the higher this figure, the longer the amplifier's operating time). For one charge of the speaker there are 3-4 charges of the mp3 player of this model.
The battery is connected using a micro connector. You can make it yourself. The result is an extremely strong, reliable miniature connection. Made from components widely used connectors. A special feature is that externally the detachable connection looks like a solid wire with virtually no bulges. The heat-shrink tube additionally compresses the contacts (one inside the other). To open it, you have to apply force. You can see how the connectors work. The video tutorial shows their use when connecting the speaker and battery. Such connectors can be successfully used in any electronic equipment.

| Maximum output power | (Upit = 4V) | 1 W |
| Minimum supply voltage | 1.6 V | |
| Maximum supply voltage | 6 V | |
| Maximum input voltage | 50 mV | |
| Consumption current | (Uin=0) | 3.2 mA |
| Maximum input current amplitude | 0.5 A | |
| Harmonic distortion factor | (Pout = 50 mW) (Pout = 0.1 W) (Pout = 1 W) |
0.1% 0.5% 8% |
| Gain | 32 dB | |
| Frequency range | 50 Hz - 18 kHz | |
| Signal to noise ratio | (Pout = 1 W) | 60 dB |
| Optimal load resistance | 8 ohm |

By downloading the video tutorial, you will learn in what sequence to assemble the ULF, which tool is best to use, and you will be able to clearly see the technique for performing the work. By repeating the entire sequence of actions with me, you will save precious time and quickly achieve what you want. I wish you creative success. And good luck to everyone
One of the most important functions modern smartphones is their ability to reproduce different sounds. This allows you to view media files, play music or enjoy your favorite TV series by downloading it on the Internet in excellent quality. But sometimes the power of the phone's speakers is not enough and you may need to connect an additional accessory - a speaker.
You shouldn’t immediately go to the store for an expensive purchase, especially if you need the speaker for one or several times. It is quite possible to do it yourself, because it does not require special skills or deep knowledge in the field of technology. You will learn about what a speaker can be made from and what methods exist for this in this article.
How to make a speaker for a phone from a speaker for a PC or tape recorder
The first method is a kind of transformation of a speaker for a computer or tape recorder into a portable one for a phone. The advantage of such accessories is that they do not need to be plugged into an outlet - which is why the phone often requires a separate, portable device. It is convenient to carry it with you, take it on trips, or simply use it at home if you are far from a power source.
In this case, we take as a basis a device designed for a computer. Even the simplest will do, and this is even more desirable if you have never done something like this before - the fewer parts inside, the easier it is to create a new unit.
First of all, you need to disassemble the accessory and unsolder the network transformer and power cable. After this, you need to install a special charge controller into the “sole” - it can be purchased at any specialized store.

IMPORTANT! Be as careful as possible so as not to cause any damage to the tracks - this will negatively affect the final result of the work.
You can glue the board using tape or special glue. After this, you need to get rid of the diodes - usually there are four of them, but a lot depends on the model of your original speakers. Power from the board should be soldered to the plus and minus of the diode bridge. Then you need to attach the circuit with a canopy on the wires to check the correct operation of the resulting device.
You also need to make a hole in the sole directly opposite the controller indication. This way you can monitor the charge level.
ATTENTION! Charging these speakers is quite simple - using any USB output.
If the power is not enough, you can add more batteries. Portable speakers are ready!
Homemade column made of polypropylene pipe
Another method would be to use a polypropylene pipe as a base.
To do this, you will need to make a hole in the middle that resembles the number eight and get rid of the protruding elements that are formed. Now you need to solder the battery and speaker to the board. After this, a piece of aluminum foil or electrical tape should be glued to a fairly thick film - the choice is yours, any of these materials will probably be found in everyone’s home.
Then you need to cut a circle with a diameter equal to the pipe and attach it using durable glue. This part of the future column is called a diffuser.
The next step will be the mandatory sealing of all contacts. Next, having connected all the parts, you need to tape the speaker to the pipe using electrical tape. Now you need to strengthen everything with glue and conduct a full inspection of the resulting product.
After finishing work, be sure to check the functionality of the device. If everything is in order, then you can safely start using it.
DIY cardboard phone speaker
A speaker for your smartphone can also be made from cardboard, no matter how unsuitable this material may seem for such an undertaking.
A great option would be a toilet paper roll so that you don't have to make a cardboard cylinder yourself.
The first step is to measure the side of the phone where the speaker is located. Then make a hole in the bushing exactly the same size. You need to attach two plastic cups to the sides - these will be sound guides that will allow you to achieve better amplification.

To ensure that the cups fit snugly on the cardboard, first carefully measure the size and cut a hole to the nearest centimeter.
IMPORTANT! If desired, you can use other cardboard objects of a suitable elongated shape or make a cylinder yourself. In this case, the cardboard should be dense and durable.
After all the components have been secured, the column is ready. All that remains is to insert the phone into the resulting product and turn on the desired audio track.
Speaker in plywood casing
One more in a simple way will be the manufacture of a device using plywood. To do this, you first need to determine the dimensions of the speakers and find a table of correspondence between speakers and columns. All this information can be easily found on the Internet on thematic sites and forums.
Now you need to calculate the size of the future column. Apply markings to a sheet of plywood; there should be a drawing of the speakers on the front side. Now you can cut out the parts from plywood, and then sand them with sandpaper - the surface should be even and smooth, without protruding jagged edges.

The parts can be connected using a self-tapping screw. Sealing is required homemade device. Then you need to treat the surface with paint for a more aesthetic appearance. The connecting wire is screwed to the desired connector, and on the other side is wound into back speakers and soldered to the speaker terminals. Pay attention to the polarity.
The next step is to attach the speakers to the speaker body. The free cable remains inside. The accessory is ready!
Now you know several ways to make a speaker for your phone yourself. This way, you can save a lot on the purchase of this accessory and enjoy listening to music or watching movies at the right volume and in excellent quality. In addition, the manufacturing process will not take much time, and you will not need to purchase a large amount of additional materials.
Hello dear readers of my blog, this time the article will not be entirely on the topic of the site, but still quite useful. Now I will tell you how you can make it yourself...
Hello dear readers of my blog, this time the article will not be entirely on the topic of the site, but still quite useful. Now I will tell you how you can make your own speakers for your phone or just portable speakers. There are times when you need to organize music, say, in nature, naturally you won’t find a 220v socket, unless you brought a diesel generator with you, of course. Personally, I needed to make such a modification to the speakers in order to take them with me to the horizontal bars. I used to order portable acoustics for myself on the Internet, overall I liked it, but it already seems that it doesn’t play enough. My purchased speaker was the divoom i-tour 20, which I talked about.
In general, the device is good, the volume is very strong, despite its small size. But now let's move on to creating something more powerful.
What you will need for work:
And so here is a photo of what I used, now we will look in detail at each element of the photo.
1. Screwdriver. I think you will find such a tool in your home, because I cannot imagine life when there is no tool at home. Therefore, you simply shouldn’t have any problems finding this item.
2. Battery. Well, here you can use any one, the main condition is that the voltage in it is 12v. This is where the question should arise, since I have been looking for one for a long time, I even had thoughts of buying a car one. But everything is much simpler. This is the battery for the source uninterruptible power supply. They are used for computers if the current in the outlet is lost. You can find it in computer stores. But I was too lazy, I ordered it through an online store, where everything is for computers. My battery is 12v, its capacity is 9Ah. If money allows, you can take one with a larger capacity.
3. Wires. As you can see, I have it double, so look for the same one, or take two single ones. But I would like to note that the core in my wire is thin, it is better to take a thicker one, since this one may not withstand it.
4. Columns. The most common speakers, which can be found in any computer store. I've had them lying around in a box for many years, so I decided to find a use for them. Well, the main thing here is to take not very powerful ones, since the electricity in the battery is not rubber, so take speakers that your battery can handle. Personally, after opening it, 3 W is written on the speakers, that is, the total power is 6 W. In principle, this is enough.
5. Wire cutters. During the remodeling process, you will need to cut the wires a little, that's why you need wire cutters, you shouldn't chew the iron with your teeth. Such a tool may not be found as often as a screwdriver, but still. If it’s really tight, you can cut it off with a knife, the wires are thin there.
Well, besides this, you will need a little care so as not to accidentally cut the wrong wires. In general, now you can move on to the work itself.
We create speakers for the phone:
If you have prepared everything you need, then let's make speakers for the phone. To begin with, we only need a column with a switch, since this is where the transformer is located. And we don’t need the second one at all, so if the connector becomes disconnected, remove it. And place the main speaker on the table.
If your front part is covered with some kind of panel, it is better to remove it, since there may be screws hidden under it that keep the speaker closed. But don't break it off if it doesn't work. You may have another case where all the screws are on the rear panel side.
After you find all the fasteners, unscrew the screws and open the column, but only carefully, in my case it did not open too much, the wires inside may be short. In this picture I opened it slightly, in the next one you will see how much maximum it has opened.
As you can see, it didn’t open very wide, so it was difficult to photograph the inside of the speaker. But you can see how there is a whole bunch of wires running down the center. We are only interested in the number 1.
1. Transformer. It converts the current from 220v to 12v, that’s exactly what we need to connect after it, it will be just what we need. In my case, blue wires came from it, and all the others in the case were black.
So the column opened wider when I cut the wires from the transformer, in this picture I marked it with a letter T. I recommend cutting the wires in the middle, in case you ever decide to remake the speaker, then at least you can twist the wires, I personally did just that. It is best to insulate the wires coming from the transformer with electrical tape. For now, let them stick out from the board.
Next, we prepare the wires with which we will connect the battery. It is necessary to cut off the insulation and then connect it first to the speaker, and then to the battery, just be careful not to close the terminals with your fingers, because then there will be a loud swearing throughout the house. Well, in principle, that’s all, but don’t close it, check first for functionality. By the way, it is not necessary to observe the polarity, even if you do the opposite, the speaker will simply play inside the case and the sound will be a little quieter. And if you guess right, it will be absolutely gorgeous.
Now we carefully turn it on and voila, the column is working. Next, insulate the connection points inside the housing and you can tighten and assemble.
By the way, in the photo you can’t see what’s working, so I turned off the flash, but the quality became bad, I’m writing an article at night and there’s no lighting.
Done, you can clamp the wire with the lid with the speaker, it should not break, or tighten this edge a little looser. Now your task will be to constantly charge the battery. If you take everything with the same parameters as mine, then it should be enough for 10 hours of work.
By the way, my wires that I pulled to the battery were in a varnish winding, I couldn’t clean it with a knife, so I just set the wire on fire. Well, good luck everyone, I hope it helped.
Updated (05.10.2013 at 19:45).
Still, I decided to continue the article a little, a photograph of a house is of course good, but there is always a risk that you may be deceived. This is not my goal, so I decided to post another photo of the speakers working, but this time on the street. The idea to take a photo came completely spontaneously. As usual, I got ready to go train, went outside, came to the horizontal bars near the house, worked out, went to the uneven bars and decided to turn on the music. And so, just between approaches, this idea came to me. Therefore, here is another photo confirming that everything described in the article is correct and what I advise actually works.
As you can see, there is not even a leaf with a copyright, as in the previous photographs. That's the only thing, I want to apologize, I took pictures on my phone, but it was already dark outside, so the quality leaves much to be desired. Now the article is definitely over.
There is probably no person on the planet who does not like to listen to music. Modern technologies allow you to do this anywhere and using different devices. Some people prefer to listen to music on a computer or laptop, while others prefer to listen to music on headphones. Be that as it may, there are times when it is not possible to take a laptop with you, but you want to listen to music. This is why they came up with portable speakers that can be connected to your phone. A high-quality portable speaker for a phone can cost a lot of money, so many people are wondering how to make a radio at home.
Pipe column
Before you begin assembling the column, you need to collect all the necessary materials and tools. In fact, this stage is quite important, since the quality of the sound depends on the quality of the parts. For a homemade portable speaker you will need the following items:
- Amplifier. This part can be purchased on the radio market. Her approximate cost is 100 rubles. It is better to use elements that are assembled on a high-quality microcircuit;
- Speaker at 3w, 4 Ohm;
- Several wires of short length;
- Battery;
- Power button;
- Soldering iron;
- Housing for the device;
- 3.5 mm plug. It can be taken from old headphones;
- A mesh that will serve as protection for the speakers;
- Special glue;
- Charging socket;
- Construction knife.
If all necessary tools and the parts have been collected, you can start assembling. For those who don’t know how to make a speaker for a phone themselves, you must first determine the most important design elements of this equipment.
The device can be divided into several parts:
- Frame;
- Speaker;
- Electronics.

Portable speaker
Assembling a speaker for a mobile phone with your own hands begins with making the case. To create the base you can use different materials. IN in this example The option of using a regular small box will be considered. You should pay attention to the structure of the material from which the box is made. It is better that the box is made of thick cardboard.
The first step is to cut a hole in the lid of the box. This can be done using a construction knife. To make the hole even, you can draw a circle with a compass. It is also necessary to prepare a place for the button and wire. To do this, a small hole, approximately 0.5 centimeters in diameter, and an opening for the button are cut out on the side.

Making a protective mesh for speakers
To avoid accidentally damaging the speaker when using the device, you need to know how to protect it. This can be done by making a mesh that will be attached to the top. To do this, you will need a construction fine mesh. You need to draw two circles on it, one the diameter of the speaker, the second a centimeter larger. After installing the speaker into the housing, the protective mesh can be screwed on top.
Manufacturing of electronic parts
For many, this stage is considered the most difficult, since they do not know how and what to solder. The first step is to solder two wires to a special mount on the speaker. This must be done on different sides. Next, the edges of the resistor are bent and attached to the mosfet. One side of the wire that will connect to the crown is also attached here. A wire from the speaker is attached to the free pin, and a capacitor is soldered to the pin that is without a wire.
After this, the wires from the button are attached to the capacitor and the second wire from the speaker. After everything is already soldered, you can connect the crown.

Assembly diagram
Installing speakers into the cabinet
After everything is soldered, you can begin installing all the parts into the case. The first step is to attach the speaker to the base. This can be done using glue. Then all other structural elements are put in place and secured with glue.
Important! Also, do not forget about the mesh; it must be attached on top of the speaker.
Features of homemade computer speakers
You can use the speakers not only by connecting them to your phone, but also to your computer. In order for the device to work on a home PC, it needs to be made more powerful. For this, larger speakers are used, as well as an amplifier.
Also, computer speakers are significantly larger in size. All this must be taken into account when making a portable speaker with your own hands.
Do-it-yourself amplifier for a portable speaker
For those who don't know how to make a speaker amplifier, you need to learn the basic structure of the device. After this, you can begin assembly. First you need to solder the jack to the first wire from the speaker. The main ones are white, green and blue wires. The extreme inputs are directed to the sound of the amplifier.
It is necessary to solder together 2 transistors and a capacitor. The output from this will be a half-bridge rectifier. One of the switch wires is attached to the amplifier.
Next you need to solder the amplifier output to the speaker. Then, through the switch, power is soldered to the amplifier to the battery plus. To be able to recharge the audio device, you need to make a USB socket. After this, the socket can be displayed on the side panel of the device.
Speaker for computer from phone
To make a speaker from an old home phone personal computer, it must first be connected to this device. To do this, you need to install additional software on both your PC and smartphone. software. This method will allow you to use your phone as a sound device at any time. The program is called SoundWire.
Important! After installing the program, you must enable it on both devices at the same time.
After this, an automatic connection will occur between the computer and the phone. The program works using the Internet, so Wi-fi must work. After connecting, you need to confirm the detected device on the computer and you can start checking the new speaker.
If you don’t have money for new speakers, but you want to listen to music, you can make it using improvised means. To do this, you need to collect all the necessary tools and parts. The structure must be assembled according to the instructions. You can also use a mobile phone as a speaker.