Creating queries in visual studio c. An example of creating a local Microsoft SQL Server database in MS Visual Studio. Create a new Visual Studio project
Annotation: After completing this lecture, you will be able to: create queries using SQL Server Management Studio Query Builder, extract database information from database system tables, dynamically create simple queries based on user input, format user input and filter complex dynamic queries, perform parsing and reformat the data for use in the filter, protect the database from SQL injection attacks, use the sp_executeSql procedure to submit the query
The previous lecture talked about how to increase performance requests. Now you know how to create an effective set of queries to provide users with the most useful information from your application using pre-built queries in stored procedures or views.
However, in all but the simplest applications, it is impossible to know everything in advance. possible options the types of information users may need and how they will want to filter and organize it. Instead of trying to provide all such capabilities, you can give the user control over the information reported by the application. This lecture discusses how to dynamically build queries based on the choices the user makes during the runtime.
User interface for building queries
SQL Server Management Studio includes a sophisticated interface for building queries. Let's explore this interface to give you an idea of how queries can be created dynamically. Your application won't need all of them controls that are provided by SQL Server Management Studio. Essentially, you need to think carefully about how best to limit users' choices.
Create a query using SQL Server Management Studio Query Builder
Retrieving information about database tables
To provide the user with a list of options, the application may have to retrieve information about the database tables. There are several ways to obtain this information. The most important of these methods is the use of the INFORMATION_SCHEMA schema. This schema is standard in any database.
Using INFORMATION_SCHEMA
The INFORMATION_SCHEMA schema is a special schema that exists in every database. It contains definitions of some database objects.
INFORMATION_SCHEMA follows the ANSI standard, which is designed to retrieve information from any ANSI-compliant database engine. In SQL Server, INFORMATION_SCHEMA consists of a set of views that query sys* database tables that contain information about the structure of the database. These tables can be queried directly, just like any database table. However, in most cases, it is better to use INFORMATION_SCHEMA schema views to retrieve information from *sys tables.
Note. The INFORMATION_SCHEMA schema sometimes queries tables that are not needed, which hurts performance. IN following example This isn't particularly important for this lesson because the application was already waiting for user input. However, this should be considered if speed is an important aspect for your application.
Here is the basic T-SQL code that is used to get information about the columns that make up a table:
Note that to obtain the schema for a table, you must select the TABLE_SCHEMA field. This may have implications for creating similar queries in the future. To experiment with the techniques described in this lecture, create a new project in Visual Studio.
Create a new Visual Studio project
- From the Start menu, select All Programs, Microsoft Visual Studio 2005, Microsoft Visual Studio 2005.
- From the Visual Studio menu, select File, New, Project.
- In the Project Types panel, expand Visual Basic(Visual Basic Solutions) and select the Application template from the Templates panel. Give the project the name Chapter7 and click OK.
- The application for this example can be found in the example files in the \Chapter7\DynQuery folder. You can cut and paste the code for the following procedures from the Form1.vb file.
Getting a list of tables and views
Typically, you will need to provide the user with the ability to select not only the columns, but also the table for dynamic query, so you will have to display a list of tables to the user. Necessary information can be obtained using the following query:
SELECT TABLE_SCHEMA, TABLE_NAME, TABLE_TYPE FROM INFORMATION_SCHEMA.TABLES
In an application, this query can be used as follows.
Getting a list of tables
The Visual Basic code above initializes a SqlCommand object named com with the SQL string to be executed, and then executes the SqlCommand object. This is the easiest way to do T-SQL clause from the application.
As an exercise, you could place the diagrams and tables produced by our form's Load procedure in the application's user interface as a form so that the user can select the diagram and table to work with. For the example in this lecture, we will assume that the user has selected the Sales schema and the Customer table.
Once the user has selected a table, the list of columns for that table can be retrieved using the same method, using user input as the table name in the query. To do this, you enter a placeholder in the query string, and then replace that placeholder with a call to String.Format . In the code below, the placeholder in the query string is (0).
Getting a list of columns
- Add the following RetrieveColumns procedure to the code below the RetrieveTables procedure:
Sub RetrieveColumns(ByVal TableName As String) MyConnection As New SqlClient.SqlConnection(_ "Data Source=.\SQLExpress;" & _ "Initial Catalog=AdventureWorks;Trusted_Connection=Yes;") Dim sqlStr As String sqlStr = "SELECT TABLE_SCHEMA, TABLE_NAME , COLUMN_NAME, " + _ "ORDINAL_POSITION, DATA_TYPE " + _ "FROM INFORMATION_SCHEMA.COLUMNS " + _ "WHERE (TABLE_NAME = "(0)")" Dim tableColumns As New DataTable Dim da As New SqlClient.SqlDataAdapter(_ String.Format (sqlStr, TableName), MyConnection) da.Fill(tableColumns) For i As Integer = 0 To tableColumns.Rows.Count - 1 With tableColumns.Rows.Item(i) Console.WriteLine("(0) (1) (2 )", _ .Item(1), .Item(2), .Item(3)) End With Next End Sub
- In the Form1_Load procedure, add the following call to the RetrieveColumns procedure after the RetrieveTables procedure:
Example of creating a local Microsoft SQL Server database inMS Visual Studio
This topic shows a solution to the problem of creating a SQL Server type database using MS Visual Studio. The following questions are considered:
- working with the Server Explorer window in MS Visual Studio;
- creating a local database of the SQL Server Database type;
- creating tables in the database;
- editing table structures;
- linking database tables to each other;
- entering data into tables using MS Visual Studio.
The task
Using MS Visual Studio tools, create a MS SQL Server type database named Education. The database contains two tables Student and Session. The tables are related to each other by some field.
The structure of the first table “Student”.
The structure of the second table “Session”.

Performance
1. Download MS Visual Studio.
2. ActivatewindowServer Explorer.
For working with databases, Microsoft offers a lightweight database server, Microsoft SQL Server. There are different Microsoft versions SQL Server, for example: Microsoft SQL Server 2005, Microsoft SQL Server 2008, Microsoft SQL Server 2014 and other versions.
These versions can be downloaded from the Microsoft website www.msdn.com.
This server is great for working with databases. It's free and has GUI to create and administer databases with using SQL Server Management Tool.
First of all, before creating a database, you need to activate the Server Explorer utility. To do this, in MS Visual Studio you need to call (Fig. 1)
View -> Server Explorer Rice. 1. Call Server Explorer
Once called, the Server Explorer window will have an approximate appearance as shown in Figure 2.
 Rice. 2. Server Explorer Window
3. Creation of the “Education” database.
To create a new database based on the Microsoft SQL Server data provider, you need to click on the Data Connections node, and then select “ Create New SQL Server Database...” (Fig. 3).
 Rice. 3. Calling the database creation command SQL data Server
As a result, the window “ Create New SQL Server Database"(Fig. 4).
In the window (in the “Server Name” field), indicate the name local server installed on your computer. In our case, this name is “SQLEXPRESS”.
The “New database name:” field indicates the name of the database being created. In our case, this name is Education.
The Use Windows Authentification option must be left unchanged and click OK.
 Rice. 4. Create a new SQL Server 2008 Express database using MS Visual Studio 2010
After completing the steps, the Server Explorer window will take the form as shown in Figure 5. As can be seen from Figure 5, the Education database with the name
sasha-pc\sqlexpress.Education.dbo Rice. 5. Server Explorer window after adding the Education database
4. Education database objects.
If you expand the Education database (the “+” sign), you can see a list of the following main objects:
- Database Diagrams – database diagrams. Diagrams show relationships between database tables, relationships between fields of different tables, etc.;
- Tables – tables in which database data is placed;
- Views – representations. The difference between views and tables is that database tables contain data, while data views do not, and the content is selected from other tables or views;
- Stored procedures – stored procedures. They are a group of related operators on SQL language, which provides additional flexibility when working with the database.
5. Creating the Student table.
On this moment The Education database is completely empty and does not contain any objects (tables, stored procedures, views, etc.).
To create a table, you need to call the context menu (click right click mouse) and select the “Add New Table” command (Figure 6).
 Rice. 6. Add a new table command
There is another option for adding a database table using the Data menu commands:
Data -> Add New -> Table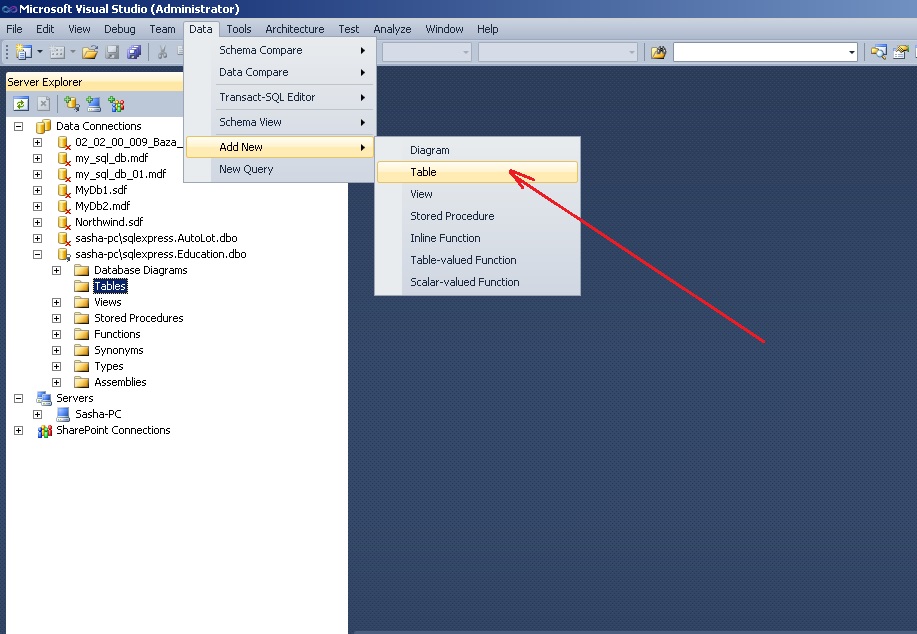
Rice. 7. Alternative option adding a new table
As a result, the add table window will open, which contains three columns (Figure 8). In the first column “Column Name” you need to enter the name of the corresponding field in the database table. In the second column “Data Type” you need to enter the data type of this field. The third column “Allow Nulls” indicates the option of the possibility of missing data in the field.
 Rice. 8. New table creation window
Using the table editor, you need to create the Student table as shown in Figure 9. The table name must be specified when closing it.
In the table editor, you can set field properties in the Column Properties window. In order to set the length of the string (nvchar) in characters, there is a Length property in the Column Properties window. The default value for this property is 10.
 Rice. 9. Student table
The next step is to set the key field. This is done by calling the “Set Primary Key” command from context menu Num_book fields. Using the key field, relationships between tables will be established. In our case, the key field is the gradebook number.
 Rice. 10. Setting a key field
After setting the primary key, the table window will look like shown in Figure 11.
 Rice. 11. Student table after final formation
Now you can close the table. In the window for saving the table, you need to set its name – Student (Fig. 12).
 Rice. 12. Entering the table name Student
6. Creating the Session table.
Following the example of creating the Student table, the Session table is created.
Figure 13 shows the Session table after final formation. The primary key is set in the Num_book field. The table name is given by Session.

Rice. 13. Session table
After completing the steps, two tables Student and Session will be displayed in the Server Explorer window.
Thus, any number of tables can be added to the database.
7. Editing the table structure.
There are times when you need to change the structure of a database table.
In order to make changes to database tables in MS Visual Studio, you first need to uncheck the “Prevent Saving changes” option that require table re-creation” as shown in Figure 14. Otherwise, MS Visual Studio will block changes to the previously created table. The Options window shown in Figure 14 is called up from the Tools menu in the following sequence:
Tools -> Options -> Database Tools -> Table and Database Designers Rice. 14. Option “ Prevent Saving changes that require table re-creation”
Once configured, you can change the table structure. To do this, use the “Open Table Definition” command (Figure 15) from the context menu, which is called for the selected table (right click).
 Rice. 15. Calling the “Open Table Definition” command
This command is also located in the Data menu:
Data -> Open Table DefinitionThe table must first be selected.
8. Establishing connections between tables.
In accordance with the conditions of the problem, the tables are linked to each other by the Num_book field.
To create a relationship between tables, you first need (Figure 16):
- select the Database Diagram object;
- select the Add New Diagram command from the context menu (or from the Data menu).

Rice. 16. Calling the command to add a new diagram
As a result, a window for adding a new Add Table diagram will open (Figure 17). In this window, you need to select two tables Session and Student in sequence and click the Add button.
 Rice. 17. Window for adding tables to a diagram
 Rice. 18. Student and Session tables after adding them to the diagram
To start establishing a relationship between tables, you need to click on the Num_book field of the Student table, and then (without releasing the mouse button) drag it to the Num_book field of the Session table.
As a result, two windows will open sequentially: Tables and Columns (Fig. 19) and Foreign Key Relationship (Fig. 20), in which you need to leave everything as is and confirm your choice with OK.
In the Tables and Columns window, you specify the name of the relationship (FK_Session_Student) and the names of the parent (Student) and child tables.
 Rice. 19. Tables and Columns Window
 Rice. 20. Window for setting up relation properties
After the completed actions, the relationship between the tables will be established (Figure 21).
 Rice. 21. Relationship between Student and Session tables
Saving a diagram is done in the same way as saving a table. The name of the diagram must be chosen at your discretion (for example, Diagram1).
After specifying the name of the diagram, the Save window will open, in which you need to confirm your choice (Figure 22).
 Rice. 22. Confirmation of saving changes in tables
9. Entering data into tables.
Microsoft Visual Studio allows you to directly enter data into database tables.
In our case, when establishing a connection (Fig. 19), the Student table is selected as Primary Key Table. Therefore, you first need to enter data into the cells of this particular table. If you try to first enter data into the Session table, the system will block such input and display a corresponding message.
To call the mode for entering data into the Student table, you need to call the Show Table Data command from the context menu (right-click) or from the Data menu (Fig. 23).
 Rice. 23. Show Table Data Command
A window will open in which you need to enter input data (Fig. 24).
 Rice. 24. Entering data in the Student table
After entering data into the Student table, you need to enter data into the Session table.
When entering data into the Num_book field of the Session table, you must enter exactly the same values that were entered into the Num_book field of the Student table (since these fields are related to each other).
For example, if the values are entered in the Num_book field of the Student table “101”, “102”, “103” (see Fig. 24), then these values should be entered in the Num_book field of the Session table. If you try to enter a different value, the system will display approximately the following window (Fig. 25).
 Rice. 25. Error message about data entry for linked Student and Session tables
The Session table with the entered data is shown in Figure 26.
In the Server Explorer window, where database tables on Microsoft SQL Server are presented in the form of a tree (see Fig. 4.1.), you can open a window for each table by clicking on the Show Table Data button. It is in this window that you can edit table data. This editing window looks approximately as shown in Fig. 4.2. Approximately, because the full volume was not included in the figure due to the large number of columns.
Implementing Database Mapping
Database mapping (DataSet component) is necessary in order to eliminate unnecessary calls to the database and server. This is a very important feature, because if many users work with the database, the load on the server can be quite large - the number of requests is many times greater, which will slow down the execution of requests.
Therefore, due to the DataSet, the client’s computer displays the database with which it works. Upon completion of work, the client and server databases are synchronized (or rather, the changes made in the client database are made to the server database)
The display of our database on MS Visual Studio 2005 looks like this:

All numeric data is of type Int32, string data is String. The sizes of the string data correspond to those given in physical model Database.
The screenshot shows that each table also contains TableAdapters. These are a kind of bridges for connecting the DataSet and the data source. There are methods such as Fill and GetData()
This method is designed to populate the table with the required data from the source (database file)
GetData() method
Designed to take data from a mapping table.
Software implementation
The main feature in the implementation of the software is the fact that all classes responsible for editing database tables are inherited from one base class, which makes implementation easier. The methods of this base class have been described above. Virtual methods of the base class must be overridden in the descendant class. All these methods allow you to change such parameters as the name of the form header, filling and saving the desired database table (one descendant class works only with one table, in the sense of editing data; however, when displaying data to the user, it is possible to use several database tables in order to display data in a form understandable to the user).
Program interface
The main window is an MDI application that has the following menu:
Each of the tables for editing the database is called up by the corresponding “Tables” menu item.
A report on the workload on teachers is also created by clicking on the corresponding “Reports” menu item.
As an additional feature of the software, there is a “Console” menu item that allows you to execute SQL queries to the database, entered by the user and display the result in a table (DataTable component). To do this, of course, you need to know the names of tables and fields, and was mainly created for the purpose of convenience in implementing the software, but other “dedicated” users can also take advantage of this.
In this article, you will learn what LINQ is and how to query lists using it.
What is LINQ? Language Integrated Query (LINQ) is an integrated query language, or rather a controversial Microsoft project to add a query language syntax similar to SQL. Specific definition, with this tool you can relatively easily create queries against tables and lists of data, not necessarily a database.
Microsoft's examples miss one small but important detail. To work with a data set, we need to use the DataContext structure, the definition of which can be obtained using SPMetal.exe for a list or library present on the Sharepoint server. In other words, we first need to define this data type, and then create a query. In general, I recommend using a special utility for working in MVS: Imtech Get SPMetal Definition Extension.
To work, we need some kind of list. Let's take advantage simple list- "custom list"; title - "Simple Appeal"; default fields: Number, Title.
And so, let's create a simple one (see the corresponding page), with the help of which we will observe the result of our manipulations. When creating a project, we will select an isolated trust model; if there is a need to work with lists or data of other nodes, then you need to create a project for the farm.
Next, let's create a file class "SimpleInversion.cs" using SPMetal.exe or a plugin for the studio. Let's add a link to the Microsoft.Sharepoint.Linq library. More information can be found on the MSDN website.

Let's create the Render function and my_mess. In the last function we will generate data for display.
// overload the function
protected override void Render(HtmlTextWriter writer)
{
base .Render(writer);
my_mess(writer);
}// Our function for working with a list
public void my_mess(HtmlTextWriter writer)
{
// Create a context
DataContext data = new DataContext("http://localhost" );
// Link it to the corresponding list on the site in the root
EntityList<Элемент>Simple_Message = data.GetList<Элемент>("Simple appeal");
// Execute the request - select all lines from the "Simple Request" list
var query = from mess in Simple_Message
select mess;
// display all data from the query result
foreach (var elem in query)
{
writer.WriteLine( "List item:"+ elem.Name.ToString());
writer.WriteBreak();
}}
We compile the project and add it to the page. As a result, all lines in the list will be displayed.
To be continued later (the article is not finished)...