Wipe data factory reset is not done. Wipe data factory reset: what is it and how to properly reset settings on Android without harm to the gadget

Many sources claim that before installation custom ROM, for example, must be done wipe systems, although there is also an opposite opinion. What to do in this situation? There is only one answer: the first option is correct. Why is that? Let's try to figure it out.
Wipe is aimed at clearing memory sections of your device. Carrying out the operation leads to both the loss of personal data and the loss of downloaded applications. System applications acquire an initial state. It turns out that wipe returns your device to the state in which you bought it.
Here are a few different wipes and a short description of them:
Wipe data/Factory reset: in this case, all your personal data will be deleted, and the system will return to its original form.
Wipe Cache Partition: This action deletes the cache. With this method, personal data is not lost.
Wipe Dalvik Cache: All your programs are in the Dalvik cache directory tree, wipe affects him, while personal data remains untouched.
Which wipe in what case should it be used? What is its meaning?
If you are installing a new ROM without committing wipe, then a lot of “garbage” remains from old system, which leads to unstable operation of the new one. You get a bunch of errors, crashes and other problems. For this reason wipe always necessary.
Let's now look at which wipe to use in which case.
When you install a new one custom ROM, but before that they used stock firmware, you should use the first option - " Wipe Data". It is also necessary when moving from one version to another, for example, from to.
If we are talking about small updates, for example, you are moving from CyanogonMod 9.0 To CyanogenMod 9.1 or install, then you need to apply " Wipe Cache Partition" And " Wipe Dalvik Cache".
That's all, actually. Now you know that wipe helps solve many problems associated with custom ROMs. If after installation a lot of errors occur in the system, you can easily eliminate them. If wipe does not help, then you need to use the "" option in recovery mode. We hope that now questions on the topic should be done wipe or not you won't have any problem.
Wipe (wipe – wipe, wipe) in Android system called a factory reset. This process is also called “formatting” or “Hard Reset”. Why do you need to reboot on Android?
The fact is that after this action the device will be completely cleared of pre-installed programs and will help get rid of the following problems:
- Possible malfunction as a result getting root rights;
- Incorrect functioning and occurrence of system errors;
- Deterioration in performance as a result of operating system updates;
- Problems due to flashing, i.e., after switching from original to custom firmware;
- Deleting all personal data (hard reset) during pre-sale preparation of the device.
Types of “reset” on Android
Hard reset on Android can be divided into two types:
- Full (aka hard reboot on Android) – deleting all programs and data on the device itself, or in any of the selected sections.
- Partial – deletes a specific folder (directory).
Ways to perform wipe
You can run Android wipe from the following modes:
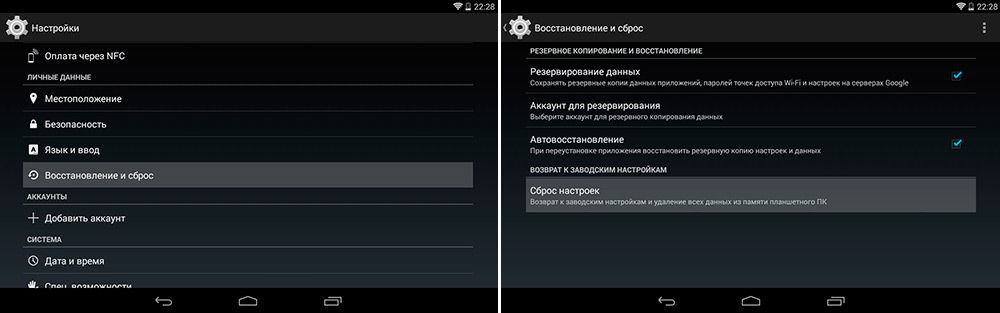
- Settings menu: go to the settings menu, then “recovery” and “reset”, check the “clear SD card” checkbox (data stored on the memory card, programs and files inclusive are deleted, information from the phone’s memory will also be deleted).
- Using the “reset” button located on the device (if provided by the manufacturer): using a paperclip (or similar object), press and hold the reset button for 15-30 seconds (the settings are reset to factory settings).
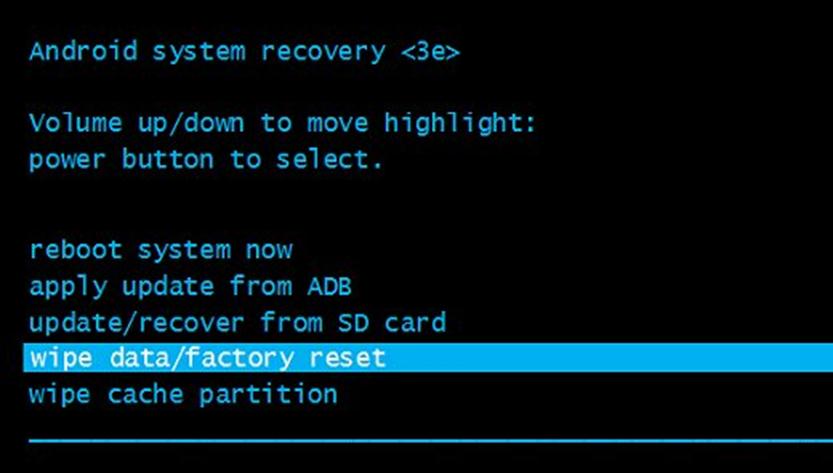
- Recovery menu: to get to the recovery menu, turn off the power, hold down the “home” key and the volume rocker to increase, simultaneously with the “power” button. Important: different devices may have other key combinations. We move through any menu by decreasing or increasing the volume, and selecting actions by pressing the “power” (turn on) key. In addition, it is possible to use a PC and ADB programs, universal for all devices. First enable USB debugging.
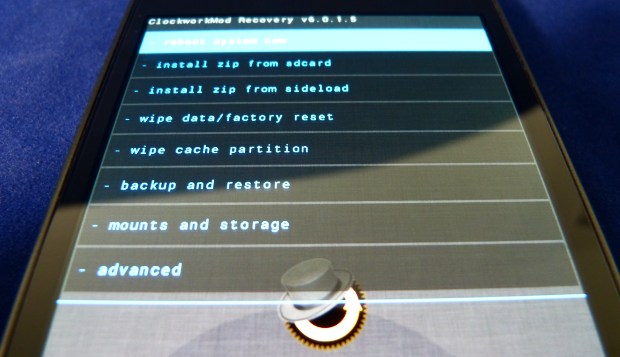
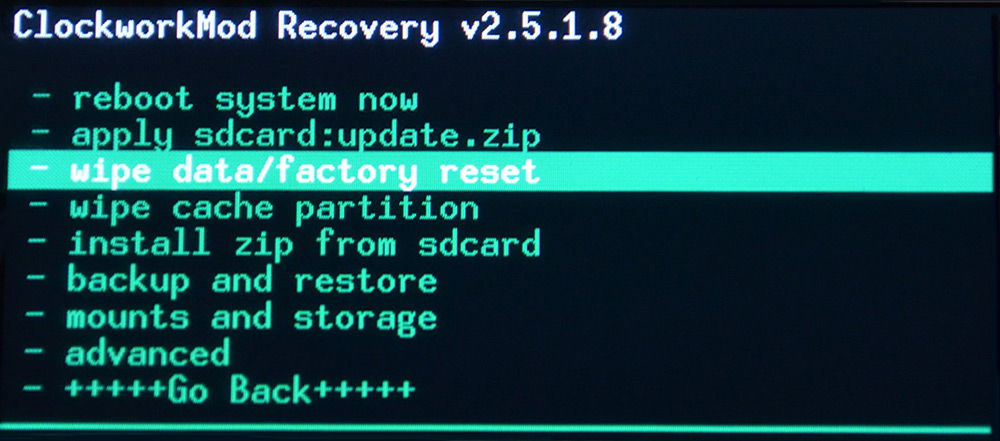
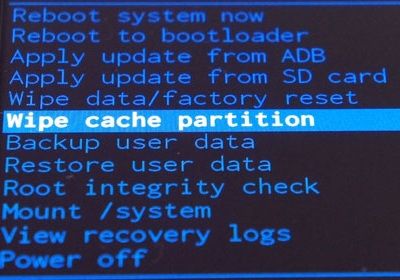
a) B standard menu recovery Android: select Wipe data/ factory reset, then “Wipe cache partition”, reboot the smartphone (Reboot system now);
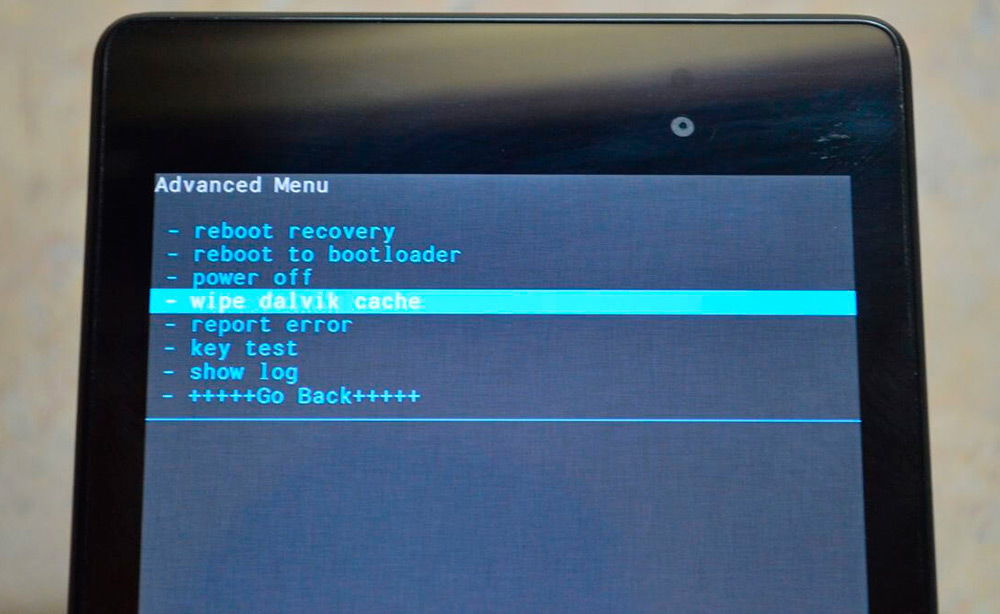
b) In the menu Recovery CWM(or similar):
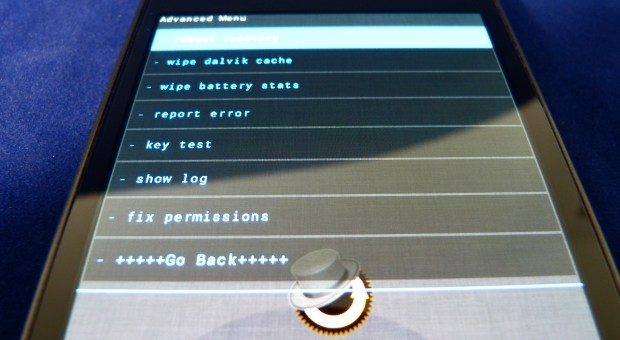
- Partial Wipe (in case of a “glitch” of some program), with saving all data or programs: “Wipe cache partition”, then “Advanced”, then “Wipe Dalvick Cache”, finally reboot, or reboot on android
- Full Wipe or hard reset android (removing all programs and their data): select “Wipe data/factory reset”, then “Wipe cache partition”, and reboot the smartphone (Reboot system now). The content is saved.
Wipe through recovery
Now directly about wipe through recovery. In the classic Android recovery version, two types of reset are available:
To delete all data stored in the DATA or CACHE sections and folders containing program data. In this way, we permanently remove all applications along with root directories and personal settings, but keep media files (image, video, music).
Wipe cache – we erase temporary information about the operation of programs and applications. This action is required if a system malfunction occurs.
What if nothing helps? You shouldn’t blame the fact that “your hands don’t grow from there”, you just need to perform “WIPE DATA/FACTORY RESET”. In this case, it is possible to do wipe applied to any section of the system.
And the last, fourth mode from which you can wipe is the Bootloader menu, but in this case you need to use fastboot tools.
Additional information about wipe on Android
Often, on sites that publish information about Android, you can find instructions on how to flash the firmware, as well as how to obtain root rights. These guides instruct you to perform a factory reset this way: wipe data, wipe cache, wipe dalvik cache, format data. However, this is a frankly incorrect recommendation, because it does not reveal the full structure of the recovery menu and speaks of ignorance file structure Android systems. The wipe data/factory reset action deletes the data partition containing the dalvik cache directory. This means that some manipulations will be completely unnecessary. The fact is that wipe and format are terms that have the same meaning, for example the system/xbin partition does not contain format files, but the wipe file is there.
Some nuances of performing a wipe on Android
Often users are faced with a dilemma: when to reset the settings, before flashing the device, or after? The answer lies on the surface - of course before flashing, because any firmware usually has a built-in function that automatically reboots the system after the installation has been completed.
If in the firmware in the section " data"there are uploaded files" wipe", let's see how the system will perform its functions after loading, if it's bad, then perform " wipe data».
And a little more information about the subtleties.
Many experts agree that the emphasis of custom CYanogenMod firmware You can call it a script - part of the installation from the recovery menu, which initially backs up the system files, and after flashing it restores them. As a result, errors may occur. Therefore, if you decide to use this firmware, then first run format system.
That’s basically all we wanted to tell you, we really hope that our information turned out to be useful.
Before you learn how to wipe on Android, you need to get to know the concept itself better and cover some issues. So, wipe translated from English means “to erase.” That is, giving it a factory state, as if you had just taken it out of the box. This is a normal formatting procedure, so you don’t need any additional formatting to complete it. software or cords, computers. You just need the device itself. In general, there are several ways to wipe a tablet or smartphone on Android. Let's consider each of them - and then you can decide which one is best for you to use in the current situation.
Reset your Android device using Wipe
Wipe ensures thorough cleaning of the device running Android and may be required in the following cases:
- If you are going to sell your device and do not want any personal data to remain on your tablet or smartphone.
- At incorrect operation, frequent failures and device errors. Perhaps a reset will help solve this problem.
- After obtaining administrator rights (for more advanced users).
Wipes can be divided into two types:
- Full - erases all entered data.
- Partial - deletes a specific place in a section.
How to make a wipe?
There are several methods, so you need to familiarize yourself with them all, and then decide which one to use.
You can wipe in two ways:
- wipe data/factory reset - this command will delete information from the DATA and CACHE sections and clear the folder on internal memory with data from these programs. In this mode, all applications and their information will also be deleted. Only images, music and videos on the device will be saved.
- wipe cache partition - allows you to delete only temporary documents while running applications. This method effective for rare operating system failures.
Wipe using custom Recovery
Menu custom Recovery has similar items as the standard one. But it still has differences.
- If some problems arise in the operation of applications, it is recommended to first try using Wipe Dalvik Cache, which is located in the Advanced tab. This method will not remove applications and will retain all information. If the problems persist, then you can use wipe data/factory reset.
- To wipe any partition in the system, custom recovery provides an additional mounts and storage item.
Some problems and wipe details
In some texts or reviews on the topic and firmware of the device, they often say that after these steps it is necessary to do wipe data, wipe cache, wipe dalvik cache, format data and the like. Naturally, this is talked about by people who do not quite understand and do not know Linux commands. Let's explain the situation: when you perform a wipe data/factory reset, your data partition, in which the dalvik cache directory is located, is erased, plus information from the cache directory is deleted. We hope that your questions about this have now disappeared.
The next very popular and somewhat controversial point is the question of what is better to use: format or wipe? Everything here is very simple, because it’s the same thing! But if you still doubt and don’t believe this statement, then let’s do a little check. If you look in the /system/xbin or /system/bin partition, you will not find there binary file format, but only wipe.
Tablet lovers also have a question about when to wipe. So, this must be done before installing the firmware, since it may contain an automatic reboot function after installation. If the firmware has documents and files written to the data directory, you should check the behavior of the operating system. If it doesn’t load, then do wipe data.
So, you have learned what wipe is on Android and how to do it. Among other things, we got acquainted with using existing methods reset, and also found out answers to popular questions from both ordinary users and more advanced ones.
On smartphones and tablets Android based there is a special menu Recovery Mode or simply . This is a special device boot mode, thanks to which you can reset all settings or, say, install new firmware to the device.
This is what Recovery Mode looks like on a Samsung smartphone:
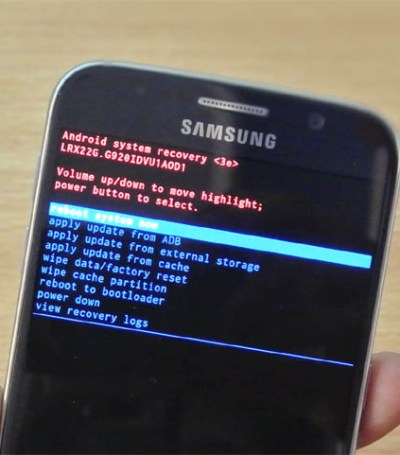
To bring up this menu, you need to do a number of steps along with rebooting the smartphone. For example, on Samsung Galaxy S3 process is as follows:
- Turn off your smartphone.
- Press the volume up button, Home button and the power key of the smartphone at the same time.
- Release the buttons as soon as you see the recovery menu logo.
Please note that the image shown above is the stock Recovery Mode. There are also custom versions of the menu, they are installed by the user independently and can have a completely different look.
There are several items in the recovery menu that raise questions among users. Let's talk about some of them.
Wipe data/factory reset
When using Wipe data/factory reset, all applications and data are deleted (cache, Accounts), excluding data such as music, photos, videos. It is usually used if any errors occur while using the device, or the smartphone or tablet starts to slow down due to some application, or the user wants to return the device to its original state and reset the settings.
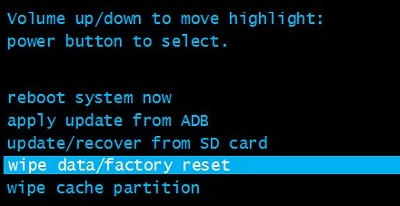
Wipe cache partition
Wipe cache partition is a way to clear a cache partition. This area stores temporary files that remain after running applications or updates. It is used if the smartphone works slowly or starts to slow down. In this case, applications are not deleted, unlike the previous case.
Other types of recovery menu
Some recovery menus have additional items. For example, in Recovery Mode on Xiaomi devices you can select additional cleaning modes, such as, say, Wipe SD Card - removing data from a memory card. And the menu look is completely different.
Contents:
Why is this function needed?
There can be many reasons to use this feature. Users often encounter memory limitation problems. An SD card always has its limit, and the phone's built-in memory can usually hold even less information.
However, despite all the warnings, we fill up the phone, filling it with music, videos and photos, which ultimately leads to unpleasant consequences:
In this case, it becomes difficult, if not completely impossible, to use, so many, when faced with this problem for the first time, rush to service center, wanting to fix everything as quickly as possible.
Important! Equipment repair and inspection services are not free and you will have to spend money on something that you can easily do at home yourself.
Viruses can also be one of the reasons. By downloading applications, games and information from unverified sites, the user risks his gadget. Sometimes the built-in one successfully copes with a virus introduced into the system, but their reliability is not always at the highest level. top level.
An effective way to get rid of the problem is to use a system reset. Along with personal files, the deletion of which, unfortunately, cannot be avoided, the virus will also be destroyed. You can use it for a number of other reasons:
- If you have recently updated the firmware of your smartphone, removing the built-in, original system, replacing it with a custom one, or simply upgrading to a higher version.
- When selling your phone to another person, without wanting them to have access to your personal information.
- In the case of constants for which you cannot find an explanation.
A reset to factory settings, of course, can be done without an urgent reason, if desired, simply saying goodbye to old and boring applications that you don’t have time to delve into.
Peculiarities
In English, wipe is translated as cleaning, wiping, and if you see it in the gadget settings, always remember that this is formatting and hardly anything else. There are two types:
Full wipe- choosing an action will lead to complete cleaning and formatting of both built-in and removable memory.
Partial wipe- helps to delete individual sections and folders, performing a cleaning operation so that this does not lead to malfunctions and failures in the future.
On Android there are three ways to use it:
How to do it on Android?
Following the first method, turn on the smartphone and find the “Settings” section in the menu (most often the gear-shaped icon) and click on it.
Next, almost at the very bottom we see the item "Recovery" and go into it. Then you should find "Reset to factory settings" and use it. To continue, click “Clear all”.
Please note: The system will definitely issue a warning that your files will be permanently deleted. We just agree and continue.
The manipulations carried out will lead to the fact that your gadget will go out for a while, and when it lights up again, the robot will appear with a scale showing what stage it is currently at. Once it's completed, the device will reboot, but it will do so very slowly, so don't be alarmed that you've broken something or only made the situation worse.
The second method is longer and requires attentiveness from the performer. Follow the instructions and you will succeed:
The course of further actions depends entirely on whether this feature is standard. If you see a list of commands on a black screen, then CWM is installed on the gadget. This means you should use the volume up and down keys to scroll through.
With their help, we reach the section of the desired section and use the button to turn the smartphone on and off to select the correct item. Next, we confirm our choice.
If TWRP is built into the gadget, the manipulations will be slightly different. After entering recovery, a grid of partitions will open, from which we select the one we need.
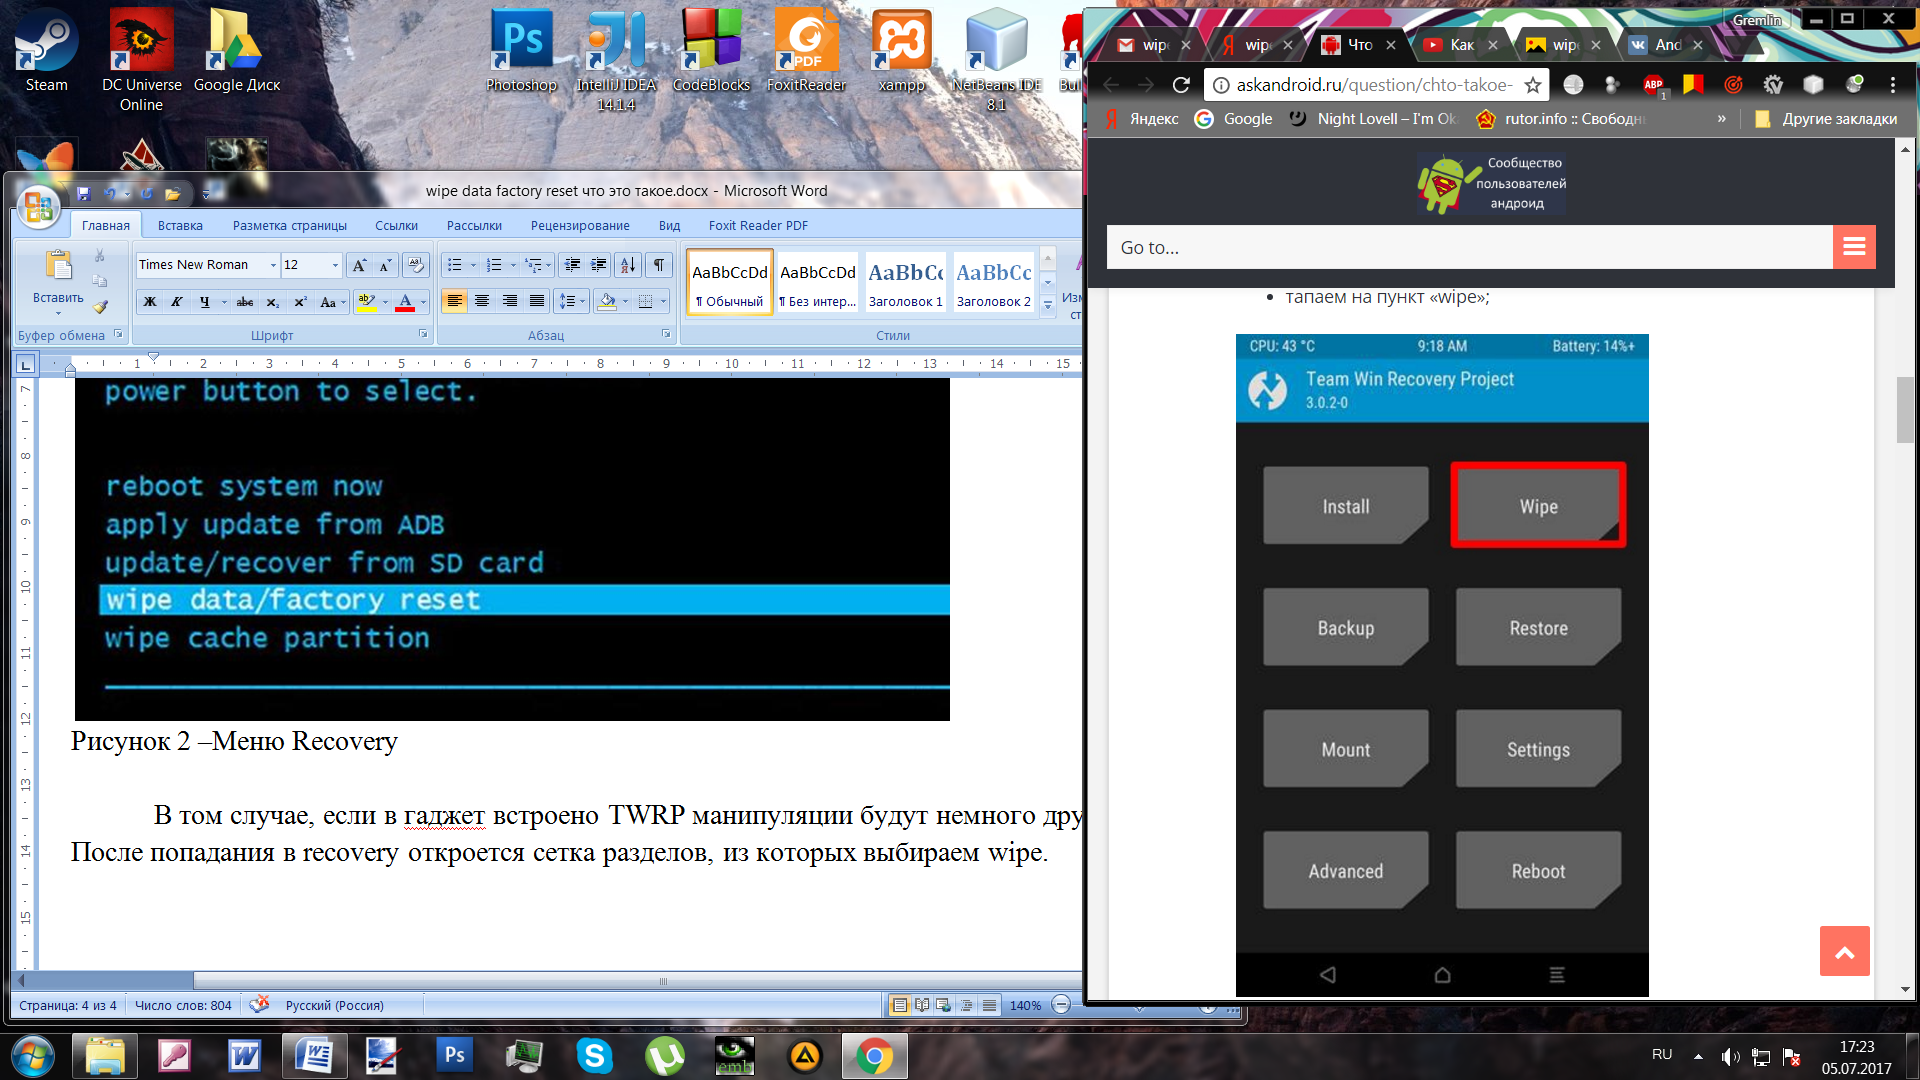
The selected section will open and you will need to drag the curved arrow to the right, after which the formatting process will start.
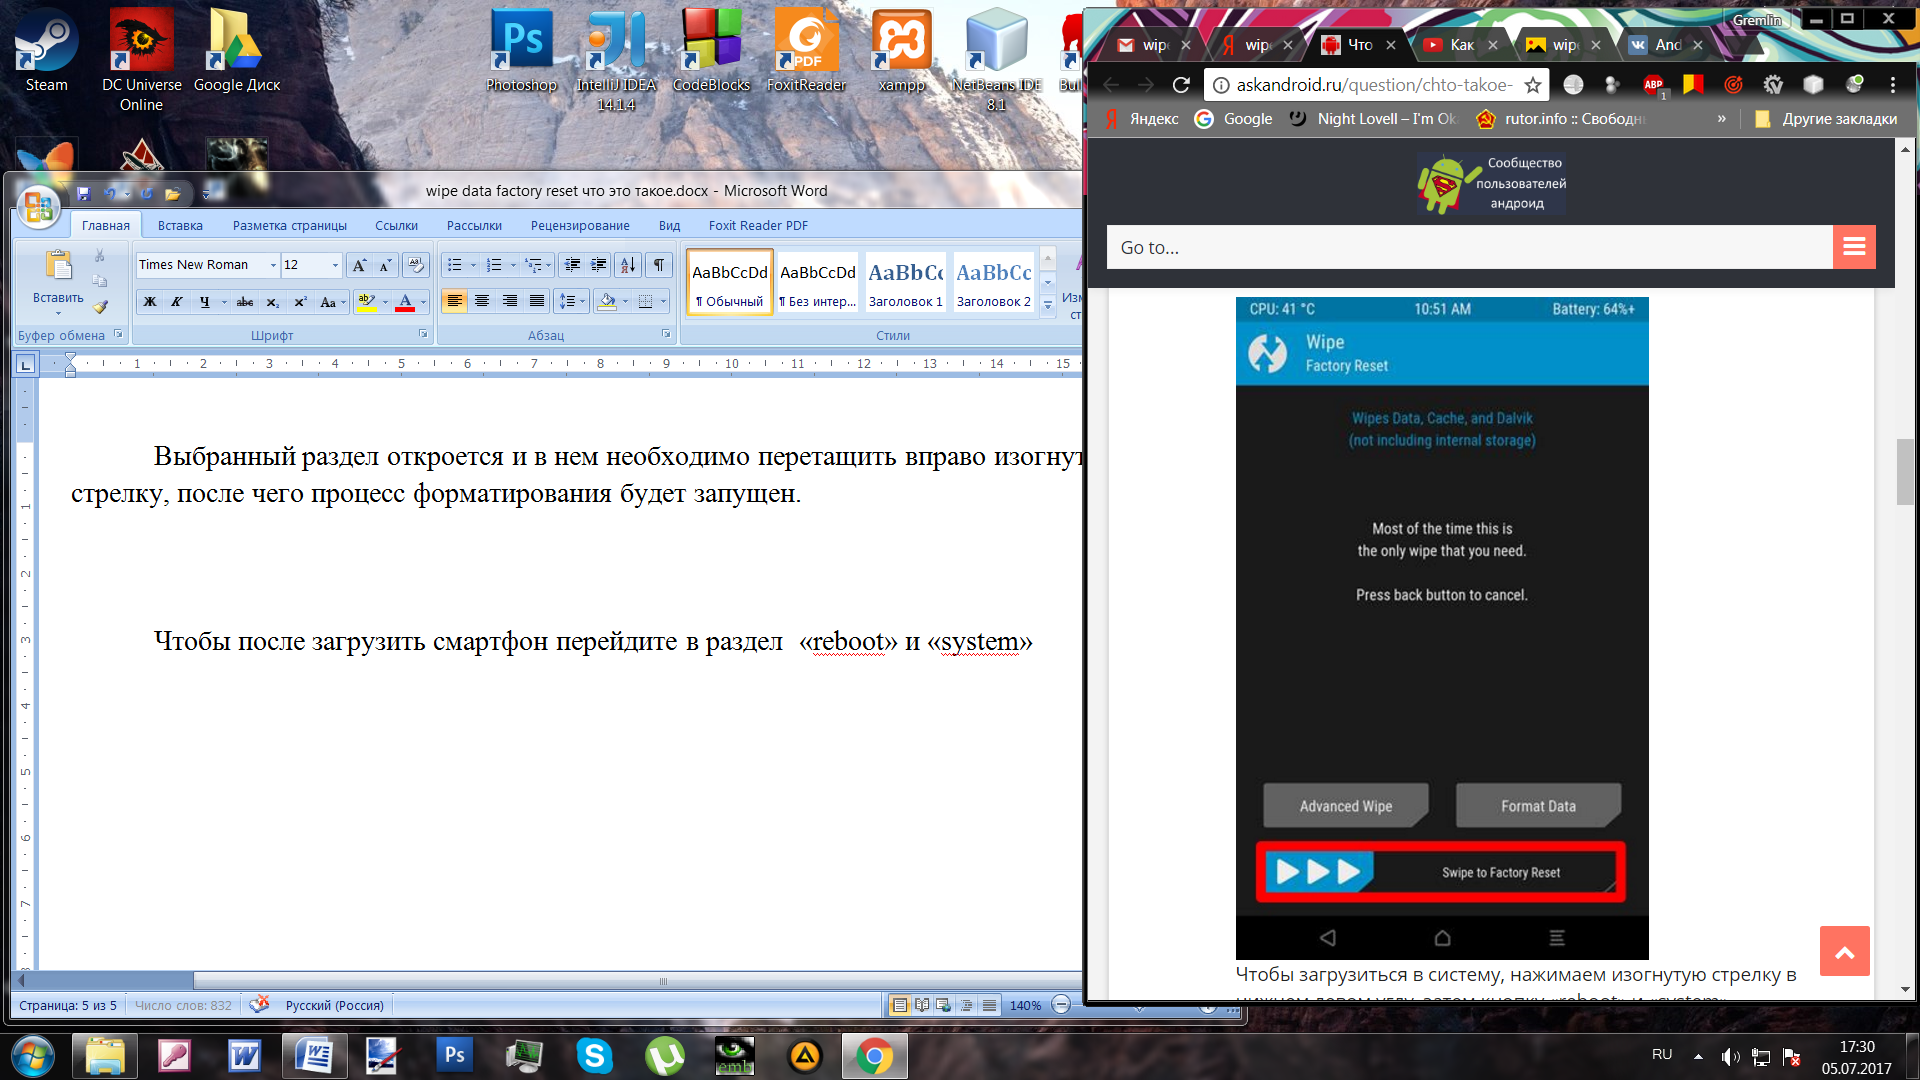
To boot your smartphone after this, go to and tap on the system key. The gadget will start and you can start working on it again, eliminating any freezes, viral pop-up advertisements and system failures.